ASP.NET Application Forms Authentication
Forms authentication is a way of requiring a login to a designated Web form before any of the other Web forms at a Web site become available for browsing. The basic idea behind this model is that users cannot view any Web form pages within a site until the login Web form validates the credentials for a user. Forms authentication offers many ways of authenticating a user, including checking credentials in an Access database. Once a user is authenticated via forms authentication, the user can view any Web form page in the Web site for the duration of the session. In other words, after logging into a session at one site, a user can go to another site and return to the site with forms authentication and still view pages without having to log in again ”as long as the login session has not expired .
An implementation of forms authentication will typically involve a minimum of three files at a Web site, but it can involve many more files. First, you need a login form. This form should accept login credentials and execute some code to validate the credentials. In validating the credentials, you can reference a table in an Access database. Second, you need to edit the Web.config file within your Web site. ASP.NET automatically creates a version of the Web.config file with default settings when you initially create a Web application with the ASP.NET Web Application template. You need to change the default Web.config file to enable forms authentication. In particular, you need to specify a page to which unauthenticated users will be redirected. If a user initially attempts to enter a site at any Web form other than the login page, they will be automatically redirected to the login page. Another change you need to make to the Web.config file is to deny anonymous login, which is the default login mode. Third, you need one or more additional Web forms. These other Web forms are secured by the login page. If a user attempts to open any of these other Web forms, he is redirected back to the login page.
| Note | Redirection via forms authentication applies only to Web pages that are Web forms. If you have an HTML page at a site, a user can browse the Web page without redirection to a login page, even if the login form has not authenticated the user s credentials yet. |
Editing the Default Web.config File
To start creating an ASP.NET Web project that uses forms authentication, create a new ASP.NET Web application. I named my sample application SecurePhoneList because it secures a page containing a list of phone numbers . Open the Web.config file from Solution Explorer. In the Code window showing the contents of the file, scroll down until you see the Authentication section. Immediately below that section will be the Authorization section. Edit the contents of these two sections so that they resemble Figure 13-8.

Figure 13-8: The edited Web.config file for the SecurePhoneList Web application project
The opening and closing authentication tags in Figure 13-8 bound a forms tag within them. An attribute setting within the opening authentication tag specifies Forms as the mode attribute value. This setting denotes the authentication mode. Note from the comment preceding the opening authentication tag that Windows , Passport , and None are alternative authentication mode settings. Within the authentication tags is a forms tag that closes itself (/). The name attribute designates the name for a cookie that forms authentication uses to track the authenticated status of a user. The loginUrl attribute designates the name of the login page within the Web site. This can be any Web Forms page. However, the attribute name is of course fixed, and the attribute is case sensitive.
The edit for the Authorization section has the effect of denying anonymous login. Anonymous login is the default way of connecting to Web pages. Enclose a self-closing deny tag within the authorization tags. By setting the users attribute for the deny tag to ?, you deny anonymous login. The Authentication and Authorization sections work together to force users to authenticate themselves . The Authentication section specifies the login page, and the Authorization section prevents users from logging into the Web site anonymously.
Creating the Login.aspx Page
Figure 13-9 shows the Design view of the Login.aspx page. The page s design consists of a couple of text boxes, a button, and three labels. The page validates data entered into the text boxes against the Employees table in the Northwind database. The top and bottom text boxes have ID property values of TextBox1 and TextBox2 . The labels to the left have ID property values of Label1 and Label2 . Label3 is the ID property value for the label above the text boxes. The button below the text boxes has an ID property value of Button1 .
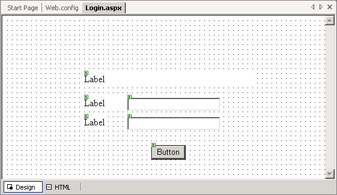
Figure 13-9: The Login.aspx page design for the SecurePhoneList Web application project
The layout of the authentication page should be familiar by now. It has a similar design to several other pages presented throughout this book. However, the code behind the page includes a novel feature because it conditionally invokes the RedirectFromLoginPage method of the FormsAuthentication class in the System.Web.Security namespace. This method redirects the flow to another page. As you will see in the completed solution, the other page and its path are arguments passed to Login.aspx. The role of the login page is to authenticate a user and return control to the page that invoked it. The authentication process creates a cookie to keep track of the authenticated user. As a developer, you can control whether this cookie exists for only the current session or is saved to the user s hard drive. Because users can block their machine from accepting cookies and tamper with cookies if their machine does accept them, there is some merit in not persisting cookies to a user s hard drive.
The code behind the Web form in Figure 13-9 consists of a Page_Load procedure and a Button1_Click procedure. The Page_Load procedure performs formatting tasks for the controls on the page. Because the procedure needs to perform these formatting tasks only for the initial opening of the page, the instructions appear within an If...Then statement with Not IsPostBack as the condition.
The Button1_Click procedure starts by declaring and instantiating cnn1 as an OleDbConnection object pointing at the Northwind database. Next, the procedure declares and instantiates cmd1 as an OleDbCommand object with a SELECT statement that returns the EmployeeID column value(s) matching the LastName and HireDate column values. The WHERE clause in the SELECT statement accepts its criteria from the Text property values for TextBox1 and TextBox2 . The invocation of the ExecuteScalar method for the cmd1 variable returns the EmployeeID column value that corresponds to the LastName and HireDate column values in TextBox1 and TextBox2 . The int1 variable stores this return value. If no return value exists, int1 retains its default value of 0.
| Note | For the Employees table in the Northwind database, rows are unique by their LastName and HireDate column values. For another table with more employee rows from another database, you might want to redesign the application to use criteria assuring the return of a unique row for any valid pair of criteria values. |
The final If...Then Else statement authenticates the credentials input to TextBox1 and TextBox2 . The credentials are valid whenever int1 is greater than 0, the default value for int1 . When int1 is greater than 0, the procedure invokes the RedirectFromLoginPage method for the FormsAuthentication class. You can specify the current user account value ( TextBox1.Text ) as the first argument for the method. The designation of False as the second argument directs ASP.NET to leave the cookie in memory instead of persisting it to the user s hard drive. The execution of the method transfers control back to the page that gave up control to Login.aspx to authenticate the user. If the LastName and HireDate column values do not match a row in the Employees table, control passes to the Else clause of the If Then Else statement. In this clause, the Write method for the Response object indicates that the values in TextBox1 and TextBox2 do not specify a valid user. In response to this feedback, a user can try a new pair of values or browse to another page to perform another task that does not require authentication.
Private Sub Page_Load(ByVal sender As System.Object, _ ByVal e As System.EventArgs) Handles MyBase.Load If Not IsPostBack Then Assign Text property values to label and button controls Label1.Text = "Last name" Label2.Text = "Secret" Label3.Text = "Enter both a " & _ "valid last name and secret." Button1.Text = "Login" Assign tab order for controls TextBox1.TabIndex = 1 TextBox2.TabIndex = 2 Button1.TabIndex = 3 End If End Sub Private Sub Button1_Click(ByVal sender As System.Object, _ ByVal e As System.EventArgs) Handles Button1.Click Declare and instantiate an OleDbConnection object and assign a connection string Dim cnn1 As New OleDb.OleDbConnection() Dim str1 As String = "Provider=Microsoft.Jet.OLEDB.4.0;" str1 &= "Data Source=c:\Program Files\Microsoft " str1 &= "Office/Office10/Samples/Northwind.mdb" cnn1.ConnectionString = str1 Declare and instantiate an OledDbCommand object to validate user Dim cmd1 As New OleDb.OleDbCommand() cmd1.CommandText = "SELECT EmployeeID " & _ "FROM Employees " & _ "WHERE LastName = " & TextBox1.Text & _ " ˜ AND HireDate=#" & TextBox2.Text & "#" cmd1.Connection = cnn1 Execute OleDbCommand object to validate user cnn1.Open() Dim int1 As Integer = cmd1.ExecuteScalar cnn1.Close() If user valid, return control to Phones.aspx; otherwise , return a message to the form If int1 > 0 Then System.Web.Security.FormsAuthentication. _ RedirectFromLoginPage(TextBox1.Text, False) Else Response.Write("Not a valid user.") End If End Sub Creating a Secure Web Page
The point of this sample is to make one or more pages that will not open unless a user inputs valid credentials to Login.aspx. This section presents an example of such a page. It does not matter what the page contains ”only that the page is a Web form (.aspx). Forms authentication does not secure .htm or .html pages.
The secured page in this sample contains a DataGrid control that the application populates with the FirstName, LastName, and HomePhone column values from the Employees table in the Northwind database. I have, however, tested this sample with simple pages that contain a simple text message. For example, you could use the application to store your passwords for various services. Then, you could access the list from any computer ”even while on the road and not directly connected to your LAN in the office. In addition, individuals without the proper credentials would not be able to view the page.
The code for the Phones.aspx page follows . It commences by connecting to the Northwind database and representing the connection with the cnn1 variable. Next, it uses the cnn1 variable along with a SELECT statement to specify an OleDbCommand object ( cmd1 ) that returns the FirstName, LastName, and HomePhone column values for all rows in the Employees table. Then, the code behind the Phones.aspx page uses an OleDbDataAdapter object ( dap1 ) to fill a local DataTable in a dataset ( das1 ) based on the values returned by the SELECT statement for the OleDbCommand object at which cmd1 points. Finally, the code behind the form concludes by assigning the DataTable as the DataSource property for the DataGrid control on the page. Throughout this process, this page provides a current list of employee home phone numbers from the Employees table. If you had a long list of employees for a company in the Employees table, you could specify some criterion in a WHERE clause for the SELECT statement that narrows the search and reduces the number of return values from the cmd1 object. For example, you could filter by department, country, or the first letter of the last name.
The point of this sample is not what s on the page. The point is that if a user attempts to open Phones.aspx without first authenticating user credentials for the current session, control passes immediately to the Login.aspx page. The Web.config file specifies this transfer of control by the settings in its Authentication and Authorization sections. If you had more than one Web page other than Login.aspx in the application, as soon as a user validated herself for any other page, she could access all the remaining pages without any need for validation within a session. The authentication of a user extends for the duration of the current session. If the session times out because a user steps away from the computer for a period exceeding the duration of a session (typically 20 minutes), the application requires the revalidation of user credentials if a user tries to reopen Phones.aspx.
Private Sub Page_Load(ByVal sender As System.Object, _ ByVal e As System.EventArgs) Handles MyBase.Load Declare and instantiate an OleDbConnection object with a connection string for the Northwind database Dim cnn1 As New OleDb.OleDbConnection() Dim str1 As String = "Provider=Microsoft.Jet.OLEDB.4.0;" str1 &= "Data Source=c:\Program Files\Microsoft " str1 &= "Office/Office10/Samples/Northwind.mdb" cnn1.ConnectionString = str1 Declare and instantiate an OleDbCommand object that returns the contact info Dim cmd1 As New OleDb.OleDbCommand() cmd1.CommandText = "SELECT FirstName, LastName, " & _ "HomePhone As Phone " & _ "FROM Employees" cmd1.Connection = cnn1 Declare and instantiate a data adapter that uses cmd1 to Fill a local DataTable object Dim dap1 As New OleDb.OleDbDataAdapter() dap1.SelectCommand = cmd1 Dim das1 As New DataSet() dap1.Fill(das1, "Contacts") Bind the DataTable object to the DataGrid control on the page DataGrid1.DataSource = (das1.Tables(0)) DataGrid1.DataBind() End Sub
Demonstrating the SecurePhoneList Web Application
Initially inputting http://localhost/SecurePhoneList/Phones.aspx within a session transfers control to the Login.aspx page in the SecurePhoneList folder on the localhost Web server. Figure 13-10 shows the browser after transfer of control to Login.aspx. Notice particularly the Address box. Appended to the URL for Login.aspx is a question mark and the return URL to which Login.aspx transfers control after a user validates himself successfully. As you can see, the Login.aspx page should return control to Phones.aspx in the SecurePhoneList folder on the localhost Web server.
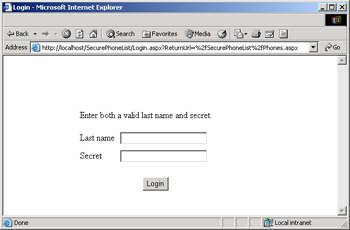
Figure 13-10: The Login.aspx operational page for the SecurePhoneList Web application project that the Phones.aspx page transfers control to
Entering valid LastName and HireDate column values, such as Davolio and 5/1/1992 , transfers control back to the Phones.aspx page. (See Figure 13-11.) Any subsequent attempts to open the Phones.aspx page in the current session succeed without requiring the transfer of control to the Login.aspx page.
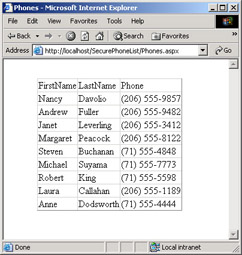
Figure 13-11: The Phones.aspx page for the SecurePhoneList Web application after a user authenticates herself
EAN: 2147483647
Pages: 111