Getting Started with Visual Studio .NET
Getting started with Visual Studio .NET is not difficult. This section highlights some critical steps along the way. First, I describe how to configure Visual Studio .NET for Visual Basic .NET. Second, you get an introduction on how to make new projects and open existing Visual Basic .NET projects from the Start Page in Visual Studio .NET. This section closes with a review of some important IDE windows . Like many sections throughout this book, our goal is not to cover any of these topics exhaustively. Instead, the aim is to expose you to selected issues and equip you to discover whatever else you need on your own.
Configuring Visual Studio .NET for Visual Basic .NET
As indicated in Chapter 1, Visual Studio .NET and the .NET Framework support multiple programming languages. Therefore, you will probably want to configure Visual Studio .NET for whatever languages you are using. In this case, the language is Visual Basic .NET. You can perform the configuration at any time after installation by opening Visual Studio to its Start Page.
Begin to open the Start Page by launching Visual Studio .NET immediately after installation. You can do this from the Start menu by pointing to All Programs, Microsoft Visual Studio .NET, and choosing Microsoft Visual Studio .NET. At a minimum, the menu exposes items for the documentation (Microsoft Visual Studio .NET Documentation) and the Visual Studio .NET application (Microsoft Visual Studio .NET). Choosing the item for the Visual Studio .NET application opens the Start Page with its default configuration. This configuration is not optimized for Visual Basic .NET.
| Note | After the initial launch of the Visual Studio .NET program, the Start Page need not show when you open the application. However, you can always show the Start Page by choosing Help, Show Start Page. |
Select My Profile from the left border of the Start Page to configure the Visual Studio .NET IDE. This allows you to choose individual settings for the Keyboard Scheme, Window Layout, and Help Filter drop-down boxes. You can do this independently for each box, or you can make a selection from the Profile box above these three configuration boxes. As a Visual Basic .NET developer, you will probably find the Visual Basic Developer selection from the Profile box most suited to your needs. This will automatically set the first two boxes below it to Visual Basic 6 and the third box below it to Visual Basic. The setting for the first two boxes will give you a familiar Visual Basic “style layout for your IDE. Figure 2-1 illustrates the My Profile tab for the Start Page with the Visual Basic Developer selection for the Profile drop-down box.
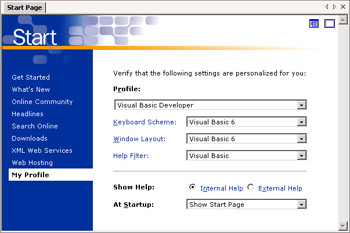
Figure 2-1: My Profile selections for starting Visual Studio .NET for a Visual Basic .NET developer
A Profile setting of Visual Basic Developer returns pages relevant exclusively to Visual Basic developers when you choose any item that opens a Help window, such as Contents, Index, or Search on the Help menu. However, developers with a general curiosity about the .NET Framework may prefer a (No Filter) setting for the Help Filter box. This setting will return information relevant for all possible audiences in response to a Help menu selection. If you find yourself with a heavy load of Web work, the Internet Development filter may be especially beneficial. Visual Studio .NET has an automation object model that is convenient for creating macros that run repetitive tasks in the IDE or extending the IDE for special kinds of tasks . Select Visual Studio Macros as the Help Filter setting to restrict Help screens to content for those using the Visual Studio .NET automation model. Several additional filters exist which you may find it useful to experiment with. In addition, you can manually alter the Help filter in the Visual Studio .NET documentation even after you configure Visual Studio .NET to open with any specific Help filter selection.
The Show Help option group offers two radio buttons . The default Internal Help selection presents Help within a window in the IDE. If you click External Help, choosing any of the Help menu items, such as Contents, Index, or Search, opens a new window or uses an existing Help window outside the Visual Studio IDE.
The last drop-down box on the My Profile tab for the Start Page lets you configure how Visual Studio .NET starts the next time that it opens. Use this drop-down box to have Visual Studio .NET open to another window besides the Start Page, such as the last project loaded or the New Project dialog box (which, not surprisingly, helps you to start a new project).
Using the Start Page
After closing and reopening Visual Studio .NET, you commit your profile changes so that the application starts according to your settings. Selecting Get Started on the Start Page offers you two buttons ”one for opening an existing project and a second for starting a new project. Links for your four most recent projects will appear in a table above the buttons. Clicking the link for the project automatically opens that project in Visual Studio .NET.
Click the New Project button to start a new project. This opens the New Project dialog box with a selection of templates for launching new projects. (The project types are summarized in the next section.) As an Access developer, you are likely to be interested in the Windows Application template. This template facilitates creating Access database solutions on a LAN. Just as with your current solutions created with Access forms or Visual Basic forms, solutions started with this template can take advantage of the rich graphics capability of a local Windows workstation. The Windows Application template opens a project with a new blank instance of the Windows Form class in the .NET Framework. In building Visual Basic .NET LAN “based solutions for your Access databases, you will use this new type of form rather than Access forms or Visual Basic forms.
Figure 2-2 shows the New Project dialog box with the Windows Application template selected. By default, Visual Studio .NET names the project WindowsApplication1 (or some other number if this is not your first Windows Application project in a directory). Unless you change the default, the dialog box will create a folder for the project in the path specified by the Location box. The name of the folder corresponds to the name of the project. This folder is the physical representation of the assembly for your project. You can deploy a solution by copying this folder to another computer on a LAN or even by copying the folder over the Internet. For example, I regularly use WinZip to package folders with the sample solutions for a chapter and send them via e-mail to my project editor at Microsoft Press. After unzipping the folder, a technical editor working with the project editor can run my solutions to verify that they work as described in the text for a chapter.
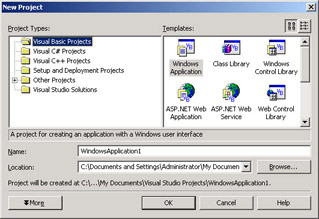
Figure 2-2: The New Project dialog box with the selection for starting your first Windows application using the Windows Application template
Clicking the Open Project button on the Start Page opens a dialog box that lets you navigate to any folder to open a project in the Visual Studio .NET IDE. Navigate to the project folder by using the dialog box, and open the file with the project s name and an .sln extension. For example, if you had previously created a WindowsApplication1 project, navigate to its folder and open WindowsApplication1.sln.
Introducing Three Important IDE Windows
As an experienced Access developer, you are probably used to thinking of the IDE as your personal playground. When moving to Visual Studio .NET, you get a new, bigger yard to play in. Figure 2-3 shows the layout of the IDE with a form named Form1; the form resides in the test05153 project. (See the resource files for this chapter.) The IDE shows three of the more important windows that you are likely to use when creating Visual Basic .NET solutions for your Access databases.
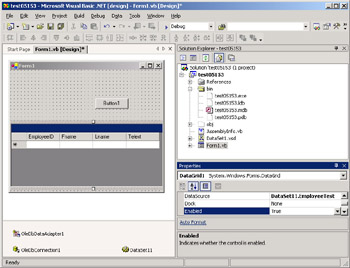
Figure 2-3: The Visual Studio .NET IDE for the test05153 project
The window on the left shows a Windows Form class instance with a Data Grid Control and a button control on it. The three icons in the tray below the form denote design-time specifications for OleDbConnection , OleDbDataAdapter , and DataSet objects. The tab name for the view showing these controls is Form1.vb[Design]. An asterisk (*) after the tab name denotes that the form has changes that are not saved. You cannot just make a change and run the code as you would in the VBA IDE in Access. All changes must be compiled before you can run them. Notice the Start Page is also a tab that you can select from the window on the left. You can have multiple selectable views that you can display in the left window, such as the code-behind Form1 . The tab name for the code window will be Form1.vb.
The top window on the right is Solution Explorer. The assembly name for the project appears right after Solution Explorer in the window s title. I clicked the Show All Files control on the Solution Explorer toolbar, and I expanded the bin subdirectory within the test05153 assembly. As you know, you can discover the name for any Windows control by placing the mouse over it. Notice that the bin subdirectory contains an Access database file named test05153.mdb. The DataGrid control in the form on the left actually displays the contents of a table from the database when you open the form.
A full description of the process for binding a DataGrid control to a table in an Access database is beyond the scope of this section. However, a discussion of the Properties window below Solution Explorer gives us some insight into the process. Notice that the Form1.vb[Design] view shows the DataGrid control selected. A currently selected entity, such as the DataGrid, has its properties shown in the Properties window. The name for the currently selected item, DataGrid1 , appears at the top of the Properties window.
Notice that the DataSource property for DataGrid1 is DataSet11.EmployeeTest . This specification designates the EmployeeTest table in the local DataSet11 object that shows in the tray below the form. You can set the DataSource property with a drop-down box that lists the available options. When a user runs the application with Form1 , DataGrid1 displays data from the EmployeeTest table in the test05153.mdb file. This display occurs so long as a form load event procedure behind Form1 populates, or fills, the EmployeeTest table in DataSet11 with the EmployeeTest table from the Access database file. The important point here is that you can graphically bind DataGrid1 to a table in a local dataset.
EAN: 2147483647
Pages: 111