Overview of Project Types and Project Folders
By introducing a wide variety of project types, Visual Basic .NET aims to make life easier as you tackle traditional and new development topics. The project types come with built-in design setups that simplify performing a task. For example, Windows Application projects include references to multiple .NET Framework namespaces, including the critical System.Windows.Forms namespace. The best thing about these project types is that you do not need to know what s in them to benefit from them. All you need to know is what types of projects there are.
This section gives you a summary of the types of projects that you can create with the Visual Basic .NET project templates. Don t get overwhelmed by the fact that there are 11 project types. You can readily start with just one or two and then get familiar with others as you need them.
For example, this section examines the Windows Application and Class Library templates. The Windows Application template will create the typical kind of client/server application that many Access developers routinely build on LANs. Visual Basic .NET is more object-oriented than Visual Basic and VBA. The Class Library project is one way to construct classes that you can instantiate as objects in your applications. Therefore, this section introduces you to Class Library projects. Both of these topics get substantial attention at many other points throughout the book.
Summary of Project Types
When you launch a new project with the Professional edition or higher of Visual Studio .NET, the New Project dialog box offers 11 Visual Basic .NET templates that you can use to start a new project. These templates automatically configure the IDE to handle a selected type of project. For example, one template starts a blank form, and another creates an empty class definition. Table 2-1 includes a list with each type of template and a brief description of the kind of projects you can start with each template.
| Project Template Name | Description of Project Created |
|---|---|
| Windows Application | This project type automatically opens a project with a blank form inherited from the Form class in the System.Windows.Forms namespace. Windows applications can perform data access and manipulation tasks via ADO.NET against an Access database on the local computer or LAN. Additionally, you can use a Windows Application project as the client for an XML Web service that exposes an Access database via the Internet. |
| Class Library | A class library project is for the creation of components that other projects will reference and use. To use the reusable class or component, you need another project that references the stand-alone class library. The components can do anything an application needs, such as perform sophisticated calculations with the result set from a query. |
| Windows Control Library | Use this type of project to create your own custom, reusable controls for use on forms in Windows applications. |
| ASP.NET Web Application | Just as Windows applications are built around Windows Forms, ASP.NET Web applications are built around Web Forms (.aspx files). Web Forms can be designed for use by any browser compatible with HTML 3.2, but the use of Microsoft Internet Explorer 5 or later provides enhanced application capabilities and easier design ” especially for developers familiar with Visual Basic or Access forms. You can invoke ADO.NET on a Web Forms page to work with an Access database just as you can on a Windows form. To create Web Forms applications, a workstation must have access to a computer with Microsoft Internet Information Services (IIS) running and the .NET Framework installed. |
| ASP.NET Web Service | Just as ASP.NET Web applications enable an end user to interact with an application over the Web, ASP.NET Web Service applications enable peer-to-peer computing between any pair of computers. One computer can invoke procedures, or exposed methods, on another computer. For example, a Web service can return tax rates or shipping costs that another computer uses to compute the final cost of an order. An ASP.NET Web Service project does not use Web Forms, but it relies on an .asmx file that provides addressable points for another computer to reference the methods exposed by a Web service. |
| Web Control Library | This project type parallels the functionality of a Windows Control Library project for Web Forms in ASP.NET Web applications. |
| Console Application | A console application runs from the command prompt in a command window. This type of project is useful for testing programming techniques without the overhead of designing and managing a graphical user interface. |
| Windows Service | Use this template to create a Windows Service application, which runs on a server in a session of its own. This project type is for advanced developers creating custom Windows Service applications that get called by other projects. |
| New Project In Existing Folder | This type of project facilitates the adding of files from a previously existing application into a new blank project. If your development workstation is running IIS, you can copy files from a previously existing Web folder for an ASP.NET Web application to a new blank project. |
| Empty Project | This project type creates a new blank project in a new folder. Developers must add their references, files, and components manually. |
| Empty Web Project | This project type creates a new blank project in a Web folder on a computer running IIS. The developer must add references for Web Forms and classes needed for the project. |
Access developers are likely to spend most of their time with Windows Application projects when they first start using Visual Basic .NET; that s because this type of project is closest to the ones that most Access developers build already. I think that Web applications and Web services are important growth opportunities for any Access developer switching from Visual Basic or VBA to Visual Basic .NET. Chapters 10 through 12 address these project types in more detail. Class library applications are likely to be important to your work whether or not you take my advice about diving into Web applications and XML Web services. The other kinds of application are more specialized, and you can add them to your repertoire as the demands of your project mix dictate .
Starting a Windows Application
The next example illustrates the process for starting a Windows application and reviews the resulting folder structure. As mentioned earlier, a Windows application features a form based on the .NET Framework Form class in the System.Windows.Forms namespace. This new type of form offers the same kind of functionality available from traditional Visual Basic and Access forms, but it also offers some new capabilities.
To start a new Windows application, launch Visual Studio .NET and click New Project on the Start Page. Figure 2-2 on page 30 shows the selection of the Windows Application template. The Location box on the New Project dialog box displays the last path used for a new project (or the default location for Visual Studio .NET projects immediately after setup). You can specify a new path by typing a string in the Location box that designates the new path. This path need not already exist.
Figure 2-4 shows the New Project dialog box for creating a project named WindowsApplication1 in the pawvbnet path of the C drive on a computer. Clicking OK will open the IDE with a blank form named Form1 , and it will add a new directory within the pawvbnet path on the computer. The new directory has the name WindowsApplication1. The directory contains several starter files reflecting the initial setup of the Windows application and a couple of subdirectories named bin and obj. The bin subdirectory normally contains an .exe file named after the project (WindowsApplication1.exe); Visual Studio .NET does not populate this directory with the file until after the first compilation.
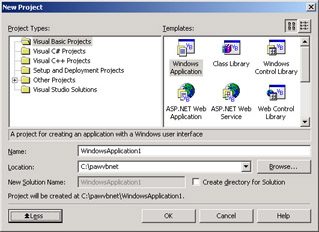
Figure 2-4: The New Project dialog box with the selection for starting your first Windows application in the C:\pawvbnet directory
| Note | Visual Studio .NET adds an .sln file to the root folder of the project s folder. Use the .sln file named after a project to open the project within the IDE. You can select the .sln file from the Open Project dialog box as described previously, or you can double-click the .sln file directly from Windows Explorer. |
Figure 2-4 also shows the Create Directory For Solution check box. Selecting this check box and clicking OK creates the directory for the project in the pawvbnet\WindowsApplication1 path on the C drive. Selecting the Create Directory For Solution check box enables the New Solution Name box and automatically populates the box with the contents of the Name box. You can override the entry in the New Solution Name box to specify a new subdirectory name for your project s folder. For example, if the New Solution Name box contained MyWindowsApplication1, the folder changes to the pawvbnet\ MyWindowsApplication1 path.
No matter where you position the folder for a project, you can force a compilation and open Form1 for the WindowsApplication1 project by pressing the F5 function key in the IDE. The IDE allows only one instance of the form to be open at a time; this capability is helpful for debugging your applications. Double-clicking the WindowsApplication1.exe file from Windows Explorer will also open Form1 . From Windows Explorer, you can open multiple instances of Form1 by repeatedly double-clicking the WindowsApplication1.exe file. In addition, you can open the WindowsApplication1.exe file on this computer from any other computer with the .NET Framework installed.
Adding a Message Box to a Windows Application
Message boxes have many uses in Windows programming. As you know from your VBA and Visual Basic work, a message box is a modal form that displays a message and contains one or more buttons . Visual Basic and VBA provide the MsgBox function for displaying message boxes and optionally capturing which button a user clicked on a message box.
The .NET Framework supports the old MsgBox function, but it adds a MessageBox class. The Show method, which is safe for multithreaded operation, displays a message box. This method can take parameters for the message to show, the caption for the message box, the buttons and icons to show, as well as selected other features offered through the class. You do not need to instantiate an instance of the MessageBox class before invoking the Show method to display a message. When a method is safe for multithreaded operation, you can invoke the members in multiple, concurrently running threads.
| Note | The Show method for the MessageBox class is overloaded to facilitate its invocation with different series of arguments. See the MessageBox.Show Method topic in the Visual Studio .NET documentation for details on the different overloaded specifications. Invoke the Help, Index command from the documentation window. Then enter the topic name in the Look For box. |
The following Visual Basic .NET event procedure fires before Form1 loads. You can open a shell for a form load event procedure by double-clicking the blank form. Do this for Form1 in the WindowsApplication1 project. The Form1_Load event procedure shell appears because the Form_Load event is the default event for a Windows form. Next, insert the indicated code within the shell for the event procedure. The procedure causes four message boxes to appear before conditionally opening Form1 . The condition for opening Form1 depends on which button a user clicks on the third message box. The sample also demonstrates the syntax for assigning a string constant to a string object. (Data types are objects in Visual Basic .NET.) The Dim statements at the top of the procedure point the str1 , str2 , and str3 variables at the string objects. The variables str1 , str2 , and str3 specify arguments for the message boxes.
Private Sub Form1_Load(ByVal sender As System.Object, _ ByVal e As System.EventArgs) Handles MyBase.Load Dim str1 As String = "Hello, from WindowsApplication1" Dim str2 As String = "Show form?" Dim str3 As String = "Show Form Message Box" Old style for presenting message box still works. MsgBox(str1) A new style is available. MessageBox.Show(str1) Conditionally process return from a message box. If MsgBoxResult.No = _ System.Windows.Forms.MessageBox.Show(str2, str3, _ MessageBoxButtons.YesNoCancel) Then MsgBox("Click OK to exit.") Me.Close() Else MsgBox("Click OK to show form.") End If End Sub After the form load event procedure is added, pressing F5 from the IDE or double-clicking WindowsApplication1.exe from Windows Explorer does not automatically present Form1 . Instead, a message box initially appears with a greeting. The procedure uses the traditional MsgBox function to present this initial message box. After a user clicks OK, a second message box appears with the same greeting. This second message box results from the invocation of the Show method for the MessageBox class. Although the first and second message boxes display the same message, they are subtly different. The second message box has a blank caption, and the first one has the project s name as a caption, which results from a default setting for the MsgBox function. You can readily assign a caption to the second message box by specifying a string value for the Show method s second argument. In fact, IntelliSense prompts for the input, but its designation is optional.
The third and fourth message boxes appear in a coordinated fashion. The message for the third message box is a question asking whether to show the form. This third message box contains three buttons labeled Yes, No, and Cancel. Its caption has the value of the str3 object. The procedure uses the MsgBoxResult enumeration in an If Then statement to verify whether the user clicked the button labeled No. You can use the MsgBoxResult enumeration with Visual Basic .NET instead of the vb intrinsic constants, such as vbYes , vbNo , and vbCancel, popular in VBA and Visual Basic solutions. The sample code presents one of two different message boxes as its fourth message box, depending on the button clicked by a user on the third message box. If the user clicks the No button, the procedure additionally invokes the Close method for the Me object, which is Form1 , after control returns from the fourth message box. Otherwise, the Form1_Load event procedure ends and opens Form1 .
Creating and Consuming a Class Library Project
A Class Library project is a component. It is similar to a Windows form, but it has no visual interface. One or more classes in a class library can expose methods and properties. You do not run Class Library projects directly. Instead, you run a project that makes an instance of a class in the class library; you can then work with properties and methods of the class.
Creating a Class Library Project
You can create a class library with the Class Library template. After clicking New Project from the Start Page, select the Class Library template in the New Project dialog box. If this is your first class library created in the path named in the Location box, Visual Studio .NET automatically enters ClassLibrary1 in the Name box. For those continuing from the previous sample, the Location box points at the pawvbnet path on the C drive. You can type over the entries in either box to change the class library s name or its destination, but this example accepts the defaults. When you click OK, Visual Studio .NET opens the IDE with the shell and settings for a class library project. In addition, Visual Studio .NET adds a folder to the file system named after the Class Library project in the path specified in the Location box.
A class library project opens to a code module with the shell for one class already defined. The default name for the class is Class1 . The class declaration includes the Public keyword so that other projects that reference the class can access its properties, methods, and events. Your code for the class can restrict access to selected class entities (for example, by using the Private keyword in their declaration). You can create properties for classes with property functions and fields. Implement class methods with Sub or Function procedures. Use the Events keyword to declare events. Classes will be discussed in greater detail later in this chapter, and Chapter 3 includes a whole section on them. Chapter 4 includes a section demonstrating event-handling techniques.
Figure 2-5 shows the definition of an About method for Class1 in the ClassLibrary1 project. This function procedure returns a string. This kind of method enables another project with an instance of the class to get information about the class. In this case, the information denotes the name of the class library as well as two sentences describing it. (This is my story. This is my song.) The procedure uses the vbCr constant to format the return string with carriage returns. The procedure also illustrates the syntax for the StrDup function. This function duplicates a string value a fixed number of times. The StrDup function performs similarly to the String function in VBA. In the About function procedure, the StrDup function inserts two carriage returns into the return string ( str1 ).
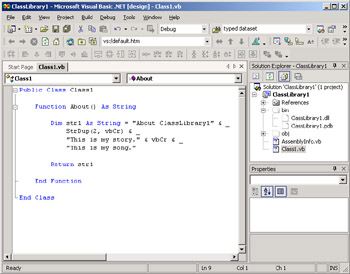
Figure 2-5: The IDE for the ClassLibrary1 project after the compilation of the solution, with the .dll file in the bin folder within the solution
| Note | The vbCr constant represents one of the printing and display intrinsic constants. The vbCr constant name represents the code for a carriage return, Chr(13) . View the Print and Display Constants topic in Visual Studio .NET documentation for more intrinsic constant names along with their function and value. |
After entering your code, such as in Figure 2-5, you can compile it by choosing Build, Build Solution from the IDE menu bar. This creates the .dll file for the ClassLibrary1 project. This file has the name of the project (ClassLibrary1) in the bin subdirectory within the class library s project folder. As you can see from Solution Explorer in Figure 2-5, the file s full name is ClassLibrary1.dll. When another project references the class library, it must reference this .dll file.
Consuming a Class Library Project
You need a second project to take advantage of the functionality exposed by a class library project. A Windows application can serve this role by referencing a class library. In the current case, all we need is a Windows application with a button on a form. The button can invoke the About method implemented by the function procedure in the Class1 class of the ClassLibrary1 project. The Windows application will manage the reference to the Class1 class so that clicking the button allows the invocation of the About method.
Create a Windows application with a name of InvokeAboutInClassLibrary1. You can position the project folder in the same directory as the prior samples, pawvbnet. The first step in preparing the project is to have it reference the ClassLibrary1.dll. From the IDE menu, choose Project, Add Reference. Then, click Browse in the Add Reference dialog box. In the Select Component dialog box, navigate to the .dll file you want to reference. Click Open to close the Select Component dialog box, and then click OK to confirm your reference selection and close the Add Reference dialog box. These steps update the items in the References folder within Solution Explorer for the InvokeAboutInClassLibrary1 project. The collection of references now includes ClassLibrary1 along with other built-in references for a Windows Application project, such as System.Windows.Forms .
The next step is to add a button to Form1 . The button will eventually get a click event procedure that invokes the About method in Class1 and displays its return string value. Choose View, Toolbox to open the Toolbox. From the Windows Forms tab in Toolbox, drag a Button control to Form1 . Figure 2-6 shows the IDE after the addition of the button to Form1 . The Toolbox appears on the left. Notice that it is tabbed to organize similar sets of controls. The example makes a selection from the Windows Forms tab because that s where many of the common controls are for Windows forms. The Data tab includes controls for ADO.NET objects, such as Connection and DataAdapter objects.
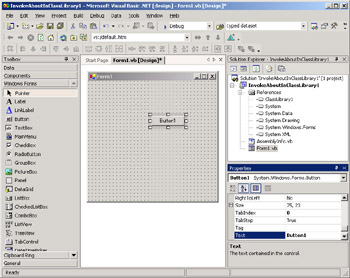
Figure 2-6: The IDE for the InvokeAboutInClassLibrary1 project after the addition of a reference to the ClassLibrary1.dll file and a button to Form1
The Properties window below Solution Explorer shows that the name of the button is Button1 , and the button s Text property also has a string value of Button1 . The Text property shows on the button, and the button s Name property is how you reference it in code. If this sample was for production instead of tutorial purposes, I might set the Text property to About and the Name property to cmdAbout in order to follow traditional naming conventions and to distinguish between the Name and Text property settings.
Before turning our focus away from Figure 2-6, look at Solution Explorer. The References folder is expanded so that you can see the individual references in the InvokeAboutInClassLibrary1 project. At the top of the list of references is the one added with the Project, Add Reference menu command. All the other references are added automatically by the selection of the Windows Application template at the project s launch.
You can open the code module behind the form by double-clicking Button1. This step adds the shell for a Click event procedure for Button1 as it opens the code module. As with the form load event in the preceding sample, the click event in this sample is the default event for the button.
| Note | You can add the shell for nondefault events with Visual Basic .NET in the standard way that you do with Visual Basic and VBA. Use the Class box, formerly called the Object box, just above the code module on the left to select a control. Use the Method box, formerly called the Procedure box, to the right of the Class box to specify a type of event. |
The click event procedure has just two lines. The first line instantiates a new instance of the Class1 class in the ClassLibrary1 component. The second line opens a message box with the contents of the return value from the About method for Class1 . The second argument for the Show method designates a caption for the message box. Figure 2-7 shows the appearance of the text. You can see the impact of the formatting conducted in the About function within Class1 .
Private Sub Button1_Click(ByVal sender As System.Object, _ ByVal e As System.EventArgs) Handles Button1.Click Dim MyClass1 As New ClassLibrary1.Class1() MessageBox.Show(MyClass1.About, _ "Invoke About method for ClassLibrary1") End Sub

Figure 2-7: The message box that displays with a return value from the About method in the ClassLibrary1 component
EAN: 2147483647
Pages: 111