Creating Tables Manually
To create a table manually, you double-click the Create Table In Design View icon in the Database window to open a blank Table window in Design view. From here, you can add fields, a primary key, and an index. (Primary keys are indexes with special property settings.)
To add a field, type the field's name in a blank Field Name column in the Design view window. Field names follow normal Visual Basic for Applications (VBA) naming conventions. They can be up to 64 characters long, and the characters can be letters, numbers, spaces, and special characters—except the period, the exclamation mark, square brackets, and the grave accent character ('). Also, you cannot start a field name with a space or a control character (ASCII values 0 through 31). While you can include internal spaces in field names, they must be bracketed in expressions and queries.
Data Types
In the Data Type column, you can specify a data type for the field. A drop-down list box offers 10 options: Text, Memo, Number, Date/Time, Currency, AutoNumber, Yes/No, OLE Object, Hyperlink, and Lookup wizard. (Data types are commonly used to identify the information a field contains. A Text field contains a Text data type, an AutoNumber field contains an AutoNumber data type, and so on.) You can use options within many of these data types to further refine your data type specifications. For example, the Number data type has seven subtypes. You can specify one of these by selecting Number for the data type and then making a selection from the Field Size drop-down list box on the General page at the bottom left of the Table window.
AutoNumber fields
AutoNumber field types frequently serve as the primary key for a table. Access automatically assigns a new value to the field when you add a record to the table. This field is not manually updateable, so its values are ideal for uniquely marking a row within a table.
Access automatically sets the value of AutoNumber field types. To cause an AutoNumber field to increment sequentially, select Increment (the default value) from the New Values drop-down list box on the General page at the bottom left of the Table window. To indicate that an AutoNumber field should have a randomly assigned value, select Random from the New Values drop-down list box.
You can use the General and Lookup pages to select other properties that affect the field, such as whether the user must enter a value into the field or whether the field has a default value. Field properties set at the table level propagate through to forms and reports. Table field properties can also simplify the code written for forms and reports. Maintaining data properties at the table level also means that properties are changed in a single place rather than within each form and report that uses a field.
Access 2000 is the first version of Access to enable programmatic control over the initial value and step size of AutoNumber field types. (Chapter 2 initially explored this capability.) You can use the ALTER TABLE and ALTER COLUMN keywords in Jet SQL to update the next start and step values for an AutoNumber field. Recall from Chapter 2 that an AutoNumber field in Jet SQL has an IDENTITY data type. The start and step properties of this data type let you programmatically modify the next AutoNumber value and the step size for subsequent values.
Text fields
You use Text fields to hold string entries that contain up to 255 characters. The Text data type can store items such as contact information and numerical values that do not require computation (for example, social security numbers, telephone numbers, and parts numbers). You can also use Text fields in a table to persist computed string values. You can index primary keys for fast sorts and retrieval based on last name or another Text field type.
Lookup fields
A lookup field shows a meaningful value that corresponds to the value stored in the field. (For example, a database might use unique numbers to represent products. A lookup field can display a product's actual name instead of the number used to represent the product.) This type of field (also known as a key column) lets you store an index value in the table but display a meaningful text value when the table is in Datasheet view. A lookup field can link to values in another table or query or to a custom list of values maintained by the table for the lookup field. After you add a lookup field that references values in another table, you cannot delete the field until you delete the relationship to the other field using the Relationships window. When you delete the relationship, Access reminds you that the field is still part of a relationship and asks you to confirm the deletion. Choose Yes at this point to remove the lookup field from the table.
You create a lookup field using the Lookup wizard. Select Lookup Wizard from the Data Type drop-down list box for a table in Design view. The wizard's initial dialog box asks whether your lookup values will come from another table or from a custom list of values. You'll usually click Next to use lookup values from another table.
If you want to use lookup values from another table, in the second wizard dialog box you can select the table or query that contains the values displayed by the lookup field. In the third dialog box, you select the field or fields that contain the values displayed by your lookup field. (Generally, you'll select a text field that is a primary key.)
The fourth dialog box allows you to set the width of the column (or columns) used to display the lookup list in Datasheet view. The lookup list can display the lookup field's value and one list item for each field that you selected in the related table. (You'll usually want to hide the key column.) The final dialog box lets you assign a caption to the lookup field.
Figure 3-6 shows the second, third, and fourth dialog boxes that were used to create the TitleID field of the Persons table in the Chapter 3 database file on the companion CD.
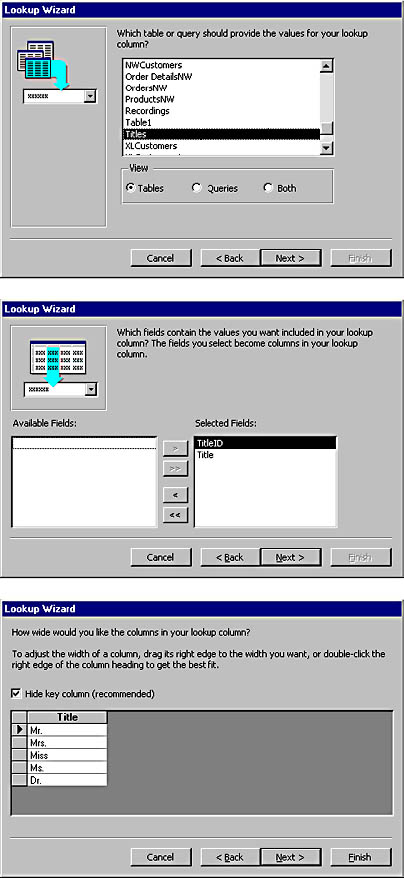
Figure 3-6. The second, third, and fourth dialog boxes of the Lookup wizard.
The Persons table in Design view shows TitleID as a number field—not a lookup field or a Text field. (See Figure 3-7.) The data type of a lookup field depends on the key column's data type. Even if you hide the key column, its data type determines the data type for the lookup field.
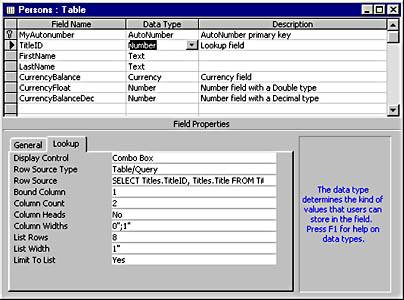
Figure 3-7. The Design view of the Persons table with the lookup field created in Figure 3-6.
The Lookup page in the table's Design view contains the SQL statement used by the lookup field. Access prepares this automatically as you make your selections in the Lookup wizard.
Number fields
Number fields are different from Text fields because they can assume a variety of subtypes, ranging from a single byte (Byte subtype) to 16 bytes (Replication ID subtype). The other data subtypes between these extremes include Integer, Long Integer, Single, Double, and Decimal. With the exception of the Byte and Replication ID subtypes, all of these data types are covered in Chapter 2 in the "Data Types" section.
The Byte subtype is similar to the Boolean variable data type. Both types can store Boolean values, but the Byte subtype requires just 1 byte of storage while the Boolean data type requires 2 bytes. The Replication ID data type is not available as a variable data type. Its primary use is in replication, but it serves as a unique identifier. Its length and method of creation make it a more secure way to ensure uniqueness than an AutoNumber field.
The Decimal subtype facilitates the elimination of rounding errors while still accommodating large numbers using Precision and Scale properties. These properties control the number of digits on either side of the decimal point. Precision, which represents the total number of digits that can be stored in the field, can range from 1 through 28. Scale, which indicates the number of digits to the right of the decimal that can be stored in the field, can range from 0 through the value in the Precision property. Because of the Scale property, the Decimal data subtype can store more digits after the decimal point without rounding errors than other Number data subtypes can.
Figure 3-8 shows the Persons table in Datasheet view. The CurrencyBalance field uses the Currency data type, CurrencyFloat uses the Number data type with the Double subtype, and CurrencyBalanceDec uses the Number data type with the Decimal subtype. The CurrencyBalanceDec field has a Scale property setting of 6, which indicates that the field can store six digits to the right of the decimal point. This is more digits than the Currency data type can precisely represent—its limit is four digits after the decimal. The Double data subtype can represent a number with four, five, or six places after the decimal, but it does not perform this task with integer precision. The first row in Persons displays the value 1.0001 in Currency, Double, and Decimal data formats. The second row expresses 1.00001 in the same three formats. Notice that in Datasheet view the Currency format initially shows 1.00001 as 1.0000 since it is limited to four places after the decimal. The Double and Decimal representations appear identical.

Figure 3-8. The Datasheet view of the Persons table with numeric values in Currency, Double, and Decimal data formats.
The DecimalArithmetic procedure below further shows the differences between these formats. It calculates the difference of each number stored in the respective fields from 1. The procedure opens a recordset based on the Persons table and then subtracts 1 from each of the three number fields in the first row and prints the results to the Immediate window. Then it moves to the second row and repeats the process.
Sub DecimalArithmetic() Dim cnn1 As New ADODB.Connection Dim rst1 As Recordset Dim intCounter As Long, sumD As Variant Dim sumC As Variant, sumF As Variant 'Open and set recordset. Set rst1 = New ADODB.Recordset rst1.ActiveConnection = CurrentProject.Connection rst1.CursorType = adOpenKeyset rst1.LockType = adLockOptimistic rst1.Open "Persons", , , , adCmdTable Debug.Print "Decimal arithmetic: " & rst1.Fields(6) - 1 Debug.Print "Floating arithmetic: " & rst1.Fields(5) - 1 Debug.Print "Currency arithmetic: " & rst1.Fields(4) - 1 rst1.MoveNext Debug.Print Debug.Print "Decimal arithmetic: " & rst1.Fields(6) - 1 Debug.Print "Floating arithmetic: " & rst1.Fields(5) - 1 Debug.Print "Currency arithmetic: " & rst1.Fields(4) _ 1 End Sub |
Figure 3-9 shows the results of calling the procedure. The Currency and Decimal formats yield the same result, 0.0001. The Double format cannot obtain this precise result; it yields .000099999999999989. For many purposes, this result is indistinguishable from the Currency and Decimal results. Nevertheless, when you need a precise outcome, it is not sufficient. When the same operation is performed on the second row, which contains the value 1.00001, the Decimal format is the only format that returns a precise result. These computations illustrate the special role that the Decimal data subtype can play. You should use it when you require precision that is not available with the Currency or Double data formats.

Figure 3-9. The output from calling the DecimalArithmetic procedure.
Memo, OLE Object, Date/Time, and Yes/No fields
Other data types included the Memo data type, which holds very large text data strings that can exceed the 255-character limit of the Text data type. A single Memo data type can grow to 64 KB. You can access and write back its contents in 64-KB blocks using the GetChunk and AppendChunk methods. Jet 4 supports indexing the first 255 characters of a Memo field. This is particularly useful for Hyperlink data types that depend on the Memo data type.
OLE Object is another large data type. It works with objects in their binary format, such as a Microsoft Excel workbook or a Microsoft Word document.
Date/Time data types can represent either dates or times. Date values are stored to the left of the decimal point; time values are stored to the right of the decimal point. (See Chapter 2 for code samples that manipulate values of Date/Time fields.)
The Yes/No data type is the smallest. It is always in one of two states—either Yes/No, True/False, or On/Off. It occupies a single byte of storage.
Validating Data
To design tables for a robust database, you must ensure that only valid data gets into your database. Access 2000 offers several features to help you do this.
Required and Allow ZeroLength properties
Sometimes a record is not valid unless it has an entry for a particular field, such as a primary key or a foreign key field. Setting the Required property for a foreign key to Yes guarantees that users cannot enter a record on the many side of a relationship without matching at least one record on the relationship's other side.
When the Required property of a field is set to Yes, Access does not accept a record with a Null value for the field. Depending on a field's setting for Allow Zero Length, you might be able to enter a zero-length string (""). Access differentiates between a field that has not been assigned a value (Null) and a field that has no value (zero-length strings for Text fields).
The Input Mask property
An input mask is a template that prompts the user about the type and format of data a field requires. Like other field properties, the InputMask property propagates through to the use of the field in forms and reports.
You can use standard input masks or create your own custom input masks. Figure 3-10 below shows the Input Mask wizard displaying a selection of input masks for a Date/Time field. You can enter values in the Try It text box to see how the mask will work in a real data entry situation.
The wizard controls both the input to a field and the display of the field's data unless you also specify the Format property for a field. When an application sets a field's Format property, that property controls the display of the field's data. The Format property does not affect the display of a value until an application saves the value to the database.

Figure 3-10. The Input Mask wizard with a selection of input masks for Date/Time fields.
Validation Rule and ValidationText properties
You use the Validation Rule and Validation Text properties to ensure that the user enters valid information. You use the Validation Rule property to set criteria for valid entries in a field. (If a field should accept only numbers greater than 1, for example, you set Validation Rule to >1.) You can use the Validation Text property to specify feedback that users see when they try to enter a value outside the range designated by the Validation Rule.
You can also specify validation rules for the table as a whole. To do so, open the table in Design view and click the Properties button on the Table Design toolbar. Then use the Validation Rule and Validation Text properties to specify a validation rule for the entire table and a feedback message for a violation of the rule. With the table's validation rule, you can specify criteria that extend beyond a single field.
If you require multiple sets of rules, you can include them in your validation rule expression using And clauses. (If a field should accept only numbers greater than 1 and less than 10, for example, you set Validation Rule to >1 And <10.) Click the Build button next to the Validation Rule property box to open the Expression Builder. You can use the built-in Access functions for validation of table fields, but custom functions are not permitted in table or field validation expressions. The Expression Builder works equally well for creating overall table validation as well as field validation expressions.
Creating Indexes
Indexes determine how tables perform and how they relate to one another. Indexes generally speed up sort, find, and selection operations on a field. Although applications can experience a performance penalty for data entry when indexes are used (because indexes require assignment with each new record), their benefits far outweigh their drawbacks.
Indexes also support referential integrity. At least one of the linking fields in a relationship must be a primary key or a unique index.
Figure 3-11 shows the Orders table in Design view with its main window and Indexes window open. The Indexes button on the Table Design toolbar toggles the visibility of the Indexes window.
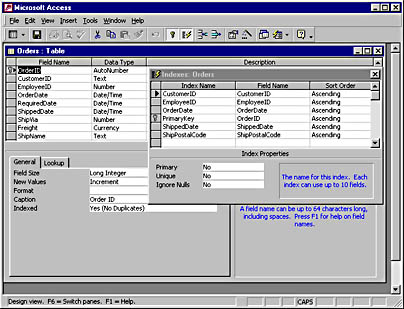
Figure 3-11. The main and Indexes windows for the Orders table in Design view.
The Indexes window in Figure 3-11 also includes a row with a key on it. Just as in the main window, this row marks the primary key. The Indexes window selects the CustomerID index. This index depends on the CustomerID field, which is a foreign key in the Orders table. The CustomerID index links the Customers and Orders tables in a one-to-many relationship. It is not the primary key in the Orders table. Therefore, it can duplicate across records. Notice additionally that some indexes, such as OrderDate and ShipPostalCode, are not keys to other tables. One reason to create an index is to speed the operations performed on the table's data, such as selecting by date or sorting by postal code.
NOTE
One way to ensure that you get the property settings for a foreign key correct is to copy the field to the Windows Clipboard on the one side of the relationship. Then you can paste it into the Design view of the table on the many side of the relationship. This avoids the need to set the foreign key properties manually.
You create an index by typing a name in the Index Name column of the Indexes window. Then, use the drop-down box to select a field for the index. Select the sort order for the field. Your choices are ascending or descending. If there is another field that belongs to the index, select its name and sort order in the immediately following row. You can add more fields to the index in the same fashion. Each additional field for the index should appear immediately below the preceding one. Only the first field in an index should have an entry for the Index Name column. All immediately succeeding rows with a blank Index Name column belong to the same index. Every entry in the Index Name column starts a new index.
You can set the three index properties independently. However, setting Primary to Yes automatically converts Unique to Yes and Ignore Nulls to No. A primary key has to be unique for every record. You cannot create a primary key on a field or fields with Null values. There can only be one primary key per table. A table can have multiple fields with unique indexes that ignore Nulls. Any index, except a primary key, can ignore Nulls. This lets you define an index on the non-Null values in a field. Choosing to ignore Nulls can save storage requirements for an index.
Figure 3-12 presents the main and Indexes windows for the Design view of the Order Details table. Notice that the main window shows the selection of the ProductID field. Its caption is Product. This is the second of the two fields that define the primary key. The other field is OrderID. Both fields are Number fields with a Long Integer data subtype. Neither field is an AutoNumber field. Rather they are foreign keys based on the AutoNumber fields in the Orders and Products tables. Both primary key components are foreign keys. Together they uniquely identify each row in the Order Details table. Junction box tables always behave this way.
The Indexes window in Figure 3-12 further identifies the primary key. Notice that the Order Details table also maintains separate indexes based on the OrderID and ProductID fields. These indexes maintain links with the Orders and Products tables. The referential integrity links between Order Details and Products draw on these indexes.
You can manually create and manage referential integrity relations between tables from the Relationships window. First, add the tables to the window if they are not there already. Right-click in the window, choose Show Table, and add as many tables as necessary. Second, join the tables by the common fields over which the tables link. Do this by dragging one or more fields from one table to the other. Drag from the one side to the many side of a relationship. Third, select the join line. Fourth, right-click the line and choose Edit Relationship. Fifth, check the Enforce Referential Integrity check box. Make any other necessary design changes to the relationship. This can include selecting the check boxes for cascading updates and cascading deletes. You can also click Join Types to choose either of two other join types besides the standard one that includes rows from both tables only when the join fields in both tables are equal. The other two options include either all the records from the one side or all the records from the many side of the relationship.
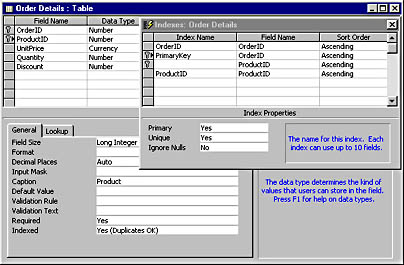
Figure 3-12. The main and Indexes windows for the Northwind Order Details table in Design view.
Figure 3-13 below reveals the Edit Relationships dialog boxes that define referential integrity relations between the Order Details table and either the Orders or the Products tables. Notice that Access automatically interprets both relationships as one-to-many. The relationship between the Orders and Order Details tables specifies cascading deletes. This allows the deletion of an order and all its line items with a single operation. Without this specification, the application would have to use two delete queries—one for each table. The relationship between the Products and the Order Details tables does not include cascading deletes. In this case, there is no automatic deletion of order line items when it becomes necessary to remove a product from the Products table. The business model may call for a special effort to purchase the product for the existing orders in the pipeline.

Figure 3-13. Two Edit Relationships dialog boxes depicting the referential integrity relationships between the Northwind Products and Order Details tables (above) and the Orders and Order Details tables (below).
EAN: 2147483647
Pages: 97