Sharing and Securing Folders
Windows Vista enables you to share folders with other users on a network in three ways:
-
Sharing existing folders on your hard drive using the Windows Vista Sharing Wizard to make folder contents available to other users on your network.
-
Using a Windows Vista feature known as Public Folder Sharing to provide an easy (but less flexible) way to simplify the folder sharing process.
-
Disabling the Sharing Wizard and configuring shared folders and permissions using a more advanced method similar to the one used by Windows Server systems like Windows 2000 Server and Windows Server 2003.
You'll learn more about each of these sharing methods in the following sections.
| Note | Administrator privileges are required to share folders and printers on a Windows Vista system. |
Sharing and Securing the Public Folder
As you learned in Chapter 13, Public folders provide a simple and effective method for users of the same PC to exchange and share files with one another. By saving, moving, or copying files into folders within the Public folder hierarchy, all shared files are accessible to all users.
By default, the Public folder is only shared among users of the same PC. For network users to gain access to the contents of the Public folder on another PC, it must be shared. Unlike folder sharing, you cannot apply different levels of access to the individual users who connect to the Public folder when it is shared. In other words, the permission level you configure on the Public folder applies to all users who access the folder across the network.
When preparing to share your Public folder, you need to choose appropriate sharing settings to ensure you properly secure the folder. The process begins by selecting one of the two available password-protected sharing settings described here:
-
Password protected sharing is enabled. If this option is selected, network users need a username and password configured on the Windows Vista system where the shared Public folder resides to connect to the folder.
-
Password protected sharing is disabled. If you select this option, any user who can gain access to your network can access the contents of the shared Public folder. Although this option makes sharing easier, it is much less secure and allows outside users to gain access to files stored in your shared Public folder.
Next, you need to select one of the three Public folder sharing settings for the folder:
-
Turn on sharing so anyone with network access can open files. Network users can open and read files stored in the Public folder, but they cannot change, delete, or add files to the folder.
-
Turn on sharing so anyone with network access can open, change, and create files. Network users can read, open, change, and delete files stored in the public folder as well as save, copy, and move new files into the folder.
-
Turn off sharing (people logged on to this computer can still access this folder). This setting is enabled by default, and stops all network users from accessing the contents of the Public folder. In effect, this setting disables network sharing of the Public folder completely.
Follow these steps to share your Public folder hierarchy with other network users:
-
Select Start → Control Panel → Network And Sharing Center.
-
Click the arrow next to Password Protected Sharing.
-
Ensure that Password Protected Sharing is enabled.
-
In the Public Folder section (see Figure 16-1), select either Turn On Sharing So Anyone With Network Access Can Open Files, or Turn On Sharing So Anyone With Network Access Can Open, Change, And Create Files, As Per Your Specific Requirements. Click Apply.
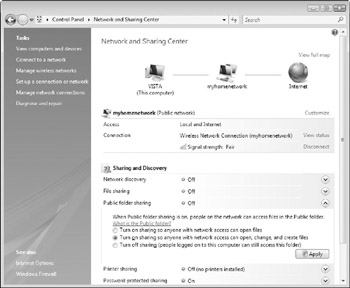
Figure 16-1: Sharing Public folders over the network. -
To make files accessible to network users through the shared Public folder, save, move, or copy files into its folder hierarchy.
When the Public folder is shared, other users can connect to it over the network. You learn more about connecting to shared folders later in this chapter.
Securing and Sharing Any Folder
Although sharing the Public folder provides the easiest option for making files you want to share available to other users on your network, it suffers from one major limitation - all users are granted the same level of permission for the folder contents. If you want a greater degree of control over which users can access a folder you share, and to what extent, then sharing other folders (rather than the Public folder) can provide the flexibility you need. Using this method you could share a folder called Vacation and grant Bill only the capability to read and open the files within the folder, while giving Sarah the power to read and open existing files, or change, add, and delete files if necessary.
Windows Vista simplifies the sharing of any folder on your hard drive through its Sharing Wizard feature. In effect, sharing a folder using the wizard walks you through the steps necessary to grant different users different levels of network access to the folder you want to share. The Sharing Wizard enables you to grant individual users one of three different permission levels to a shared folder:
-
Reader. This option restricts a user to viewing files in the shared folder.
-
Contributor. This option enables a user to view all files, add files, and change or delete any files that they add.
-
Co-owner. This option enables a user to view, change, add, and delete any files in the shared folder.
Follow these steps to share any folder using the Windows Vista Sharing Wizard:
-
Select Start → Computer.
-
Browse to the folder that you want to share with other users on your network. Right-click that folder and select Share.
-
In the File Sharing window, type the username of the person you want to share files with, and click Add. Alternatively, you can also click the drop-down arrow to the right of the text box, select the username in the list, and then click Add as shown in Figure 16-2. If the user you want to share files with isn't listed in the drop-down box select the Create A New User option and follow the steps to create a user account for him.
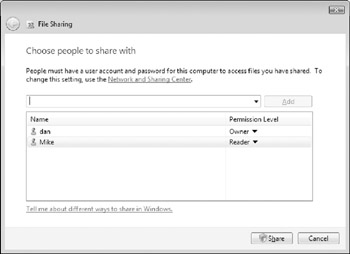
Figure 16-2: Choosing which users should have access to a shared folder. -
Under Permission Level, click the drop-down arrow next to the permission level you want to assign for that user, as shown in Figure 16-3.
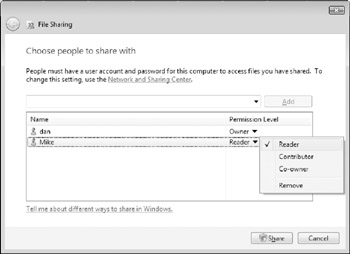
Figure 16-3: Configuring user permissions for a shared folder. -
When you have finish assigning shared folder permissions for all applicable user accounts, click the Share button. When the User Account Control dialog box appears, click Continue. When the Your Folder Is Shared screen appears (see Figure 16-4), click Done.
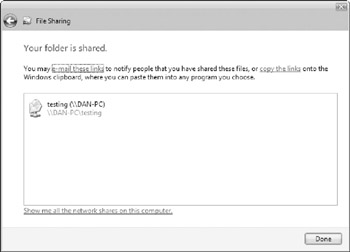
Figure 16-4: A successfully shared folder.
Advanced Sharing and Security
If you're looking for the highest degree of flexibility when sharing folders and assigning permissions on a Windows Vista system, you need to disable the Sharing Wizard feature. You can disable the Sharing Wizard in favor of using what are sometimes referred to as standard shared folder permissions. The standard shared folder permissions available on a Windows Vista system when the Sharing Wizard is disabled include:
-
Read. Read permission enables network users to open and read files, but not modify their contents or delete them outright.
-
Change. Change permission enables network users to open, read, and modify existing files, as well as add or delete files within the folder.
-
Full Control. Full Control permission enables network users to perform any function on items within the shared folder.
When you disable the Sharing Wizard, the default permission assigned to a shared folder is Allow Read to the Everyone group. The permissions that you should assign to a shared folder depend on how you want to use that folder. For example, if you only want network users to open and read (but not change) the contents of a folder, assign the Allow Read permission to the Users group (which includes only users with valid user accounts, rather than everyone). If you want to allow users to change files, grant the Change permission to the Users group. From a security perspective, you're better off granting permissions to the Users group rather than everyone. Everyone is literally anyone that may be able to connect to the shared folder, including hackers, other wireless users within range, and so forth.
| Note | Shared folder permissions only apply to users who connect to the folder over the network. |
Follow these steps to disable the Sharing Wizard and configure shared folder security settings on a Windows Vista system:
-
Select Start → Computer.
-
Press the Alt key, and select Tools → Folder Options.
-
Click the View tab, scroll down, and clear the Use Sharing Wizard (Recommended) check box as shown in Figure 16-5.
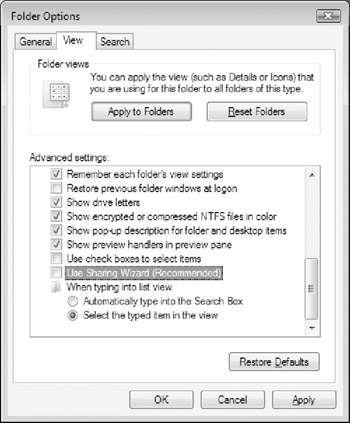
Figure 16-5: Disabling the Sharing Wizard. -
Click OK.
-
Browse to the folder you want to share. Right-click it and select Share. The Properties of the folder open to the Sharing tab, as shown in Figure 16-6.
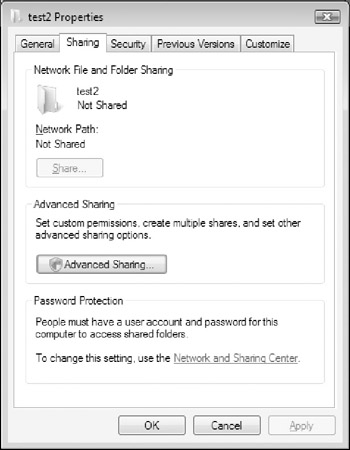
Figure 16-6: The Sharing tab in the Properties of a folder. -
Click the Advanced Sharing button. When the User Account Control dialog box appears, click Continue.
-
When the Sharing window opens, select Share This Folder as shown in Figure 16-7.
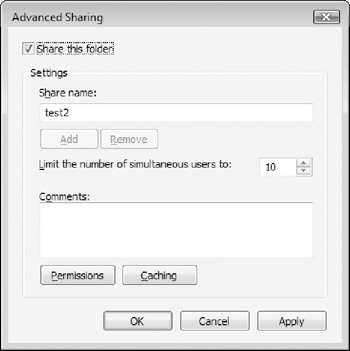
Figure 16-7: Configuring shared folder settings. -
Change the Share name to something more descriptive and add comments that describe the contents of the folder if necessary.
-
Click the Permissions button. By default, the Everyone group is granted the Allow Read permission, as shown in Figure 16-8. Use the Add and Remove buttons to change the users that will have access to the shared folder, and then use the check boxes in the Allow and Deny columns of the Permissions section to change the permissions associated with those users. When finished, click OK to exit the Permissions For Folder screen.
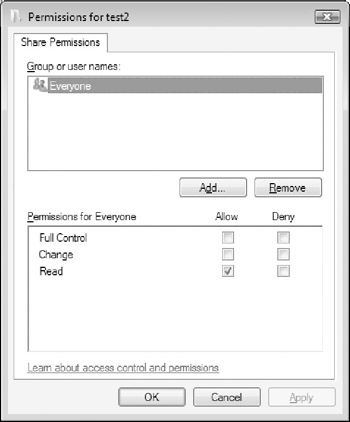
Figure 16-8: Configuring advanced shared folder permissions. -
Click OK to exit the Advanced Sharing window. Note that the Sharing tab on the Properties window has now changed to include the Network Path of the shared folder, as shown in Figure 16-9.
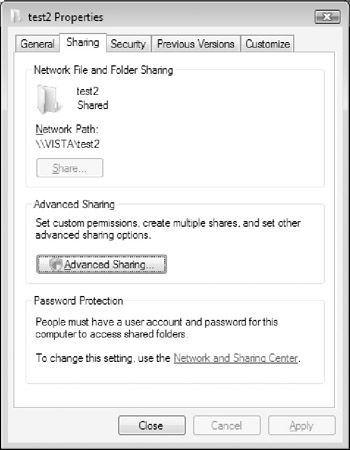
Figure 16-9: Reviewing shared folder settings.
| Tip | You can hide a shared folder by appending the $ symbol to the end of its share name. If you do this, it is invisible when users browse for shared folders using tools like Network. To access it, users need to know and enter the complete path to the folder (for example \\computername\sharedfolder$\) when mapping a network drive or using the Search text box to access it. |
In most cases, the default shared folder permission (Allow Read to the Everyone group) works just fine, but only if users don't need to change files stored in the shared folder (if they do, Allow Change is a better option). In instances where a folder is configured with both shared folder and NTFS permissions (as explored in Chapter 14), the more restrictive of the permissions apply to network users. In other words, if the NTFS permissions on a folder are set to Allow Read for a user, and the shared folder permissions that apply to the same user is Allow Full Control, then the user's effective permission when accessing the folder over the network is the more restrictive option - Allow Read.
Additionally, shared folder permissions combine in a manner similar to NTFS permissions. For example, if a user account is granted the Allow Read shared folder permission, and that user is also a member of the Administrators group that is granted the Allow Full Control permission, the user's effective shared folder permission becomes Allow Full Control. The only exception to this rule is when permissions are explicitly denied - a denied permission always takes precedence over an allowed permission.
| Cross Reference | Ensuring that shared folders are properly secured is especially important on wireless networks. If your wire less network isn't properly secured, other wireless users within range of your network can connect to it, and potentially gain access to your shared folders and printers. You'll learn more about wireless networks and some of their associated security risks in Chapter 17. |
EAN: 2147483647
Pages: 135