Managing User Accounts
Creating user accounts is only part of the job of an Administrator. After accounts have been created, they will occasionally need to be managed. Examples of security-related tasks associated with managing user accounts include:
-
Changing account types
-
Renaming accounts
-
Adding, changing, and resetting passwords
-
Deleting accounts
Each of these tasks is explained in more detail in the following sections.
Changing User Account Types
As you're now aware, using an Administrator account as your everyday user account is not recommended. Thankfully, the User Accounts tool in Windows Vista makes it easy to change an account from one type to another, such as switching an Administrator account to a Standard user, or vice versa.
Follow these steps to change a user account's type:
-
Select Start → Control Panel → User Accounts.
-
At the Make Changes To Your User Account screen, click Manage Another Account.
-
When the User Account Control dialog box appears, click Continue.
-
Select the name of the user account whose type you want to change.
-
Click Change The Account Type.
-
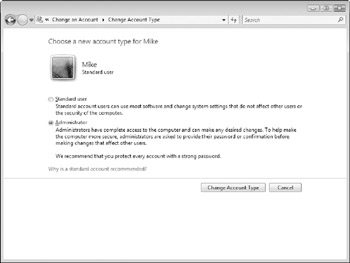
Select the type to which the account should be changed, as shown in Figure 2-4.
-
Click Change Account Type and close the Change An Account window.
| Note | Only an Administrator can change a user account's type. If the user whose account type is being changed is also logged onto the Windows Vista system when the change is made, the new account type takes effect the next time the user logs on. |

Figure 2-4: Changing an existing user account's type.
Renaming User Accounts
Changing the name associated with an existing user account is significantly different than creating a new account. When you rename an account, only the name is changed - the actual user account fundamentally remains the same. Accounts are often renamed in corporate environments to make the transition between a departing user and his replacement easier. If the account is renamed, the new user has the same rights and permissions as the old user, along with access to the old user's files and desktop environment. This is often preferable to creating an entirely new account and then configuring required rights and permissions manually. On a home PC, user accounts are typically renamed only when a user wants to change her on-screen display name.
Follow these steps to rename an existing user's account name in Control Panel:
-
Select Start → Control Panel → User Accounts.
-
At the Make Changes To Your User Account screen, click Manage Another Account. When the User Account Control dialog box appears, click Continue.
-
Select the name of the user account whose name you want to change.
-
Click Change The Account Name.
-
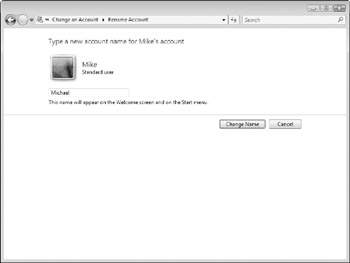
Type a new name for the account as shown in Figure 2-5 and then click the Change Name button. The account will take on the new name, but all of the old user's files and settings remain intact in the account.
-
Close the Change An Account window.

Figure 2-5: Changing a user account's name.
| Tip | The built-in Administrator user account may be hidden from the Windows Vista logon screen by default, but rest assured that hackers and others attempting to gain access to your computer know that it exists. Although you cannot delete this account, you can (and should) rename it to something less obvious. Choose a username for it that you'll remember, and then assign it a sufficiently complex password. This isn't to say that changing the name of the account will keep a determined hacker out of your system, but it will foil less experienced users and make life a little more difficult for those in the know. To change the password associated with this account, press F8 when your PC starts, select the option to boot into Safe Mode, log on, and use User Accounts in Control Panel to change the password associated with the Administrator account. |
Managing User Account Passwords
Creating individual user accounts for every person that uses your Windows Vista system is a great start, but it's only part of the story as far as security is concerned. For user accounts to do anything more than act as a facility for separating user desktops and working environments, they must be assigned passwords. Every user should assign a password to his or her user account, and as a security/ privacy precaution, be the only person who knows the password.
Follow these steps to add a password to an existing user account in Control Panel:
-
Select Start → Control Panel → User Accounts.
-
At the Make Changes To Your User Account screen, click Manage Another Account.
-
When the User Account Control dialog box appears, click Continue.
-
Select the name of the user account whose name you want to change.
-
Click Create A Password.
-
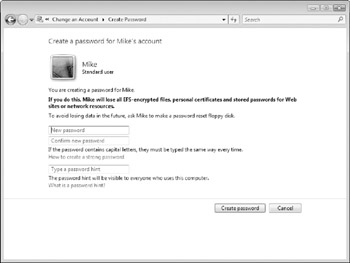
At the Create A Password For Username's Account screen (see Figure 2-6), enter the new password, confirm it, and then type a password hint that will be seen by the user (to help him remember it) if he forgets his password or enters it incorrectly.
-
Click Create Password, and then close the Change An Account window.

Figure 2-6: Adding a password to another user's account.
| Caution | Password hints exist to help you remember your password, but are visible to all users from the Windows Vista logon screen. If your hint is too obvious, other users may be able to guess your password. As a best practice, choose a password hint that makes sense to you, but won't give your password away to others. |
Adding a password to your user account is an important step forward, but if you're serious about security, make a point of changing your password at least once every month or so. The User Accounts applet in Control Panel makes it easy to change (or even remove) the password associated with your user account.
Follow these steps to change the password associated with a user account in Control Panel:
-
Select Start → Control Panel → User Accounts.
-
At the Make Changes To Your User Account screen, click Manage Another Account.
-
Select the name of the user account whose name you want to change.
-
Click Change The Password, enter (and confirm) your new password, enter a password hint, and then click the Change Password button.
-
Close the Change An Account window.
| Tip | Assigning a password to all user accounts is important, even if you're the only person using a computer. Any accounts left unprotected make it easier for hackers, viruses, and spyware, and that's a risk not worth taking. Additionally, if your computer is ever lost or stolen, not having a password assigned gives others easy access to any personal data or files stored on your system. |
Occasionally you may run into an issue where someone has forgotten the password associated with his or her user account, and cannot log on. Should this happen, an Administrator can reset the password by changing it using the User Accounts tool.
Follow these steps to reset a forgotten password using User Accounts:
-
Select Start → Control Panel → User Accounts.
-
At the Make Changes To Your User Account Screen, click Manage Another Account.
-
When the User Account Control dialog box appears, click Continue.
-
Select the name of the user account whose name you want to change.
-
Click Change The Password. Enter (and confirm) the user's new password, enter a password hint, and then click the Change Password button.
-
Close the Change An Account window.
| Caution | As a general rule, do not add, change, or reset passwords for other user accounts except during the original account creation process. If you add, change, or reset a password on their behalf (even with the best intentions), those users will lose access to their encrypted files, stored Internet certificates, and stored web site passwords. Instead, have the users log on and add a password to their accounts using the User Accounts applet in Control Panel. |
Understanding that users may forget their password, Windows Vista allows all users to create a password reset floppy disk. This disk enables a user to log on and change his password without the need to worry about losing access to encrypted files and other stored settings. You'll learn more about creating a password reset disk in Chapter 3.
Deleting User Accounts
Creating individual user accounts is essential, but it's also important to delete user accounts that are no longer needed. If you believe that an account will be used again at some point in the future, disable it. If there's no chance that it will be again, deleting it is the more secure option.
Follow these steps to delete an existing user account in Control Panel:
-
Select Start → Control Panel → User Accounts.
-
At the Make Changes To Your User Account screen, click Manage Another Account.
-
When the User Account Control dialog box appears, click Continue.
-
Select the name of the user account whose name you want to change.
-
Click Delete The Account.
-
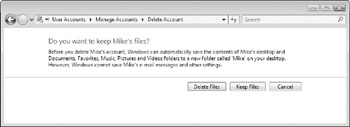
At the screen asking whether you want to keep the user's files (see Figure 2-7), click Keep Files to save the contents of the user's Documents folder to your desktop, or click Delete Files to remove them.
-
When asked to confirm that the account should be deleted, click Delete Account and then close the Manage Accounts window.

Figure 2-7: Options associated with deleting a user account.
After deleting a user account, would a new user account of the same name not smell as sweet? When it comes to how Windows Vista deals with user account names, the answer is no.
Imagine that your system includes a user account named Mike. When this user is created on a Windows Vista system, it is assigned an identifier value known as a Security ID (SID). An SID is a series of numbers that uniquely identifies a given security principal (user or group) on your system. Windows Vista identifies different users and groups using their SIDs, whereas names like Mike, Administrator, and Guest exist simply to help the mere humans keep things straight.
The reason this is important is that Mike isn't always necessarily Mike. For example, if you create a user account named Mike, delete it, and then create another user account named Mike, the two accounts are not the same. They may have the same name, and even belong to the same person. As far as Windows Vista is concerned, however, you've created one unique account (with a unique SID), deleted it, and then created another unique account (with its own unique SID). In other words, if the old Mike account had been granted any rights or permissions, the new Mike account is not automatically granted the same levels of privilege. Similarly, the new Mike may not be able to access the old Mike's files.
What it comes down to is this: deleting an account and then creating another with the same name does not the same user make.
EAN: 2147483647
Pages: 135