Linux-Based VPNs
| Because of the pervasive nature of VPNs, Netadmins often need to support VPNs on heterogeneous platforms. Although IPSec is standards-based, the interoperability of IPSec VPNs among various vendors and OS platforms can be challenging. OpenSWAN, an IPSec-based VPN project for Linux, offers interoperability with other standards-based IPSec VPNs. Consider the typical network scenario shown in Figure 10-2. This network consists of two remote offices connected through an IPSec VPN through the Internet. Site A uses dual-homed Linux machines with OpenSWAN as a VPN server, while site B uses a Cisco device as a VPN server. This Cisco box can be any of the three classes of devices that are capable of providing IPSec-based VPN services: an IOS-based device, a PIX Firewall, or a VPN 3000 concentrator. Figure 10-2. LAN-to-LAN VPN Based on this typical network scenario, the following sections discuss the IPSec-based OpenSWAN project and its interoperability with Cisco devices, such as routers, PIX Firewalls, and VPN 3000 concentrators. You will also find sample configurations for each interoperability scenario. OpenSWANThe OpenSWAN project (http://www.openswan.org) is by far the most successful open source project for IPSec-based VPNs running Linux. OpenSWAN is based on the now-defunct FreeSWAN project. Some features leading to the popularity of OpenSWAN (including FreeSWAN) are as follows:
The overall architecture of OpenSWAN consists of two main components KLIPS and Pluto. KLIPS is the IPSec kernel module for implementing ESP and packet handling. The Linux kernel 2.6 and higher features built-in support for IPSec, thus eliminating the need for KLIPS. Note that KLIPS cannot coexist with kernel 2.6 and can cause the kernel to freeze. Pluto is the IKE daemon for negotiating IKE and IPSec parameters for ESP. In addition to these two components, various built-in scripts exist for administration of OpenSWAN. Within its standards-compliant architectural framework, OpenSWAN supports the following protocols and algorithms:
Deploying OpenSWANThe steps for deploying OpenSWAN are as follows:
Verifying PrerequisitesBefore deploying OpenSWAN on a Linux machine, the following prerequisites should be met:
Tip To harden Red Hat Linux, Fedora, SuSE, Mandrake, Debian, and Gentoo, visit http://www.bastille-linux.org/. Additionally, Debian users can also refer to http://www.debianhardened.org/. Note The Linux command used to assign the default gateway is route add default gw next-hopipaddess interface-name (for example, route add default gw 99.1.1.2 eth0). Example 10-1. Contents of the /etc/network/options File root@linuxbox:~# cat /etc/network/options ip_forward=yes spoofprotect=no syncookies=no Installing the OpenSWAN FilesOpenSWAN is available in both source code and packaged form for various Linux distributions. Depending on the kernel version and the distribution, the installation steps will vary. For Debian-Linux with kernel 2.6 and higher, use the following apt-get command: apt-get install openswan After the installation, you can verify the OpenSWAN environment by using the ipsec verify command, as shown in Example 10-2. Example 10-2. Output of the ipsec verify Commandroot@linuxbox2:~# ipsec verify Checking your system to see if IPSec got installed and started correctly: Version check and ipsec on-path [OK] Linux Openswan U2.2.0/K2.6.7 (native) Checking for IPSec support in kernel [OK] #This message is OK if only using pre-shared key Checking for RSA private key (/etc/ipsec.secrets) [FAILED] ipsec showhostkey: no default key in "/etc/ipsec.secrets" Checking that pluto is running [OK] Two or more interfaces found, checking IP forwarding [OK] Checking NAT and MASQUERADEing [N/A] Checking for 'ip' command [OK] Checking for 'iptables' command [OK] Checking for 'setkey' command for native IPSec stack support [OK] #OE is not used with Cisco interoperating, so any FAILED message for OE is ok Opportunistic Encryption DNS checks: Looking for TXT in forward dns zone: linuxbox2 [MISSING] Does the machine have at least one non-private address? [OK] Looking for TXT in reverse dns zone: 1.1.1.99.in-addr.arpa. [OK] root@linuxbox2:~# Editing the Configuration FilesAfter installation, OpenSWAN is ready for configuration. Like the configuration of most Linux-based programs, OpenSWAN configuration is controlled through text files. Netadmins must have a clear understanding of the syntax and parameters used in these text files. The two configuration files used by OpenSWAN are as follows:
ipsec.conf FileThe /etc/ipsec.conf file is a text file that specifies the configuration and control information for the OpenSWAN IPSec subsystem. Comments are preceded by a white space followed by the pound sign (#). The first line of the file must always specify the OpenSWAN version; an example is as follows: version 2 The rest of the ipsec.conf file consists of two main sections: config and conn. The config section specifies general configuration information for IPSec, while the conn section specifies an IPSec connection. The syntax is as follows: Section-type name parameter1=value parameter2=value parameter3=value Caution Note the syntax for the ipsec.conf file. Without the white space (Tab) before the parameters, OpenSWAN will not start and it generates the following error message: ipsec_setup: (/etc/ipsec.conf) section header has wrong number of fields (1) -- 'restart' aborted Config section The first line of the config section must be config setup. The remaining text consists of parameters and their values. Table 10-1 lists the common parameters for the config section.
Based on the syntax discussed in Table 10-1, sample code for the config section is as follows: config setup interfaces=%defaultroute klipsdebug=all plutodebug=all Conn section The conn section specifies the connection details. Unlike the config section, you can have multiple instances of conn in the same file. The setup for each remote VPN peer is described by its own entry using the conn connection-name syntax. The naming convention (specified by OpenSWAN developers) refers to the local peer as left and the remote peer as right. Table 10-2 lists the most common parameters for the conn section. Note that every parameter that begins with left has a right counterpart.
OpenSWAN has a unique feature called Opportunistic Encryption (also referred as OE) that provides automatic encryption using public keys distributed through a DNS server. However, you should disable this feature when interoperating with a Cisco device because this feature is not supported by any major network vendor, including Cisco. The code snippet for disabling OE is as follows: #Disable Opportunistic Encryption conn block auto=ignore conn private auto=ignore conn private-or-clear auto=ignore conn clear-or-private auto=ignore conn clear auto=ignore #End of config for disabling Opportunistic Encryption This code snippet should be appended to the /etc/ipsec.conf file. Example 10-3 provides sample contents of the /etc/ipsec.conf file that also include the code for disabling Opportunistic Encryption. Note The OpenSWAN package for Debian contains similar code for disabling OE in the text file /etc/ipsec.d/examples/no_oe.conf. To instruct OpenSWAN to read this file, simply specify the path through the include keyword in the ipsec.conf file, as follows: include /etc/ipsec.d/examples/no_oe.conf Consider the VPN scenario shown previously in Figure 10-2. The VPN tunnel is configured to allow connectivity between site A and site B LANs. Site A uses an OpenSWAN server as the VPN gateway to establish a LAN-to-LAN IPSec tunnel with preshared keys. The sample ipsec.conf file for such a setup is shown in Example 10-3. Example 10-3. Sample ipsec.conf File # /etc/ipsec.conf - OpenSWAN IPSec configuration file #The version information is needed for OpenSWAN version 2.0 # basic configuration config setup interfaces=%defaultroute klipsdebug=all plutodebug=all # Add connections here conn ciscovpn type= tunnel left= 99.1.1.1 leftnexthop= 99.1.1.2 leftsubnet= 192.168.10.0/24 right= 200.1.1.1 rightnexthop= 200.1.1.2 rightsubnet= 192.168.20.0/24 # Instruct OpenSWAN to use preshared keys authby=secret auto=add # change this to auto=start for start at boot # Disable Opportunistic Encryption # essential for inertoperating with Cisco devices conn block auto=ignore conn private auto=ignore conn private-or-clear auto=ignore conn clear-or-private auto=ignore conn clear auto=ignore # End of config for disabling Opportunistic Encryption Note When tunneling multiple subnets, you need to create an individual conn entry for each subnet. Alternatively, if possible, you can summarize multiple subnets in the same conn entry. ipsec.secrets FileThe /etc/ipsec.secrets file is the second file used to configure OpenSWAN parameters. This file contains the preshared or RSA keys to be used for authentication. The PLUTO daemon uses this file to authenticate with the remote IPSec peer. Each entry in the file contains the IP addresses of the local IPSec peers, the remote IPSec peers, and the mutual authentication key. Each entry must start as a new line. The format to specify the preshared keys is as follows: Public-IP-of-local-peer Public-IP-of-remote-peer: PSK "secret-key-string" To use an FQDN instead of IP addresses, precede the name with an at sign (@). The preshared key cannot contain empty spaces or quotation marks within the text string. (As an example, mypassword123 is valid but mypassword 123 is invalid because of the space in the string. Similarly mypass"word"123 is invalid because of the quotation marks within the string. Example 10-4 shows a sample configuration of the ipsec.secrets file that contains preshared keys. Example 10-4. Sample ipsec.secrets File# Preshared key string "cisco123" for peer 99.1.1.1 and 200.1.1.1 99.1.1.1 200.1.1.1: PSK "cisco123" # Use the include keyword to specify additional files containing secrets # for example #include ipsec.test.secrets Warning The preshared key text string (cisco123) used in the previous example is too small and easy to use in a production network. Always use a long and complex text string as a preshared key. Because of its sensitive contents, this file should only be accessible to those with root privileges. Access should be blocked for other users using the chown and chmod commands, as shown in Example 10-5. Example 10-5. Changing Permission on the ipsec.secrets Fileroot@linuxbox2:~# chown root:root /etc/ipsec.secrets root@linuxbox2:~# chmod 600 /etc/ipsec.secrets root@linuxbox2:~# ls -l /etc/ipsec.secrets -rw------- 1 root root 36 Dec 29 22:35 /etc/ipsec.secrets The PLUTO daemon reads the contents of the ipsec.secrets file only during startup. To force PLUTO to read the ipsec.secrets file after the contents are changed, use the following command: ipsec auto --rereadsecrets Running the OpenSWAN ServerOpenSWAN is administered through the ipsec command. To start, stop, or restart an IPSec subsystem, use the ipsec setup command, as shown in Example 10-6. Example 10-6. Restarting an IPSec Subsystemroot@linuxbox2:~# ipsec setup Usage: ipsec setup {--start|--stop|--restart|--status} root@linuxbox2:~# ipsec setup restart ipsec_setup: Stopping Openswan IPSec... ipsec_setup: Starting Openswan IPSec U2.2.0/K2.6.7... To open a connection, use the ipsec auto up connection-name command as shown in Example 10-7. The connection-name parameter is the name specified in the conn section of the ipsec.conf file. Example 10-7. Manually Starting an IPSec Connectionroot@linuxbox2:~# ipsec auto --up ciscovpn 104 "ciscovpn" #1: STATE_MAIN_I1: initiate 106 "ciscovpn" #1: STATE_MAIN_I2: sent MI2, expecting MR2 003 "ciscovpn" #1: ignoring Vendor ID payload [e9c9b3ac0e8f770f58170fad5a5c986b] 108 "ciscovpn" #1: STATE_MAIN_I3: sent MI3, expecting MR3 Phase 1 main mode is established 004 "ciscovpn" #1: STATE_MAIN_I4: ISAKMP SA established 112 "ciscovpn" #2: STATE_QUICK_I1: initiate 003 "ciscovpn" #2: ignoring informational payload, type IPSEC_RESPONDER_LIFETIME Phase 2 quick mode is established 004 "ciscovpn" #2: STATE_QUICK_I2: sent QI2, IPSec SA established {ESP=>0x25b822f1 <0x7054091b} After the connection is up, the hosts in the remote subnets should be able to communicate with each other. The route to the remote host is shown in the routing table. To check the routing table, you can use the route or the netstat -nr command. Example 10-8 shows the routing table before starting the IPSec connection. Example 10-8. Display Routing Table root@linuxbox2:~# route Kernel IP routing table Destination Gateway Genmask Flags Metric Ref Use Iface 99.1.1.0 * 255.255.255.0 U 0 0 0 eth0 192.168.10.0 * 255.255.255.0 U 0 0 0 eth1 default 99.1.1.2 0.0.0.0 UG 0 0 0 eth0 Example 10-9 shows the routing table after the connection is established. Note the addition of the route to the remote subnet 192.168.20.0/255.255.255.0, as shown in the highlighted text. The next hop for the 192.168.20.0/255.255.255.0 subnet is the host 99.1.1.2, which is also the default gateway. Example 10-9. Display Routing Tableroot@linuxbox2:~# route Kernel IP routing table Destination Gateway Genmask Flags Metric Ref Use Iface 192.168.20.0 99.1.1.2 255.255.255.0 UG 0 0 0 eth0 99.1.1.0 * 255.255.255.0 U 0 0 0 eth0 192.168.10.0 * 255.255.255.0 U 0 0 0 eth1 default 99.1.1.2 0.0.0.0 UG 0 0 0 eth0 To test the communication between the two subnets, you can ping to the host 192.168.10.100 from the host 192.168.20.100. A successful ping reply confirms that the IPSec VPN tunnel is working. Troubleshooting the OpenSWAN ServerTo verify the status of an IPSec subsystem, use the ipsec setup --status command, as shown in Example 10-10. Note that this example uses Linux kernel 2.6 with built-in IPSec support, so the KLIPS module is not running; this causes OpenSWAN to generate the KLIPS error message. Example 10-10. Verifying IPSec Status root@linuxbox2:~# ipsec setup --status IPSec running but... KLIPS module is not loaded! To verify the status of a connection subsystem, use the ipsec auto --status command, as shown in Example 10-11. This command displays the IPSec subsystem status report, including the list of active connections with the negotiated ISAKMP and IPSec SAs. Example 10-11. Verifying the OpenSWAN Connection Statusroot@linuxbox2:~# ipsec auto --status 000 interface lo/lo ::1 000 interface lo/lo 127.0.0.1 000 interface eth1/eth1 192.168.10.1 000 interface eth0/eth0 99.1.1.1 000 %myid = (none) 000 debug raw+crypt+parsing+emitting+control+lifecycle+klips+dns+oppo+controlmore+pfkey+na ttraversal+x509 000 # IKE Phase 1 negotiations begin # OpenSWAN local peer is offering encryption options 000 algorithm ESP encrypt: id=2, name=ESP_DES, ivlen=8, keysizemin=64, keysizemax=64 000 algorithm ESP encrypt: id=3, name=ESP_3DES, ivlen=8, keysizemin=192, keysizemax=192 000 algorithm ESP encrypt: id=7, name=ESP_BLOWFISH, ivlen=8, keysizemin=40, keysizemax=448 000 algorithm ESP encrypt: id=11, name=ESP_NULL, ivlen=0, keysizemin=0, keysizemax=0 000 algorithm ESP encrypt: id=12, name=ESP_AES, ivlen=8, keysizemin=128, keysizemax=256 000 algorithm ESP encrypt: id=252, name=ESP_SERPENT, ivlen=8, keysizemin=128, keysizemax=256 000 algorithm ESP encrypt: id=253, name=ESP_TWOFISH, ivlen=8, keysizemin=128, keysizemax=256 # OpenSWAN local peer is offering hashing options 000 algorithm ESP auth attr: id=1, name=AUTH_ALGORITHM_HMAC_MD5, keysizemin=128, keysizemax=128 000 algorithm ESP auth attr: id=2, name=AUTH_ALGORITHM_HMAC_SHA1, keysizemin=160, keysizemax=160 000 algorithm ESP auth attr: id=5, name=AUTH_ALGORITHM_HMAC_SHA2_256, keysizemin=256, keysizemax=256 000 algorithm ESP auth attr: id=251, name=(null), keysizemin=0, keysizemax=0 000 000 algorithm IKE encrypt: id=7, name=OAKLEY_AES_CBC, blocksize=16, keydeflen=128 000 algorithm IKE encrypt: id=5, name=OAKLEY_3DES_CBC, blocksize=8, keydeflen=192 000 algorithm IKE hash: id=2, name=OAKLEY_SHA, hashsize=20 000 algorithm IKE hash: id=1, name=OAKLEY_MD5, hashsize=16 000 algorithm IKE dh group: id=2, name=OAKLEY_GROUP_MODP1024, bits=1024 000 algorithm IKE dh group: id=5, name=OAKLEY_GROUP_MODP1536, bits=1536 000 algorithm IKE dh group: id=14, name=OAKLEY_GROUP_MODP2048, bits=2048 000 algorithm IKE dh group: id=15, name=OAKLEY_GROUP_MODP3072, bits=3072 000 algorithm IKE dh group: id=16, name=OAKLEY_GROUP_MODP4096, bits=4096 000 algorithm IKE dh group: id=17, name=OAKLEY_GROUP_MODP6144, bits=6144 000 algorithm IKE dh group: id=18, name=OAKLEY_GROUP_MODP8192, bits=8192 000 000 stats db_ops.c: {curr_cnt, total_cnt, maxsz} :context={0,6,36} trans={0,6,336} attrs={0,6,224} 000 000 "ciscovpn": 192.168.10.0/24===99.1.1.1---99.1.1.2...200.1.1.2--- 200.1.1.1===192.168.20.0/24; erouted; eroute owner: #7 000 "ciscovpn": ike_life: 3600s; ipsec_life: 28800s; rekey_margin: 540s; rekey_fuzz: 100%; keyingtries: 0 # IKE Phase 1 (Main Mode) SA established 000 "ciscovpn": policy: PSK+ENCRYPT+TUNNEL+PFS+UP; prio: 24,24; interface: eth0; 000 "ciscovpn": newest ISAKMP SA: #5; newest IPSec SA: #7; 000 "ciscovpn": IKE algorithms wanted: 5_000-1-5, 5_000-1-2, 5_000-2-5, 5_000-2- 2, flags=-strict 000 "ciscovpn": IKE algorithms found: 5_192-1_128-5, 5_192-1_128-2, 5_192-2_160- 5, 5_192-2_160-2, 000 "ciscovpn": IKE algorithm newest: 3DES_CBC_192-MD5-MODP1536 # IKE Phase 2 (Quick Mode) negotiations begin 000 "ciscovpn": ESP algorithms wanted: 3_000-1, 3_000-2, flags=-strict 000 "ciscovpn": ESP algorithms loaded: 3_000-1, 3_000-2, flags=-strict 000 "ciscovpn": ESP algorithm newest: 3DES_0-HMAC_MD5; pfsgroup=<Phase1> 000 # IPSec SA established - Phase 2 quick mode over 000 #7: "ciscovpn" STATE_QUICK_I2 (sent QI2, IPSec SA established); EVENT_SA_REPLACE in 25566s; newest IPSEC; eroute owner 000 #7: "ciscovpn" esp.2609002f@200.1.1.1 esp.d7fdb0aa@99.1.1.1 tun.0@200.1.1.1 tun.0@99.1.1.1 000 #5: "ciscovpn" STATE_MAIN_R3 (sent MR3, ISAKMP SA established); EVENT_SA_REPLACE in 860s; newest ISAKMP 000 root@linuxbox2:~# For troubleshooting purposes, you can also check the OpenSWAN logs in the following locations:
As mentioned earlier, make sure that UDP port 500 and protocol 50 are not blocked. You can also use packet sniffers like Tcpdump or Ethereal for further troubleshooting. Table 10-3 summarizes all the IPSec commands used for operating and troubleshooting OpenSWAN.
Note To interoperate OpenSWAN and Cisco devices using an X.509 certificate, a CA server should be available. A CA server generates and distributes digitally signed X.509 certificates. The "Interoperating" section in the OpenSWAN documentation (http://wiki.openswan.org) provides a sample configuration for such advanced scenarios. Tip The Knoppix-STD live CD provides a preinstalled and patched version of the original FreeSWAN code. The live CD provides a quick-and-easy VPN server that can be deployed in less than 5 minutes, thus making it ideally suited for test environments or troubleshooting VPN scenarios. Interoperating OpenSWAN with Cisco IOSCisco routers offer IPSec capabilities with IOS Release 11.3 and higher. The IPSec security feature set is also implemented in the newer IOS-based Catalyst switches with Enhanced Multilayer Image (EMI). The Cisco implementation of IPSec enables Netadmins to deploy IPSec-based VPNs and remote access. The standards-based IPSec stack in the IOS enables interoperability with other standards-compliant IPSec products, including OpenSWAN. IOS Configuration TasksTo configure an IPSec-based VPN for IOS using preshared keys, follow these steps:
Step 1: Determine the Security PoliciesTo enable smoother interoperation between any two IPSec peers, the configuration must adhere to a common IPSec policy. The IPSec policies describe various parameters and their possible values. An IPSec connection only works after successful negotiation of all the IPSec parameters. Cisco IOS offers a high degree of flexibility for configuring various features and parameters that are available within the IPSec framework. Table 10-4 lists various IPSec parameters and their possible values offered by IOS.
Step 2: Configure the IKE ParametersThe IPSec phase 1 (IKE parameters) configuration commands for IOS are listed in Table 10-5. Note the router prompt for each command. While the configuration starts in the global configuration mode, IKE options are mainly configured through the config-isakmp mode. The commands in Table 10-5 are specific to IKE authentication using preshared keys.
Step 3: Configure the IPSec ParametersThe IPSec configuration on IOS is achieved by defining the IPSec SA lifetime, transform sets, crypto maps, and the interesting traffic. The SA lifetime can be specified in terms of seconds or kilobytes. The interesting traffic (the traffic that must be protected by IPSec) is defined through access lists. These access lists (also called crypto access lists) are similar in syntax to the regular IOS access-list statements. The traffic defined by the permit keyword is protected by IPSec, whereas the traffic defined by the deny statement is not selected for the VPN. The IOS commands used to configure IPSec options are listed in Table 10-6.
Caution The encryption access lists must not use the any keyword to specify the source or destination addresses. Always use granular access lists with specific source and destination subnet addresses. The use of the any keyword creates various problems and prevents IPSec from functioning correctly. Step 4: Monitor and TroubleshootThe commands for monitoring IPSec phases 1 and 2 status and their parameters are listed in Table 10-7.
The output of some of these commands is shown later in Example 10-13. Case Study IOS and OpenSWAN VPN with Preshared KeysConsider the network scenario, shown in Figure 10-3, for an IPSec VPN between two LANs. Site A uses a Linux OpenSWAN based VPN server, while site B uses a Cisco IOS based router as an IPSec-based VPN server. Also, the OpenSWAN server shown in the diagram was installed on a Debian-Linux machine with a Pentium III 1.0-GHz CPU with 512 MB RAM. (According to the OpenSWAN website, this configuration exceeds the minimum requirements for OpenSWAN for such a scenario.) Figure 10-3. OpenSWAN IOS VPN To ensure interoperability, the IPSec parameters should match on both sides. Based on the properties of OpenSWAN and IOS, following is a list of these parameters, including the suggested values. The values are based on the OpenSWAN configuration discussed in the previous sections:
Note that the OpenSWAN IPSec SA lifetime is 8 hours by default, whereas the IOS IPSec SA lifetime is 1 hour. Although the SA lifetimes do not match, both negotiating peers propose their individual lifetimes and agree on the smaller of the two values. IOS ConfigurationThe resulting configuration of the OpenSWAN server has already been shown in Examples 10-3 and 10-4. The configuration of the Cisco IOS router is shown in Example 10-12. The configuration is based on the commands discussed in the previous section. Example 10-12. IOS Configuration Cisco-rtr#show running-config Building configuration... Current configuration : 1273 bytes ! version 12.1 no service single-slot-reload-enable service timestamps debug uptime service timestamps log uptime no service password-encryption ! hostname Cisco-rtr ! enable password cisco ! ip subnet-zero no ip domain-lookup ip domain-name test.com ! crypto isakmp policy 3 encr 3des hash md5 authentication pre-share group 5 crypto isakmp key cisco123 address 99.1.1.1 ! crypto ipsec transform-set myset esp-3des esp-md5-hmac ! crypto map vpn 30 ipsec-isakmp set peer 99.1.1.1 set transform-set myset set pfs group2 match address 100 ! interface Ethernet0/0 ip address 192.168.20.1 255.255.255.0 ! interface Serial0/0 ip address 200.1.1.1 255.255.255.252 crypto map vpn ! ip classless ip route 0.0.0.0 0.0.0.0 200.1.1.2 ! access-list 101 permit ip 192.168.20.0 0.0.0.255 192.168.10.0 0.0.0.255 ! line con 0 line aux 0 line vty 0 4 password cisco login ! end Cisco-rtr# Monitoring and TroubleshootingTo verify whether the tunnel is up, ping a host in site B from a host in site A. A successful receipt of a ping reply confirms that the VPN tunnel is up and running. To monitor or troubleshoot, use the commands provided in Table 10-7. Example 10-13 shows the output of the various show commands. Also included is the output of the debug command during the establishment of the IPSec tunnel. Note that the highlighted text that begins with an exclamation point (!) indicates comments that are inserted within the output. These comments provide a relevant explanation for the output. Example 10-13. Monitoring and Troubleshooting Command OutputCisco-rtr#show crypto map ! The output shows the IPSec parameters for phase 2 Crypto Map "vpn" 30 ipsec-isakmp Peer = 99.1.1.1 Extended IP access list 130 access-list 130 permit ip 192.168.20.0 0.0.0.255 192.168.10.0 0.0.0. 255 Current peer: 99.1.1.1 Security association lifetime: 4608000 kilobytes/3600 seconds PFS (Y/N): Y DH group: group2 Transform sets={myset,} Interfaces using crypto map vpn: Serial0/0 Cisco-rtr#show crypto isakmp sa ! The output shows the negotiated phase 1 SAs dst src state conn-id slot 99.1.1.1 200.1.1.1 QM_IDLE 26 0 Cisco-rtr#show crypto ipsec sa ! The output shows the negotiated phase 2 SAs interface: Serial0/0 Crypto map tag: vpn, local addr. 200.1.1.1 local ident (addr/mask/prot/port): (192.168.20.0/255.255.255.0/0/0) remote ident (addr/mask/prot/port): (192.168.10.0/255.255.255.0/0/0) current_peer: 99.1.1.1 PERMIT, flags={origin_is_acl,} ! The increments in packet count indicates the IPSec tunnel operation ! including the operation of the access-lists #pkts encaps: 12041, #pkts encrypt: 12041, #pkts digest 12041 #pkts decaps: 11677, #pkts decrypt: 11677, #pkts verify 11677 #pkts compressed: 0, #pkts decompressed: 0 #pkts not compressed: 0, #pkts compr. failed: 0, #pkts decompress failed: 0 #send errors 710, #recv errors 0 local crypto endpt.: 200.1.1.1, remote crypto endpt.: 99.1.1.1 path mtu 1500, media mtu 1500 current outbound spi: A1B2B3FF ! Please note that 2 separate SAs, one for inbound ! second for outbound inbound esp sas: spi: 0x151D1967(354228583) transform: esp-3des esp-md5-hmac , in use settings ={Tunnel,} slot: 0, conn id: 2002, flow_id: 3, crypto map: vpn sa timing: remaining key lifetime (k/sec): (4607972/3335) IV size: 8 bytes replay detection support: Y inbound ah sas: inbound pcp sas: outbound esp sas: spi: 0xA1B2B3FF(2712843263) transform: esp-3des esp-md5-hmac , in use settings ={Tunnel,} slot: 0, conn id: 2003, flow_id: 4, crypto map: vpn sa timing: remaining key lifetime (k/sec): (4607972/3334) IV size: 8 bytes replay detection support: Y outbound ah sas: outbound pcp sas: Cisco-rtr#debug crypto isakmp Crypto ISAKMP debugging is on Cisco-rtr# debug crypto isakmp Crypto IPSEC debugging is on Cisco-rtr# debug crypto engine Crypto Engine debugging is on Cisco-rtr# show debug ! Following debugs are currently running on the router Cryptographic Subsystem: Crypto ISAKMP debugging is on Crypto Engine debugging is on Crypto IPSEC debugging is on Cisco-rtr# ! The following debug capture was generated during the initial setup of the IPSec tunnel ! Phase 1 negotiations begin 05:23:05: ISAKMP (26): received packet from 99.1.1.1 (I) QM_IDLE 05:23:05: CryptoEngine0: generate hmac context for conn id 26 05:23:05: ISAKMP (0:26): processing SA payload. message ID = -118861484 05:23:05: ISAKMP (0:26): Checking IPSec proposal 0 05:23:05: ISAKMP: transform 0, ESP_3DES 05:23:05: ISAKMP: attributes in transform: 05:23:05: ISAKMP: group is 5 05:23:05: ISAKMP: encaps is 1 05:23:05: ISAKMP: SA life type in seconds 05:23:05: ISAKMP: SA life duration (basic) of 28800 05:23:05: ISAKMP: authenticator is HMAC-MD5 05:23:05: validate proposal 0 05:23:05: ISAKMP (0:26): atts are acceptable. 05:23:05: IPSEC(validate_proposal_request): proposal part #1, (key eng. msg.) dest= 99.1.1.1, src= 200.1.1.1, dest_proxy= 192.168.20.0/255.255.255.0/0/0 (type=4), src_proxy= 192.168.10.0/255.255.255.0/0/0 (type=4), protocol= ESP, transform= esp-3des esp-md5-hmac , lifedur= 0s and 0kb, spi= 0x0(0), conn_id= 0, keysize= 0, flags= 0x44 05:23:05: validate proposal request 0 05:23:05: CryptoEngine0: generate alg parameter 05:23:05: CRYPTO_ENGINE: Dh phase 1 status: 0 05:23:05: CRYPTO_ENGINE: Dh phase 1 status: 0 05:23:05: ISAKMP (0:26): processing NONCE payload. message ID = -118861484 05:23:05: ISAKMP (0:26): processing KE payload. message ID = -118861484 05:23:05: CryptoEngine0: generate alg parameter 05:23:06: ISAKMP (0:26): processing ID payload. message ID = -118861484 05:23:06: ISAKMP (26): ID_IPV4_ADDR_SUBNET src 192.168.10.0/255.255.255.0 prot 0 port 0 05:23:06: ISAKMP (0:26): processing ID payload. message ID = -118861484 05:23:06: ISAKMP (26): ID_IPV4_ADDR_SUBNET dst 192.168.20.0/255.255.255.0 prot 0 port 0 05:23:06: ISAKMP (0:26): asking for 1 spis from ipsec 05:23:06: IPSEC(key_engine): got a queue event... 05:23:06: IPSEC(spi_response): getting spi 354228583 for SA from 99.1.1.1 to 200.1.1.1 for prot 3 05:23:06: ISAKMP: received ke message (2/1) 05:23:06: CryptoEngine0: generate hmac context for conn id 26 05:23:06: ISAKMP (26): sending packet to 99.1.1.1 (I) QM_IDLE 05:23:06: ISAKMP (26): received packet from 99.1.1.1 (I) QM_IDLE 05:23:06: CryptoEngine0: generate hmac context for conn id 26 05:23:06: ipsec allocate flow 0 05:23:06: ipsec allocate flow 0 05:23:06: CryptoEngine0: clear dh number for conn id 1 ! Phase 2 negotiations begin 05:23:06: ISAKMP (0:26): Creating IPSec SAs 05:23:06: inbound SA from 99.1.1.1 to 200.1.1.1 (proxy 192.168.10.0 to 192.168.20.0 ) 05:23:06: has spi 354228583 and conn_id 2002 and flags 45 05:23:06: lifetime of 28800 seconds 05:23:06: outbound SA from 200.1.1.1 to 99.1.1.1 (proxy 192.168.20.0 to 192.168.10.0 ) 05:23:06: has spi -1582124033 and conn_id 2003 and flags 45 05:23:06: lifetime of 28800 seconds 05:23:06: ISAKMP (0:26): deleting node -118861484 error FALSE reason "quick mode done (await()" 05:23:06: IPSEC(key_engine): got a queue event... 05:23:06: IPSEC(initialize_sas): , (key eng. msg.) dest= 200.1.1.1, src= 99.1.1.1, dest_proxy= 192.168.20.0/255.255.255.0/0/0 (type=4), src_proxy= 192.168.10.0/255.255.255.0/0/0 (type=4), protocol= ESP, transform= esp-3des esp-md5-hmac , lifedur= 28800s and 0kb, spi= 0x151D1967(354228583), conn_id= 2002, keysize= 0, flags= 0x45 05:23:06: IPSEC(initialize_sas): , (key eng. msg.) src= 200.1.1.1, dest= 99.1.1.1, src_proxy= 192.168.20.0/255.255.255.0/0/0 (type=4), dest_proxy= 192.168.10.0/255.255.255.0/0/0 (type=4), protocol= ESP, transform= esp-3des esp-md5-hmac , lifedur= 28800s and 0kb, spi= 0xA1B2B3FF(2712843263), conn_id= 2003, keysize= 0, flags= 0x45 05:23:06: IPSEC(create_sa): sa created, (sa) sa_dest= 200.1.1.1, sa_prot= 50, sa_spi= 0x151D1967(354228583), sa_trans= esp-3des esp-md5-hmac , sa_conn_id= 2002 05:23:06: IPSEC(create_sa): sa created, (sa) sa_dest= 99.1.1.1, sa_prot= 50, sa_spi= 0xA1B2B3FF(2712843263), sa_trans= esp-3des esp-md5-hmac , sa_conn_id= 2003 05:23:06: IPSEC(add_sa): peer asks for new SAs -- expire current in 120 sec., (sa) sa_dest= 99.1.1.1, sa_prot= 50, sa_spi= 0xC11E602E(3239993390), sa_trans= esp-3des esp-md5-hmac , sa_conn_id= 2001, (identity) local= 200.1.1.1, remote= 99.1.1.1, local_proxy= 192.168.20.0/255.255.255.0/0/0 (type=4), remote_proxy= 192.168.10.0/255.255.255.0/0/0 (type=4) Interoperating OpenSWAN with a Cisco PIX FirewallThe steps involved in configuring a Cisco PIX Firewall for an IPSec-based VPN using preshared keys are similar to those for IOS devices. The command syntax closely matches their IOS counterparts. PIX Configuration TasksThe tasks involved in enabling an IPSec-based VPN on a Cisco PIX Firewall are as follows:
Configuration CommandsTable 10-8 lists the global-configuration-mode commands that configure the PIX according to the tasks noted in Steps 1 through 4 in the previous section. The resulting configuration provides a preshared authentication based IPSec VPN on a PIX Firewall version 6.0 or higher. The PIX IPSec policy parameters are similar to those offered by IOS, except for the authentication mechanism. The PIX only supports preshared and RSA signatures, while IOS also supports RSA-encrypted nonces. (Nonces are arbitrarily generated numbers that are created for one-time use only.) Also note that unlike the IOS configuration mode, the PIX's global configuration mode does not offer context-sensitive subconfiguration modes (such as config-if or config-isakmp).
Monitoring and Troubleshooting CommandsTable 10-9 lists the commands used to monitor and troubleshoot IPSec on a Cisco PIX Firewall.
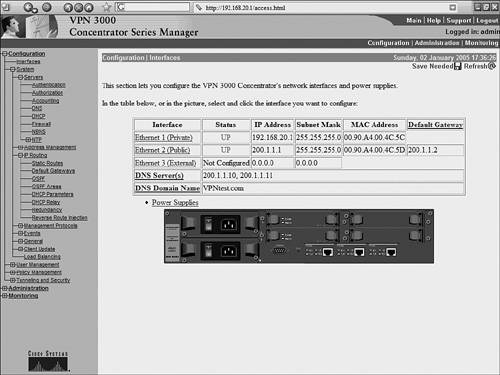
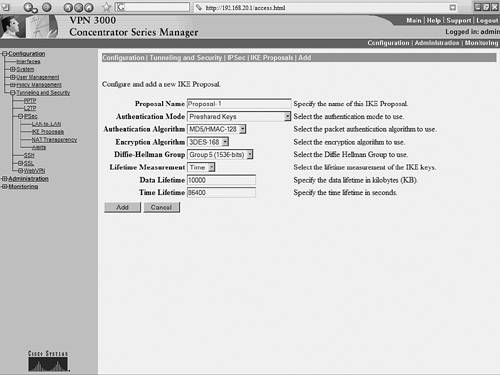
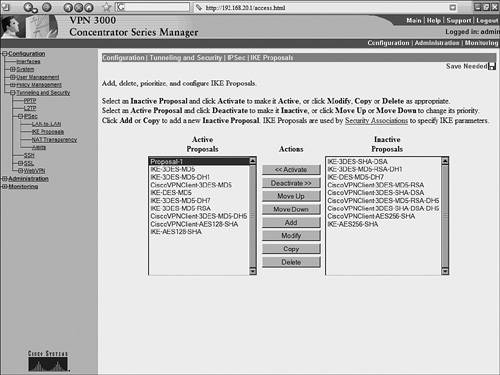
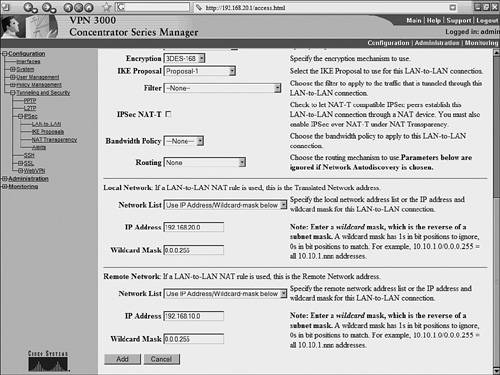
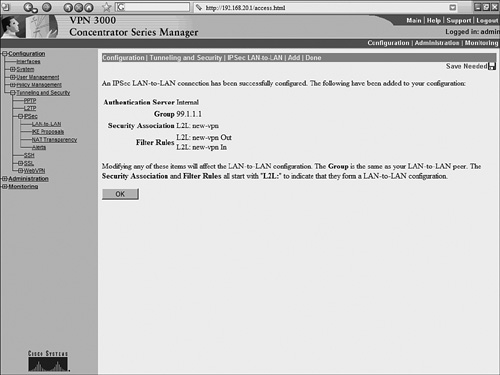
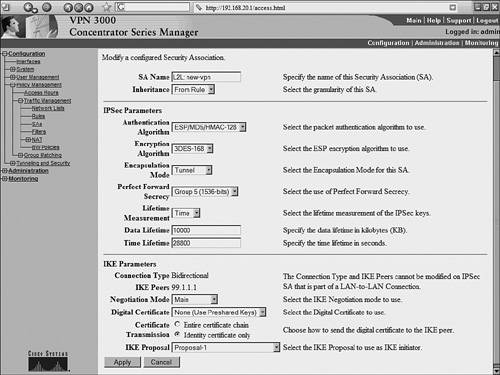
The output of these show and debug commands are illustrated later in Example 10-15. Case Study: PIX Firewall and OpenSWAN VPN with Preshared KeysConsider the network scenario, shown in Figure 10-4, for an IPSec VPN between two LANs. Site A uses a Linux OpenSWAN based VPN server, while site B uses a Cisco PIX appliance, acting as both a firewall and an IPSec-based VPN server. Figure 10-4. OpenSWAN PIX VPN The resulting configuration of the OpenSWAN server has already been shown in Examples 10-3 and 10-4. The configuration of the Cisco PIX Firewall is shown in Example 10-14. The configuration is based on the commands discussed in Table 10-8. Note that the highlighted text that begins with an exclamation point (!) indicates comments. These comments are inserted to explain the relevant configuration. Example 10-14. IOS ConfigurationPIX-FW#show running-config : Saved : PIX Version 6.3(4) interface ethernet0 10baset interface ethernet1 100full nameif ethernet0 outside security0 nameif ethernet1 inside security100 enable password 8Ry2YjIyt7RRXU24 encrypted passwd 2KFQnbNIdI.2KYOU encrypted ! Specify the Hostname for PIX firewall hostname PIX-FW ! Specify the Domain name for PIX firewall domain-name VPNtest.com fixup protocol dns maximum-length 512 fixup protocol ftp 21 fixup protocol h323 h225 1720 fixup protocol h323 ras 1718-1719 fixup protocol http 80 fixup protocol icmp error fixup protocol rsh 514 fixup protocol rtsp 554 fixup protocol sip 5060 fixup protocol sip udp 5060 fixup protocol skinny 2000 fixup protocol smtp 25 fixup protocol sqlnet 1521 fixup protocol tftp 69 names ! Define interesting traffic to be encrypted by IPSec VPN access-list 101 permit ip 192.168.20.0 255.255.255.0 192.168.10.0 255 .255.255.0 ! Define traffic that should NOT BE NATed access-list 102 permit ip 192.168.20.0 255.255.255.0 192.168.10.0 255 .255.255.0 ! access-list 120 is for allowing Ping traffic ! for test purpose only, should be avoided in production network access-list 120 permit icmp any any no pager mtu outside 1500 mtu inside 1500 ! Assign the IP address on the interfaces ip address outside 200.1.1.1 255.255.255.0 ip address inside 192.168.20.1 255.255.255.0 ip audit info action alarm ip audit attack action alarm pdm history enable arp timeout 14400 global (outside) 1 interface ! Disable NAT for VPN traffic nat (inside) 0 access-list 102 ! NAT the non VPN traffic nat (inside) 1 0.0.0.0 0.0.0.0 0 0 access-group 120 in interface outside ! Specify default route route outside 0.0.0.0 0.0.0.0 200.1.1.2 1 timeout xlate 3:00:00 timeout conn 1:00:00 half-closed 0:10:00 udp 0:02:00 rpc 0:10:00 h225 1:00:00 timeout h323 0:05:00 mgcp 0:05:00 sip 0:30:00 sip_media 0:02:00 timeout uauth 0:05:00 absolute aaa-server TACACS+ protocol tacacs+ aaa-server TACACS+ max-failed-attempts 3 aaa-server TACACS+ deadtime 10 aaa-server RADIUS protocol radius aaa-server RADIUS max-failed-attempts 3 aaa-server RADIUS deadtime 10 aaa-server LOCAL protocol local http server enable http 192.168.20.0 255.255.255.255 inside no snmp-server location no snmp-server contact snmp-server community public no snmp-server enable traps floodguard enable ! IMPORTANT - Intruct PIX to bypass Firewall rules for IPSec traffic ! VPN will not work without sysopt command sysopt connection permit-ipsec ! define transform set called "myset" ! "myset" use ESP with 3DES encryption and MD5 hash crypto ipsec transform-set myset esp-3des esp-md5-hmac ! !Define crypto map called "mymap" ! & configure parameters for the map crypto map mymap 10 ipsec-isakmp crypto map mymap 10 match address 101 crypto map mymap 10 set pfs group2 crypto map mymap 10 set peer 99.1.1.1 crypto map mymap 10 set transform-set myset crypto map mymap interface outside ! ! Define IKE parameters ! isakmp enable outside ! the isakmp key is hidden by the "show running-config" output ! the command was "isakmp key cisco123 address 99.1.1.1 . ." isakmp key ******** address 99.1.1.1 netmask 255.255.255.255 isakmp identity address isakmp policy 10 authentication pre-share isakmp policy 10 encryption 3des isakmp policy 10 hash md5 isakmp policy 10 group 5 isakmp policy 10 lifetime 86400 telnet timeout 5 ssh timeout 5 console timeout 0 terminal width 80 Cryptochecksum:dbb37121c657444491a37d631b9eb82e : end Example 10-15 shows the output of the various show and debug commands that are listed in Table 10-9. The highlighted text that begins with an exclamation point indicates comments that provide more information about the command outputs. Example 10-15. PIX IPSec show CommandsPIX-FW# show isakmp ! Command displays the ISAKMP configuration on the Firewall ! and is useful for quickly verifying configuration isakmp enable outside isakmp key ******** address 99.1.1.1 netmask 255.255.255.255 isakmp identity address isakmp policy 10 authentication pre-share isakmp policy 10 encryption 3des isakmp policy 10 hash md5 isakmp policy 10 group 5 isakmp policy 10 lifetime 86400 PIX-FW# PIX-FW# show isakmp policy Protection suite of priority 10 encryption algorithm: Three key triple DES hash algorithm: Message Digest 5 authentication method: Pre-Shared Key Diffie-Hellman group: #5 (1536 bit) lifetime: 86400 seconds, no volume limit Default protection suite encryption algorithm: DES - Data Encryption Standard (56 bit keys). hash algorithm: Secure Hash Standard authentication method: Rivest-Shamir-Adelman Signature Diffie-Hellman group: #1 (768 bit) lifetime: 86400 seconds, no volume limit PIX-FW# PIX-FW# show isakmp sa ! Command output provides details regarding existing phase 1 SA, ! and helps in verifying if phase 1 is working Total : 2 Embryonic : 0 dst src state pending created 200.1.1.1 99.1.1.1 QM_IDLE 0 0 200.1.1.1 99.1.1.1 QM_IDLE 0 0 PIX-FW# PIX-FW# show crypto map ! Command output displays crypto maps that are applied to the interfaces ! The hitcnt counter is useful in verifying the operation of the access-lits ! Incrementing hitcnt counter indicate the traffic is getting selected and ! encrypted by IPSec Crypto Map: "mymap" interfaces: { outside } Crypto Map "mymap" 10 ipsec-isakmp Peer = 99.1.1.1 access-list 101; 1 elements access-list 101 line 1 permit ip 192.168.20.0 255.255.255.0 192.168.10.0 255.255.255.0 (hitcnt=23695) Current peer: 99.1.1.1 Security association lifetime: 4608000 kilobytes/28800 seconds PFS (Y/N): Y DH group: group2 Transform sets={ myset, } PIX-FW# PIX-FW# show crypto ipsec security-association lifetime Security association lifetime: 4608000 kilobytes/28800 seconds PIX-FW# show crypto ipsec transform-set Transform set myset: { esp-3des esp-md5-hmac } will negotiate = { Tunnel, }, PIX-FW# PIX-FW# show crypto ipsec sa ! Command output is useful in verifying the existing phase 2 SAs interface: outside Crypto map tag: mymap, local addr. 200.1.1.1 ! The following ouput indicates the local and remote subnets that are ! being encapsulated and encrypted by IPSec local ident (addr/mask/prot/port): (192.168.20.0/255.255.255.0/0/0) remote ident (addr/mask/prot/port): (192.168.10.0/255.255.255.0/0/0) current_peer: 99.1.1.1:500 PERMIT, flags={origin_is_acl,} ! The packet encapsulation and encryption statistics are useful in verifying the ! working of IPSec. Incrementing counters indicate the successful operation #pkts encaps: 7925, #pkts encrypt: 7925, #pkts digest 7925 #pkts decaps: 7917, #pkts decrypt: 7917, #pkts verify 7917 #pkts compressed: 0, #pkts decompressed: 0 #pkts not compressed: 0, #pkts compr. failed: 0, #pkts decompress failed: 0 #send errors 29, #recv errors 0 local crypto endpt.: 200.1.1.1, remote crypto endpt.: 99.1.1.1 path mtu 1500, ipsec overhead 56, media mtu 1500 current outbound spi: 2eff0256 inbound esp sas: spi: 0x7b7cc75(129485941) transform: esp-3des esp-md5-hmac , in use settings ={Tunnel, } slot: 0, conn id: 4, crypto map: mymap sa timing: remaining key lifetime (k/sec): (4607441/22957) IV size: 8 bytes replay detection support: Y inbound ah sas: inbound pcp sas: outbound esp sas: spi: 0x2eff0256(788464214) transform: esp-3des esp-md5-hmac , in use settings ={Tunnel, } slot: 0, conn id: 3, crypto map: mymap sa timing: remaining key lifetime (k/sec): (4607595/22957) IV size: 8 bytes replay detection support: Y outbound ah sas: outbound pcp sas: PIX-FW# ! Debug commands are added to capture IPSec phase 1 ! and phase 2 negotiations PIX-FW# debug crypto isakmp PIX-FW# debug crypto ipsec PIX-FW# show debug debug crypto ipsec 1 debug crypto isakmp 1 PIX-FW# ! IPSec phase 1 negotiations begin crypto_isakmp_process_block:src:99.1.1.1, dest:200.1.1.1 spt:500 dpt:500 OAK_MM exchange ISAKMP (0): processing SA payload. message ID = 0 ! Phase 1 ISAKMP parameters are being proposed ISAKMP (0): Checking ISAKMP transform 0 against priority 10 policy ISAKMP: life type in seconds ISAKMP: life duration (basic) of 3600 ISAKMP: encryption 3DES-CBC ISAKMP: hash MD5 ISAKMP: auth pre-share ISAKMP: default group 5 ISAKMP (0): atts are acceptable. Next payload is 3 ISAKMP (0): SA is doing pre-shared key authentication using id type ID_IPV4_ADDR return status is IKMP_NO_ERROR crypto_isakmp_process_block:src:99.1.1.1, dest:200.1.1.1 spt:500 dpt:500 OAK_MM exchange ISAKMP (0): processing KE payload. message ID = 0 ISAKMP (0): processing NONCE payload. message ID = 0 return status is IKMP_NO_ERROR crypto_isakmp_process_block:src:99.1.1.1, dest:200.1.1.1 spt:500 dpt:500 OAK_MM exchange ISAKMP (0): processing ID payload. message ID = 0 ISAKMP (0): processing HASH payload. message ID = 0 ISAKMP (0): SA has been authenticated ISAKMP (0): ID payload next-payload : 8 type : 1 protocol : 17 port : 500 length : 8 ISAKMP (0): Total payload length: 12 return status is IKMP_NO_ERROR ISAKMP (0): sending INITIAL_CONTACT notify ISAKMP (0): sending NOTIFY message 24578 protocol 1 VPN Peer: ISAKMP: Added new peer: ip:99.1.1.1/500 Total VPN Peers:1 VPN Peer: ISAKMP: Peer ip:99.1.1.1/500 Ref cnt incremented to:1 Total VPN Peers:1 crypto_isakmp_process_block:src:99.1.1.1, dest:200.1.1.1 spt:500 dpt:500 OAK_QM exchange ! IPSec phase 2 negotiations begins oakley_process_quick_mode: OAK_QM_IDLE ISAKMP (0): processing SA payload. message ID = 545732397 ISAKMP : Checking IPSec proposal 0 ISAKMP: transform 0, ESP_3DES ISAKMP: attributes in transform: ISAKMP: group is 5 ISAKMP: encaps is 1 ISAKMP: SA life type in seconds ISAKMP: SA life duration (basic) of 28800 ISAKMP: authenticator is HMAC-MD5 ISAKMP (0): atts are acceptable.IPSEC(validate_proposal_request): proposal part #1, (key eng. msg.) dest= 200.1.1.1, src= 99.1.1.1, dest_proxy= 192.168.20.0/255.255.255.0/0/0 (type=4), src_proxy= 192.168.10.0/255.255.255.0/0/0 (type=4), protocol= ESP, transform= esp-3des esp-md5-hmac , lifedur= 0s and 0kb, spi= 0x0(0), conn_id= 0, keysize= 0, flags= 0x44 ISAKMP (0): processing NONCE payload. message ID = 545732397 ISAKMP (0): processing KE payload. message ID = 545732397 ISAKMP (0): processing ID payload. message ID = 545732397 ISAKMP (0): ID_IPV4_ADDR_SUBNET src 192.168.10.0/255.255.255.0 prot 0 port 0 ISAKMP (0): processing ID payload. message ID = 545732397 ISAKMP (0): ID_IPV4_ADDR_SUBNET dst 192.168.20.0/255.255.255.0 prot 0 port 0IPSEC(key_engine): got a queue event... IPSEC(spi_response): getting spi 0xf514b0d7(4111773911) for SA from 99.1.1.1 to 200.1.1.1 for prot 3 return status is IKMP_NO_ERROR crypto_isakmp_process_block:src:99.1.1.1, dest:200.1.1.1 spt:500 dpt:500 OAK_QM exchange oakley_process_quick_mode: OAK_QM_AUTH_AWAIT ISAKMP (0): Creating IPSec SAs inbound SA from 99.1.1.1 to 200.1.1.1 (proxy 192.168.10.0 to 192.168.20.0) has spi 4111773911 and conn_id 1 and flags 45 lifetime of 28800 seconds outbound SA from 200.1.1.1 to 99.1.1.1 (proxy 192.168.20.0 to 192.168.10.0) has spi 1483854339 and conn_id 2 and flags 45 lifetime of 28800 secondsIPSEC(key_engine): got a queue event... IPSEC(initialize_sas): , (key eng. msg.) dest= 200.1.1.1, src= 99.1.1.1, dest_proxy= 192.168.20.0/255.255.255.0/0/0 (type=4), src_proxy= 192.168.10.0/255.255.255.0/0/0 (type=4), protocol= ESP, transform= esp-3des esp-md5-hmac , lifedur= 28800s and 0kb, spi= 0xf514b0d7(4111773911), conn_id= 1, keysize= 0, flags= 0x45 IPSEC(initialize_sas): , (key eng. msg.) src= 200.1.1.1, dest= 99.1.1.1, src_proxy= 192.168.20.0/255.255.255.0/0/0 (type=4), dest_proxy= 192.168.10.0/255.255.255.0/0/0 (type=4), protocol= ESP, transform= esp-3des esp-md5-hmac , lifedur= 28800s and 0kb, spi= 0x5871d203(1483854339), conn_id= 2, keysize= 0, flags= 0x45 ! IPSec phase 2 SA established VPN Peer: IPSEC: Peer ip:99.1.1.1/500 Ref cnt incremented to:2 Total VPN Peers:1 VPN Peer: IPSEC: Peer ip:99.1.1.1/500 Ref cnt incremented to:3 Total VPN Peers:1 return status is IKMP_NO_ERROR Interoperating OpenSWAN with a Cisco VPN ConcentratorCisco VPN 3000 Series concentrators offer standards-compliant IPSec-based VPN services for LAN-to-LAN and remote-access VPNs. The concentrators are known to interoperate with various IPSec-compliant devices, including OpenSWAN. While Cisco routers and PIX Firewalls can also provide VPN functionality, VPN 3000 concentrators are more appropriate for networks that support a large number of remote users (more than 100). The configuration steps for enabling site-to-site VPNs on VPN 3000 concentrators are similar to those of IOS- and PIX Firewall based IPSec VPNs. The initial step is to prepare the concentrator for IPSec, followed by configuration of the IKE and IPSec parameters. However, unlike IOS and the PIX Firewall, the VPN 3000 concentrators provide a web-based GUI for configuration and administration. The case study presented in next section covers each of these steps with the help of screen shots of the VPN 3000 concentrator GUI. Case Study: VPN 3000 Concentrator and OpenSWAN VPN with Preshared KeysConsider the network scenario, shown in Figure 10-5, for an IPSec VPN between two LANs. Site A uses a Linux OpenSWAN based VPN server, while site B uses a Cisco VPN 3000 concentrator, acting as an IPSec-based VPN server. Figure 10-5. OpenSWAN PIX VPN While Examples 10-3 and 10-4, earlier in this chapter, show the OpenSWAN server configuration, the following section describes the configuration of the VPN 3000 concentrator. VPN 3000 Concentrator ConfigurationThis section illustrates the configuration of the VPN 3000 concentrator when enabling a site-to-site VPN using IPSec with preshared keys. The configuration steps are as follows:
Monitoring the VPN 3000 ConcentratorThe web-based GUI for the VPN 3000 concentrator provides a user-friendly interface for monitoring VPN sessions and event logs. To monitor active sessions, choose Monitoring > Sessions. Click the name of the active session for more details, as shown in Figure 10-13. The details are helpful in quickly identifying the remote IPSec peers by their IP address, the encryption in use, and the duration of the IPSec session. The Bytes Tx and Bytes Rx fields provide information about traffic being encrypted and decrypted. Figure 10-13. Session Details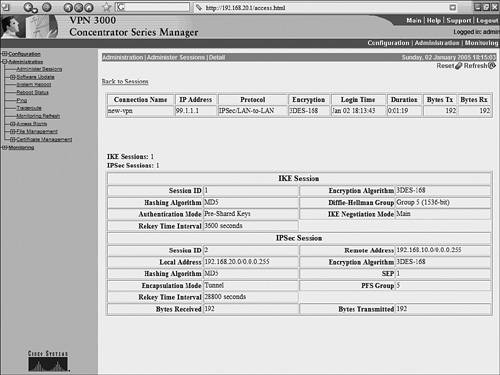 The system log messages generated by the concentrator are stored locally within the flash memory (of the concentrator). These messages are helpful for troubleshooting purposes and can be accessed through the navigation pane on the left side of the concentrator GUI. To view these system log messages from within the concentrator GUI, click Monitoring > Filterable Event Log. Example 10-16 shows the content of the event logs. Example 10-16. VPN 3000 Event Log2 01/02/2005 18:18:11.050 SEV=4 IKE/119 RPT=3 99.1.1.1 Group [99.1.1.1] PHASE 1 COMPLETED 3 01/02/2005 18:18:11.050 SEV=4 AUTH/22 RPT=3 User [99.1.1.1] Group [99.1.1.1] connected, Session Type: IPSec/LAN-to-LAN 4 01/02/2005 18:18:11.050 SEV=4 AUTH/84 RPT=3 LAN-to-LAN tunnel to headend device 99.1.1.1 connected 5 01/02/2005 18:18:11.090 SEV=5 IKE/35 RPT=4 99.1.1.1 Group [99.1.1.1] Received remote IP Proxy Subnet data in ID Payload: Address 192.168.10.0, Mask 255.255.255.0, Protocol 0, Port 0 8 01/02/2005 18:18:11.090 SEV=5 IKE/34 RPT=4 99.1.1.1 Group [99.1.1.1] Received local IP Proxy Subnet data in ID Payload: Address 192.168.20.0, Mask 255.255.255.0, Protocol 0, Port 0 11 01/02/2005 18:18:11.090 SEV=5 IKE/66 RPT=4 99.1.1.1 Group [99.1.1.1] IKE Remote Peer configured for SA: L2L: new-vpn 12 01/02/2005 18:18:11.220 SEV=4 IKE/49 RPT=4 99.1.1.1 Group [99.1.1.1] Security negotiation complete for LAN-to-LAN Group (99.1.1.1) Responder, Inbound SPI = 0x43fbdf31, Outbound SPI = 0x6267ed2b 15 01/02/2005 18:18:11.220 SEV=4 IKE/120 RPT=4 99.1.1.1 Group [99.1.1.1] PHASE 2 COMPLETED (msgid=cae1aa9a) Example 10-17 shows the output generated on an OpenSWAN server by the ipsec auto -- up ciscovpn command while negotiating IPSec parameters with the VPN 3000 concentrator. The output reports the status of the IPSec negotiation at various stages. Such information is helpful in diagnosing and troubleshooting IPSec session settings. The highlighted text indicates embedded comments that describe the OpenSWAN output. Example 10-17. OpenSWAN Debugs104 "ciscovpn" #1: STATE_MAIN_I1: initiate 003 "ciscovpn" #1: ignoring Vendor ID payload [4048b7d56ebce88525e7de7f00d6c2d3c0000000] 106 "ciscovpn" #1: STATE_MAIN_I2: sent MI2, expecting MR2 003 "ciscovpn" #1: ignoring Vendor ID payload [Cisco-Unity] 003 "ciscovpn" #1: ignoring Vendor ID payload [XAUTH] 003 "ciscovpn" #1: ignoring Vendor ID payload [d54e32e2f67104c8fecf02cd7237addf] 003 "ciscovpn" #1: ignoring Vendor ID payload [1f07f70eaa6514d3b0fa96542a500401] 108 "ciscovpn" #1: STATE_MAIN_I3: sent MI3, expecting MR3 003 "ciscovpn" #1: received Vendor ID payload [Dead Peer Detection] # IPSec phase 1 is established 004 "ciscovpn" #1: STATE_MAIN_I4: ISAKMP SA established 112 "ciscovpn" #2: STATE_QUICK_I1: initiate # IPSec phase 2 is established 004 "ciscovpn" #2: STATE_QUICK_I2: sent QI2, IPSec SA established {ESP=>0x43fbdf31 <0x6267ed2b} |

EAN: 2147483647
Pages: 106