Deploying Syslog Servers
| Consider a typical campus network of an organization consisting of routers, firewalls, VPN concentrators, and switches to interconnect the application servers to the users' workstations. Figure 4-1 shows a scaled-down version of the campus network of one such organization, ABC Investments. Figure 4-1. Campus Network of ABC Investments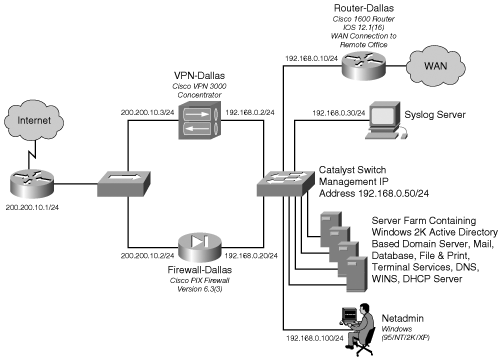 To enable a centralized location to collect all the messages and alerts generated by various Cisco devices, the Netadmin has installed a syslog server. This server should be configured to accept, filter, and store syslog messages generated by the Cisco devices. Figure 4-2 illustrates LAN devices sending syslog messages to a central syslog server (with IP address 192.168.0.30). The following sections cover the step-by-step process of deploying the syslog server based on the choice of operating system. Figure 4-2. Network Devices Sending Syslog Messages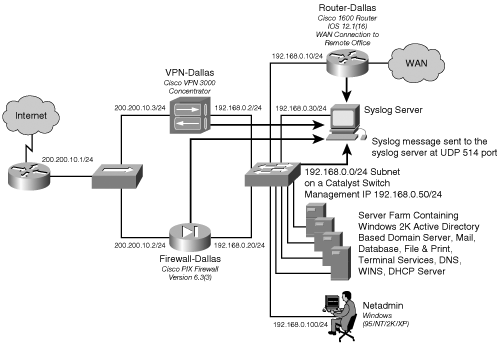 Deploying the Default Syslog DaemonTo collect syslog messages generated by Cisco devices, many Netadmins might prefer to use the default syslog daemon that is included with the Linux operating system. Although it is well integrated with the operating system, the internal syslog server is not enabled for use as a network-based syslog server. To use the syslog daemon as a network-based syslog server, you must configure it through the /etc/syslog.conf file. Additionally, you must enable the syslog daemon to receive syslog messages from the network. Configuring the Syslog DaemonThe /etc/syslog.conf file controls the configuration of the syslog daemon. This file contains the rules for sorting syslog messages. The rules specify the criteria by which to sort syslog messages on the basis of facility and severity levels, and to send them to destination log files. The default contents of the /etc/syslog.conf file are used to log the OS messages and should not be altered. To log messages from Cisco devices, simply append the new rules to the /etc/syslog.conf file. The syntax for specifying a rule is as follows: facility.severity<Tab>destination-file-path To log messages from Cisco devices, the possible values for facility are local0 through local7 and those for severity are debug, info, notice, warning, err, crit, alert, emerg, and none. The keyword none indicates no severity for the given facility. Although abbreviated, the keywords correspond to the severity levels listed in Table 4-2. In addition, recall from Table 4-2 that debug is the highest level of severity. Specifying debug in the /etc/syslog.conf file results in all the messages (from severity debug to emergency) being logged. The use of crit results in logging all messages with a severity of critical, alert, and emergency, thereby excluding the higher levels (error, warning, notice, informational, and debug). To override this default behavior, you can use the special characters described in Table 4-3.
You can create customized rules for sorting and storing various syslog messages based on the options listed in Table 4-3. For example, the following entry sends all the local7 messages to the file /var/log/router.log: local7.debug /var/log/router.log By using the debug severity level, all the messages (from severity debug to emergency) are included. You can add multiple rules to the /etc/syslog.conf file. Depending on the configuration, a message can match multiple rules and hence can be sent to multiple log files. Note Always use the Tab character instead of a space between the severity and destination fields of the /etc/syslog.conf file. Many Linux systems do not work with spaces in the /etc/syslog.conf file. Example 4-1 contains several sample rules to be added to the /etc/syslog.conf file. Example 4-1. Sample Entries for the /etc/syslog.conf File# all message from all facilities will be sent to /var/log/allmessages.log file *.debug /var/log/allmessages.log # # Send all local4 messages to the /var/log/pix.log file # By default Cisco PIX firewall uses local4 facility local4.debug /var/log/pix.log # # Send messages with facility local5 and severity level notice through emergency, # to the /var/log/notice.log file local5.notice /var/log/notice.log # # Only send messages with facility local4 and severity level of info local4.=info /var/log/onlyinfo.log # # Send all messages with facility local4 to the /var/log/errorandbelow.log file, but # exclude messages with severity error, critical, alert and emergency local4.*;local4.!err /var/log/errorandbelow.log # # Send all messages with facility local6 to the /var/log/allexcepterror.log file, and # only exclude messages with severity level err local6.*;local6.!=err /var/log/allexcepterror.log By default, the syslog daemon only accepts local syslog messages. To enable the daemon to accept remote syslog messages, you must run the syslogd process in conjunction with the -r option. In Debian systems, the syslogd process is run through the /etc/init.d/sysklogd file. Using a text editor such as vi, you can edit the contents of the /etc/init.d/sysklogd file, as shown in Example 4-2. Example 4-2. Partial Contents of the /etc/init.d/sysklogd File#! /bin/sh # /etc/init.d/sysklogd: start the system log daemon. PATH=/bin:/usr/bin:/sbin:/usr/sbin pidfile=/var/run/syslogd.pid binpath=/sbin/syslogd test -x $binpath || exit 0 # Options for start/restart the daemons # For remote UDP logging use SYSLOGD="-r" # #SYSLOGD="" SYSLOGD="-r" # ---OUTPUT SUPPRESSED--- Running the Syslog DaemonAfter editing the configuration files, you must restart the syslog daemon. On Debian Linux machines, you can use the init script, as follows: root@linuxbox:~# /etc/init.d/sysklogd restart Restarting system log daemon: syslogd. The syslog daemon is now ready for use as a network syslog server. To verify the operation of the syslog daemon, use the ps command, in conjunction with grep, as follows: root@linuxbox:~# ps -ef | grep syslog root 5750 1 0 19:45 ? 00:00:00 /sbin/syslogd -r To verify that the syslog daemon is listening for remote syslog messages on the default UDP port of 514, use the netstat command, as follows: root@linuxbox:~# netstat -na | grep 514 udp 0 0 0.0.0.0:514 0.0.0.0:* The line entry beginning with udp indicates that the system is listening at UDP port 514. If you make changes in the /etc/syslog.conf file, you can instruct the syslog daemon to reload the file, without restarting the entire syslog daemon, using the kill command, as follows: root@linuxbox:~# kill -HUP `cat /var/run/syslogd.pid` You can also use the kill -1 `cat /var/run/syslog.pid` command to get the same results. To view the syslog messages, you can use the Linux system commands such as cat, tail, and head. For example, to view the last five syslog messages in the /var/log/pix.log file, use the tail -n 5 /var/log/pix.log command, as shown in Example 4-3. Example 4-3. Viewing Syslog Messages Using the tail Commandroot@linuxbox:~# tail -n 5 /var/log/pix.log Apr 16 16:03:01 192.168.0.20 Apr 16 2005 15:37:27: %PIX-7-710002: TCP access permitted from 192.168.0.150/20184 to inside:192.168.0.20/telnet Apr 16 16:03:03 192.168.0.20 Apr 16 2005 15:37:29: %PIX-6-605005: Login permitted from 192.168.0.150/20184 to inside:192.168.0.20/telnet for user "" Apr 16 16:03:07 192.168.0.20 Apr 16 2005 15:37:33: %PIX-7-111009: User 'enable_15' executed cmd: show logging Apr 16 16:04:37 192.168.0.20 Apr 16 2005 15:39:03: %PIX-7-111009: User 'enable_15' executed cmd: show running-config | inc logg Apr 16 16:04:43 192.168.0.20 Apr 16 2005 15:39:09: %PIX-6-302010: 0 in use, 0 most used root@linuxbox:~# To view the messages in real time, use the tail command with -f option. In this case, the command would be tail -f /var/log/pix.log. Deploying a Linux-Based Syslog-ng ServerAs discussed earlier, Linux has a preinstalled syslog server, called Syslogd, that is an integral part of the operating system. However, the Syslogd daemon is older and suffers from the following limitations:
Several open source and commercial projects have tried to develop alternatives to the original syslog daemon. Some of them are Syslog-ng, SDSC Syslog, and Secure Syslog. Of these three, Syslog-ng, by Balazs Scheidler, is the next generation of syslog and offers the following advantages:
Because Syslog-ng offers more options and flexibility to the Netadmin, the following sections discuss the details of deploying a Syslog-ng server. Installing the Syslog-ng DaemonThe steps involved in installing a Syslog-ng daemon on a Linux server are as follows:
The Syslog-ng daemon is now ready for configuration. Example 4-4 shows the commands that are used in the installation process. Example 4-4. Syslog-ng Installation[root@linuxbox]# tar zxvf libol-0.3.14.tar.gz [root@linuxbox]# cd libol-0.3.14/ [root@linuxbox libol-0.3.14]# ./configure [root@linuxbox libol-0.3.14]# make [root@linuxbox libol-0.3.14]# make install [root@linuxbox libol-0.3.14]# cd .. [root@linuxbox]# tar xvfz syslog-ng-1.6.5.tar.gz [root@linuxbox root]# cd syslog-ng-1.6.5 [root@linuxbox syslog-ng-1.6.5]# ./configure [root@linuxbox syslog-ng-1.6.5]# make [root@linuxbox syslog-ng-1.6.5]# make install Note Debian users can avoid all the steps listed in this section and install Syslog-ng by using the apt-get install syslog-ng command. Configuring the Syslog-ng DaemonThe Syslog-ng daemon is configured through the /etc/syslog-ng file. The following five components are used to configure the syslog-ng.conf file:
OptionsSyslog-ng.conf uses the options parameter to define global options for the Syslog-ng daemon. The command syntax is as follows: options { option1(value); option2(value); ... }; Table 4-4 provides a partial list of options.
Example 4-5 shows a sample snippet for the options components of the /etc/syslog-ng.conf file. This code prepares the Syslog-ng daemon to be used as a central syslog server for Cisco devices. Example 4-5. Syslog-ng.conf Options Components options { chain_hostnames(yes); keep_hostname(yes); use_fqdn(yes); use_dns(no) sync(0); }; SourceThe source statement defines one or more source categories used by the Syslog-ng daemon to collect messages. The /etc/syslog-ng.conf file refers to these sources as source-drivers. The command syntax for declaring all the sources is as follows: source identifier { source-driver(params); source-driver(params); ... }; The identifier is a text string that uniquely identifies the source. Table 4-5 provides a partial list of source-drivers.
Note the last two entries in Table 4-5. The UDP and TCP source-drivers enable the Syslogng daemon to act as a central syslog server. These source-drivers instruct the daemon to accept messages through the network. Example 4-6 shows a sample snippet for the source components of the syslog-ng.conf file. The code (with identifier s_cisconetwork) prepares the Syslog-ng daemon to get syslogs sent by Cisco devices through the network at the default UDP port of 514. Example 4-6. Syslog-ng.conf Source Components # source s_cisconetwork will listen on default UDP514 source s_cisconetwork { udp(); }; destinationThe destination statement is used by the daemon to direct the syslog messages after filtering. Similar to sources, destinations use one or more destination-drivers to define message handling. The command syntax for declaring the all the sources is as follows: destination identifier { destination-driver(params); destination-driver(params); ... }; The identifier is a text string that uniquely identifies the destination list. Table 4-6 provides a partial list of destination-drivers.
The first entry in Table 4-6, the file driver, is one of the most important destination-drivers in Syslog-ng. It allows you to include macros to automatically create new files based on the syslog message content. Note that this functionality requires the use of the create_dirs(yes) option in the destination-driver statement. The macros are included by prefixing the macro name with a dollar sign ($) (such as $HOSTS and $LEVEL). For example, the following statement uses the $HOST macro in the file destination-driver: destination hosts { file("/var/log/host/$HOST" create_dirs(yes)); }; This creates a new log file for each of the hosts that sends a network message to this Syslogng daemon. The syslog messages sent by the host Router-Dallas are stored in the log file/var/log/host/router-dallas. If the router-dallas file does not exist, it is automatically created. Table 4-7 provides a complete list of macros that are available for the file destination-driver. As shown in this example, these macros provide highly flexible methods of handling syslog messages. A Netadmin can control the logging of syslog based on the host name, facility, severity, date, and timestamp of the syslog messages generated by Cisco devices.
Tip Instead of grouping by host name, you can also group files by time, such as day, date, or weekday. For example by using the DATE macro, messages are sorted by their date of creation. Consequently, by the end of the year, you will have 365 different files. Additionally, each file will contain messages generated by all the devices on the given day. This chronological grouping of all the messages helps Netadmins to correlate events across multiple devices. The command syntax is as follows: destination hosts { file("/var/log/host/$DATE" create_dirs(yes)); }; Along with using the macros listed in Table 4-7, the file destination-driver also allows the use of local options that override the global options listed in the beginning of the syslogng.conf file. Table 4-8 shows a partial list of these options.
Example 4-7 shows a sample snippet for the destination components of the /etc/syslogng.conf file. This code instructs the Syslog-ng daemon to create separate log files for each host that sends syslog messages. The second part of the code (with the d_cisco_facility identifier) instructs the Syslog-ng daemon to create separate files for each message based on the facility code. The third part of the code (with the d_cisco_severity identifier) instructs the Syslog-ng daemon to create separate files for each message based on the severity code. Example 4-7. Syslog-ng.conf Destination Components destination d_hosts { file("/var/log/HOSTS/$HOST.log" create_dirs(yes)); }; destination d_cisco_facility { file("/var/log/FACILITY/$FACILITY.log" create_dirs(yes)); }; destination d_cisco_severity { file("/var/log/LEVEL/$LEVEL.log" create_dirs(yes)); }; filterThe filter statement is used by Syslog-ng to route the syslog messages. You can use a Boolean expression to allow a message to pass through the filter. The syntax is as follows: filter identifier { expression; }; The identifier is a text string that uniquely identifies the filters in the log statements. An expression can contain parentheses; the Boolean operators AND, OR, and NOT; and any of the functions listed in Table 4-9.
Example 4-8 shows a sample snippet for the filter components of the /etc/syslog-ng.conf file. The first four filter statements sort the messages based on their facility code. For this filter to work as intended, the Netadmin must configure all the routers to use facility at local2, switches at local3, firewall at local4, and VPN concentrators at local5. If the Netadmin needs to catch all messages with severity level error and above, he can use the last filter (with identifier f_errandabove). Example 4-8. Syslog-ng.conf Filter Components filter f_router { facility(local2); }; filter f_switch { facility(local3); }; filter f_firewall { facility(local4); }; filter f_vpnbox { facility(local5); }; filter f_errandabove { level(err..emerg);}; logThe log statement is used to combine the source, filter, and destination components. The syntax is as follows: log { source(s1); source(s2); ... filter(f1); filter(f2); ... destination(d1); destination(d2); ... flags(flag1[, flag2...]); }; Messages coming from any of the listed sources that match the listed filters are sent to all listed destinations. Because log statements are processed in the order they appear in the config file, a single log message might be sent to the same destination several times. This default behavior can be changed by using the flag parameters listed in Table 4-10.
Example 4-9 shows a sample snippet for the log components of the /etc/syslog-ng.conf file. Example 4-9. Syslog-ng.conf Log Components log { source(s_cisconetwork); filter(f_errandabove); destination(d_cisco_severity); }; log { source(s_cisconetwork); filter(f_router); destination(d_cisco_facility); }; log { source(s_cisconetwork); destination(d_hosts); }; The first log statement does the following:
The second log statement does the following:
The third log statement does the following:
Caution Deleting the default statements in the original /etc/syslog-ng.conf is not recommended. To prepare the Syslog-ng daemon as a central syslog server, just add the relevant code snippets in the respective sections of the syslog-ng.conf file. Also, it is good administrative practice to save the original /etc/syslog-ng/syslog-ng.conf file using the following command: linuxbox:~# mv /etc/syslog-ng/syslog-ng.conf /etc/syslog- ng/syslogng.conf.orig Example 4-10 shows the working copy of the /etc/syslog-ng.conf file after editing. The new configuration is highlighted throughout the file. Note that this is the default /etc/syslogng.conf file that is installed with the apt-get install syslog-ng command on a Debian 3.0 stable release. Example 4-10. Edited Copy of the /etc/syslog-ng/syslog-ng.conf File # Syslog-ng configuration file, compatible with default Debian syslogd # installation. Originally written by anonymous (I can't find his name) # Revised, and rewrited by me (SZALAY Attila <sasa@debian.org>) # First, set some global options. #options { long_hostnames(off); sync(0); }; # NOTE THE NEW OPTIONS LIST options { chain_hostnames(yes); keep_hostname(yes); use_fqdn(yes); use_dns(no); sync(0); }; # # This is the default behavior of sysklogd package # Logs may come from unix stream, but not from another machine. # source src { unix-dgram("/dev/log"); internal(); }; # # If you wish to get logs from remote machine you should uncomment # this and comment the above source line. # # source src { unix-dgram("/dev/log"); internal(); udp(); }; # the following source driver will enable listening for network mssg on udp514 source s_cisconetwork {udp(); }; # After that set destinations. # First some standard logfile # destination authlog { file("/var/log/auth.log" owner("root") group("adm") perm(0640)); }; destination syslog { file("/var/log/syslog" owner("root") group("adm") perm(0640)); }; destination cron { file("/var/log/cron.log" owner("root") group("adm") perm(0640)); }; destination daemon { file("/var/log/daemon.log" owner("root") group("adm") perm(0640)); }; destination kern { file("/var/log/kern.log" owner("root") group("adm") perm(0640)); }; destination lpr { file("/var/log/lpr.log" owner("root") group("adm") perm(0640)); }; destination mail { file("/var/log/mail.log" owner("root") group("adm") perm(0640)); }; destination user { file("/var/log/user.log" owner("root") group("adm") perm(0640)); }; destination uucp { file("/var/log/uucp.log" owner("root") group("adm") perm(0640)); }; # This files are the log come from the mail subsystem. # destination mailinfo { file("/var/log/mail.info" owner("root") group("adm") perm(0640)); }; destination mailwarn { file("/var/log/mail.warn" owner("root") group("adm") perm(0640)); }; destination mailerr { file("/var/log/mail.err" owner("root") group("adm") perm(0640)); }; # Logging for INN news system # destination newscrit { file("/var/log/news/news.crit" owner("root") group("adm") perm(0640)); }; destination newserr { file("/var/log/news/news.err" owner("root") group("adm") perm(0640)); }; destination newsnotice { file("/var/log/news/news.notice" owner("root") group("adm") perm(0640)); }; # Some `catch-all' logfiles. # destination debug { file("/var/log/debug" owner("root") group("adm") perm(0640)); }; destination messages { file("/var/log/messages" owner("root") group("adm") perm(0640)); }; # The root's console. # destination console { usertty("root"); }; # Virtual console. # destination console_all { file("/dev/tty8"); }; # The named pipe /dev/xconsole is for the nsole' utility. To use it, # you must invoke nsole' with the -file' option: # # $ xconsole -file /dev/xconsole [...] # destination xconsole { pipe("/dev/xconsole"); }; destination ppp { file("/var/log/ppp.log" owner("root") group("adm") perm(0640)); }; # following destination drivers were added for cisco devices destination d_hosts { file("/var/log/HOSTS/$HOST.log" create_dirs(yes)); }; destination d_cisco_facility { file("/var/log/FACILITY/$FACILITY.log" create_dirs(yes)); }; destination d_cisco_severity { file("/var/log/LEVEL/$LEVEL.log" create_dirs(yes)); }; # Here's come the filter options. With this rules, we can set which # message go where. filter f_authpriv { facility(auth, authpriv); }; filter f_syslog { not facility(auth, authpriv); }; filter f_cron { facility(cron); }; filter f_daemon { facility(daemon); }; filter f_kern { facility(kern); }; filter f_lpr { facility(lpr); }; filter f_mail { facility(mail); }; filter f_user { facility(user); }; filter f_uucp { facility(uucp); }; filter f_news { facility(news); }; filter f_debug { not facility(auth, authpriv, news, mail); }; filter f_messages { level(info .. warn) and not facility(auth, authpriv, cron, daemon, mail, news); }; filter f_emergency { level(emerg); }; filter f_info { level(info); }; filter f_notice { level(notice); }; filter f_warn { level(warn); }; filter f_crit { level(crit); }; filter f_err { level(err); }; filter f_cnews { level(notice, err, crit) and facility(news); }; filter f_cother { level(debug, info, notice, warn) or facility(daemon, mail); }; filter ppp { facility(local2); }; # following filters were added for cisco devices filter f_router { facility(local2); }; filter f_switch { facility(local3); }; filter f_firewall { facility(local4); }; filter f_vpnbox { facility(local5); }; filter f_errandabove { level(err..emerg); }; log { source(src); filter(f_authpriv); destination(authlog); }; log { source(src); filter(f_syslog); destination(syslog); }; #log { source(src); filter(f_cron); destination(cron); }; log { source(src); filter(f_daemon); destination(daemon); }; log { source(src); filter(f_kern); destination(kern); }; log { source(src); filter(f_lpr); destination(lpr); }; log { source(src); filter(f_mail); destination(mail); }; log { source(src); filter(f_user); destination(user); }; log { source(src); filter(f_uucp); destination(uucp); }; log { source(src); filter(f_mail); filter(f_info); destination(mailinfo); }; log { source(src); filter(f_mail); filter(f_warn); destination(mailwarn); }; log { source(src); filter(f_mail); filter(f_err); destination(mailerr); }; log { source(src); filter(f_news); filter(f_crit); destination(newscrit); }; log { source(src); filter(f_news); filter(f_err); destination(newserr); }; log { source(src); filter(f_news); filter(f_notice); destination(newsnotice); }; log { source(src); filter(f_debug); destination(debug); }; log { source(src); filter(f_messages); destination(messages); }; log { source(src); filter(f_emergency); destination(console); }; #log { source(src); filter(f_cnews); destination(console_all); }; #log { source(src); filter(f_cother); destination(console_all); }; log { source(src); filter(f_cnews); destination(xconsole); }; log { source(src); filter(f_cother); destination(xconsole); }; log { source(src); filter(ppp); destination(ppp); }; # following logs were added for cisco devices log { source(s_cisconetwork); filter(f_errandabove); destination(d_cisco_severity); }; log { source(s_cisconetwork); filter(f_router); destination(d_cisco_facility); }; log { source(s_cisconetwork); destination(d_hosts); }; # config ends here Starting the Syslog-ng DaemonAfter configuring the syslog-ng.conf file to deploy a Linux-based central syslog server, you must restart the daemon. The Syslog-ng daemon can be started or stopped using the init script, as follows: /etc/init.d/syslog-ng {start | stop | restart | reload | force-reload} The following example shows the command that restarts the daemon: linuxbox:~# /etc/init.d/syslog-ng restart Viewing the LogsAll the logs are stored in the location defined by the file destination-driver. Use the tail command to view the latest messages added to a particular log file. Examples are as follows: Linuxbox:~# tail /var/log/HOSTS/router-dallas.log Linuxbox:~# tail /var/log/LEVEL/err.log Linuxbox:~# tail /var/log/FACILITY/local2.log Configuring a Windows-Based Syslog ServerThe MS-Windows based servers have a syslog-like feature called the Event Viewer. However, the message format used by the Event Viewer is proprietary to Microsoft and is not compatible with the UNIX syslog. To run a syslog server on MS-Windows machines, you need to install a third-party utility. One of the most popular syslog servers for Windows is Kiwi Syslogd Server. Some of the outstanding features of Kiwi Syslogd Server are as follows:
Deploying a Kiwi Syslog Server consists of following steps:
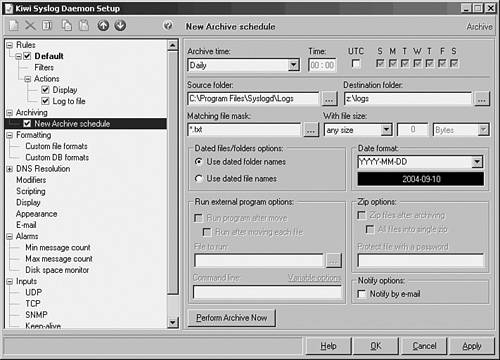
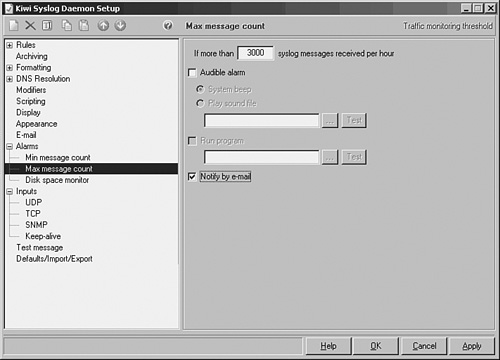
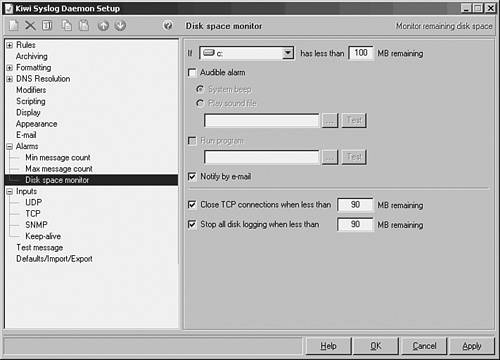
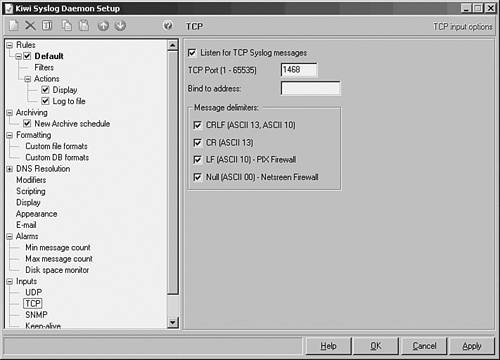
Installing the Syslog ServerDownload and save the service version of the Kiwi Syslog Daemon from http://www.kiwisyslog.com. The service version runs syslog as a service in the background instead of as an application on the desktop. At the time of this writing, the current stable version is 7.14, and the installation filename is Kiwi_Syslogd_Service.exe. Begin the installation process by double-clicking the downloaded file and following the default values when prompted. Configuring the Syslog ServerAfter the installation is complete, follow these steps to configure the Kiwi Syslog Server:
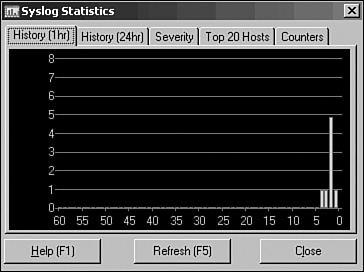
Starting the Syslog ServerStart the Syslog service by choosing Manage > Start the Syslogd service. The status bar briefly displays the message The syslog server has been started. The server is now ready to accept the syslog messages. Viewing Messages on the Syslog ServerTo test the operation of the syslog server, choose File > Send test message to localhost in the Service Manager window. The Service Manager window displays the message shown in Figure 4-10. Figure 4-10. Kiwi Syslog Manager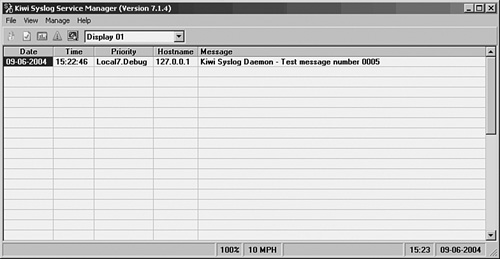 By default, the syslog server saves all logs to the following text file: C:\Program Files\Syslogd\Logs\SyslogCatchAll.txt. To view the logs, open the SyslogCatchAll.txt file in a text editor. Example 4-11 shows the sample content of the SyslogCatchAll.txt file as viewed using Windows Notepad. Example 4-11. Contents of the SyslogCatchAll.txt File2005-04-16 21:50:56 Local7.Notice 192.168.0.10 9071: Apr 16 20:50:57.852 PST: %SYS-5-CONFIG_I: Configured from console by vty0 (192.168.0.150) 2005-04-16 21:50:56 Local7.Notice 192.168.0.10 9072: Apr 16 20:50:58.388 PST: %LINK-5-CHANGED: Interface Loopback0, changed state to administratively down 2005-04-16 21:50:58 Local7.Notice 192.168.0.10 9073: Apr 16 20:50:59.380 PST: %LINEPROTO-5-UPDOWN: Line protocol on Interface Loopback0, changed state to down 2005-04-16 21:51:13 Local4.Debug 192.168.0.20 %PIX-7-710005: UDP request discarded from 192.168.0.151/33375 to inside:192.168.0.255/sunrpc 2005-04-16 21:51:17 Local4.Debug 192.168.0.20 %PIX-7-710005: UDP request discarded from 192.168.0.151/33375 to inside:192.168.0.255/sunrpc 2005-04-16 21:51:22 Local7.Notice 192.168.0.10 9074: Apr 16 20:51:23.588 PST: %SYS-5-CONFIG_I: Configured from console by vty0 (192.168.0.150) 2005-04-16 21:51:23 Local7.Error 192.168.0.10 9075: Apr 16 20:51:24.771 PST: %LINK-3-UPDOWN: Interface Loopback0, changed state to up 2005-04-16 21:51:23 Local7.Notice 192.168.0.10 9076: Apr 16 20:51:25.763 PST: %LINEPROTO-5-UPDOWN: Line protocol on Interface Loopback0, changed state to up 2005-04-16 21:58:12 Local7.Notice 192.168.0.10 9077: .Apr 16 20:58:12.142 PST: %SYS-5-CONFIG_I: Configured from console by vty0 (192.168.0.150) 2005-04-16 21:58:45 Local7.Notice 192.168.0.10 9078: .Apr 17 04:58:45.596 UTC: %SYS-5-CONFIG_I: Configured from console by vty0 (192.168.0.150) 2005-04-16 21:58:49 Local4.Debug 192.168.0.20 %PIX-7-710005: UDP request discarded from 192.168.0.151/33382 to inside:192.168.0.255/sunrpc 2005-04-16 21:58:57 Local4.Debug 192.168.0.20 %PIX-7-710005: UDP request discarded from 192.168.0.151/33382 to inside:192.168.0.255/sunrpc 2005-04-16 21:59:07 Local4.Debug 192.168.0.20 %PIX-7-710005: UDP request discarded from 192.168.0.151/33382 to inside:192.168.0.255/sunrpc 2005-04-16 21:59:09 Local7.Notice 192.168.0.10 9079: .Apr 17 04:59:08.748 UTC: %LINK-5-CHANGED: Interface Loopback0, changed state to administratively down 2005-04-16 21:59:09 Local7.Notice 192.168.0.10 9080: .Apr 17 04:59:09.740 UTC: %LINEPROTO-5-UPDOWN: Line protocol on Interface Loopback0, changed state to down 2005-04-16 21:59:11 Local7.Notice 192.168.0.10 9081: .Apr 17 04:59:11.324 UTC: %SYS-5-CONFIG_I: Configured from console by vty0 (192.168.0.150) 2005-04-16 21:59:13 Local7.Error 192.168.0.10 9082: .Apr 17 04:59:12.998 UTC: %LINK-3-UPDOWN: Interface Loopback0, changed state to up 2005-04-16 21:59:13 Local7.Notice 192.168.0.10 9083: .Apr 17 04:59:13.990 UTC: %LINEPROTO-5-UPDOWN: Line protocol on Interface Loopback0, changed state to up You can also directly open this file in MS-Excel to sort the messages. Moreover, you can choose other file formats for the log files by selecting options on the Log file format drop-down menu in the Kiwi Syslog Daemon Setup window. To navigate to the choices (from the Kiwi Syslog Service Manager window), choose File > Setup to launch the Kiwi Syslog Daemon Setup window. From within this Setup window, navigate to Rules > Default > Actions > Log to file > Log File Format. To view a graphical summary of syslog statistics, choose View > View Syslog Statistics in the Service Manager window. Fig 4-11 shows the 1-hour history report for syslog statistics. Each bar represents the number of messages received during each 1-minute interval. The chart scrolls from right to left, and the rightmost bar (0) indicates the current traffic. Apart from the 1-hour history report, the Syslog Statistics windows also features four other tabs, as shown in Figure 4-11. These tabs are History (24hr), Severity, Top 20 Hosts, and Counters. The History (24hr) tab shows a bar chart of the last 24 hours of traffic and is similar to the 1-hour history window. Figure 4-11. Syslog Statistics The Severity tab lists a summary of messages by priority level. The Top 20 Hosts tab comes in handy for quickly identifying chatty hosts. A large number of messages from a particular host indicates a problem on that device. The Counters tab reports the traffic and error statistics for the syslog server. The Messages - Average counter is handy for setting maximum thresholds for alarm notification. Note Cisco offers the PIX Firewall Syslog Server (PFSS), an MS-Windows based syslog server for Cisco PIX Firewalls. It runs as a service, has no GUI, listens on either UDP or TCP ports, and is controlled through the Windows Services management console. It can also be used as a syslog server for other devices. The syslog messages are stored in the following text file: C:\Program Files\Cisco\PIX Firewall Syslog Server\pfss.log. The PFSS can be downloaded by registered users from the Cisco website. Securing Syslog ServersSo far, you have learned about deploying Linux- and Windows-based syslog servers to collect syslog messages from Cisco devices in a network. However, regardless of the type of operating system or the type of the syslog server, the biggest drawback of the syslog protocol is security. The syslog protocol inherently lacks security for the following reasons:
|


EAN: 2147483647
Pages: 106