Using RADIUS for AAA
| The RADIUS protocol is the de facto standard for implementing centralized authentication, authorization, and accounting by multiple vendors. RADIUS is widely popular across the industry because it is a fully open protocol. A RADIUS server is distributed in source code format and can be modified to work with any security system that is currently on the market. Similar to the TACACS+-based AAA deployment covered in previous sections, the following sections discuss RADIUS deployment. Specifically, the discussion covers deploying a RADIUS Server and configuring RADIUS-based AAA on various Cisco devices. Deploying a Linux-Based RADIUS ServerRADIUS, originally developed by Livingston, was later enhanced by various open source projects. Several of the open source RADIUS products were enterprise grade and are still used by Internet service providers (ISP) around the world. The following is a partial list of the most popular enterprise-grade RADIUS Server products that run in Linux (and other UNIX variants):
Of all these RADIUS Servers, this discussion covers FreeRADIUS because it offers the following advantages:
You must have a Linux machine, with network connectivity, to install the FreeRADIUS server software. After installation, you must edit the configuration text files that control the FreeRADIUS server properties. Following configuration, you can start the server for use within the network. Installing the FreeRADIUS ServerDownload the FreeRADIUS installation files, in compressed tar file format, from the FreeRADIUS home page at http://www.freeradius.org. This discussion is based on the stable release file freeradius-1.0.0.tar.gz. The compressed tar file (represented by the tar.gz extension) contains the installation files for the FreeRADIUS server. To uncompress and install the server, follow these steps:
Note Debian users can use the apt-get install freeradius command to quickly install the FreeRADIUS server. Configuring the FreeRADIUS ServerThe text files located in the default directory (/etc/raddb) control the properties of the FreeRADIUS server. These files are automatically created during the installation process and must be edited before starting the FreeRADIUS server. However, unless specified otherwise, do not delete or remove the default content of these files. Instead, add the newer configuration at the bottom of the existing file. Within each of these text files, every line starting with a hash sign (#) is treated as a comment. Table 3-12 provides a list of relevant files that must be tweaked before deploying the FreeRADIUS server in a Cisco network.
Note In Debian Linux, if the FreeRADIUS server is installed using the apt-get install freeradius command, the default directory of the text files is /etc/freeradius instead of /etc/raddb. However, there is no other impact on the properties of the FreeRADIUS server. The following sections provide more information for each of the files listed in Table 3-12. /etc/raddb/clients.conf FileThe /etc/raddb/client.conf file contains a list of all the RADIUS clients that can query the FreeRADIUS server for AAA requests. The format for adding each RADIUS client is as follows: # CLIENT CONFIG BEGINS client hostname-or-IP-address { secret = encryption-key shortname = hostname nastype = type-of-RADIUS-client } # CLIENT CONFIG ENDS You can specify the client either by host name or IP address. The encryption key for specifying the value of secret should be exactly similar to that specified for the RADIUS Client. The shortname parameter is used to specify an alias for the host, while the nastype is always cisco for Cisco devices. The default /etc/raddb/clients.conf file only contains one entry for the localhost. Each additional client should be appended to the default file. Optionally, you can also specify a network address (for example, 192.168.5.0/24) instead of a single client. The following sample snippet can be appended to the default /etc/raddb/ clients.conf file: # ADD A SINGLE CLIENT client 192.168.0.10 { secret = testing123 shortname = CiscoRouter nastype = cisco } # ADD A NETWORK SUBNET client 192.168.5.0/24 { secret = testing123567 shortname = Brach-office nastype = cisco } # CONFIG ENDS The first entry adds a single client with IP address 192.168.0.10, while the second entry adds all the clients in the 192.168.5.0/24 subnet. /etc/raddb/users FileThe /etc/raddb/users file contains a list of users and their credential information. The format for adding a user in the /etc/raddb/users file is as follows: user Auth-Type := "local-or-system-authentication" Service-Type = Shell-User, Cisco-AVPair = " protocol:attribute sep value" Table 3-13 provides an explanation of each field used to define user credentials in the /etc/ raddb/users file.
Based on the description in Table 3-13, the following code can be added to the /etc/raddb/ users file. This code snippet defines two users, with username spope and jkeith, respectively: spope Auth-Type := System Service-Type = Shell-User, Cisco-AVPair = "shell:priv-lvl=15", Cisco-AVPair = "shell:cmd*" jkeith Auth-Type := Local, Password == "securepassword123" Service-Type = Shell-User, Cisco-AVPair = "shell:priv-lvl=1", Cisco-AVPair = "shell:cmd*" Note that user spope is configured to use the system password, while user jkeith is using the local password securepassword123. For authentication to succeed for the user spope, you must create a user spope using the Linux command adduser. User spope is assigned privilege level of 15, whereas user jkeith has a limited privilege level of 1. Additionally, the statement Cisco-AVPair = "shell:cmd*" exclusively authorizes the use of the command shell for each user. Note The default contents of the /etc/raddb/users file might conflict with the configurations for new users and can lead to unexpected results. In such cases, either insert the new configuration at the beginning of the default file, or better yet, create a fresh /etc/raddb/users file that contains the new configuration only. In the latter case, rename the original /etc/ raddb/users file before creating the new one. /etc/raddb/radiusd.conf FileThe /etc/raddb/radiusd.conf file defines the global configuration for the FreeRADIUS server. The /etc/raddb/radiusd.conf file is a large file, and most of the contents do not need tweaking. However, to use the FreeRADIUS server in a Cisco environment, you must tweak the parameters listed in Table 3-14.
Referring to the parameters listed in Table 3-14, the contents of the /etc/raddb/radiusd.conf file should match the following output: #OUTPUT SUPPRESSED log_auth_badpass = yes log_auth_goodpass = yes #OUTPUT SUPPRESSED unix { #OUTPUT SUPPRESSED passwd = /etc/passwd shadow = /etc/shadow group = /etc/group #OUTPUT SUPPRESSED } #OUTPUT SUPPRESSED preprocess { #OUTPUT SUPPRESSED with_cisco_vsa_hack = no #OUTPUT SUPPRESSED } Caution Exercise caution while editing the radiusd.conf file. You should make a backup copy of this file before making changes. Except for the parameters discussed in this section, do not make changes to this file. Also, do not change the order in which the commands appear within the file. /etc/raddb/dictionary FileA dictionary file contains a list of RADIUS attributes and values for a particular vendor. The /etc/raddb/dictionary file is a master file that references other dictionary files by using the following statement: $INCLUDE /usr/share/freeradius/dictionary For the FreeRADIUS server to include Cisco-specific dictionary files, the /usr/share/ freeradius/dictionary file must contain the following three statements: $INCLUDE dictionary.cisco $INCLUDE dictionary.cisco.vpn3000 $INCLUDE dictionary.cisco.vpn5000 /etc/raddb/acct_users FileBy default, the accounting feature on the FreeRADIUS server is turned off. To enable accounting, you must uncomment the two DEFAULT Acct-Status-Type statements in the / etc/raddb/acct_users file, as follows: # BEFORE ENABLING ACCOUNTING # DEFAULT Acct-Status-Type == Start # DEFAULT Acct-Status-Type == Stop # AFTER ENABLING ACCOUNTING DEFAULT Acct-Status-Type == Start DEFAULT Acct-Status-Type == Stop # END OF CONFIGURATION The RADIUS server records the accounting logs in the /var/log/radius/radacct directory. Running the FreeRADIUS ServerSo far, the discussion has covered the installation and configuration of the Linux-based RADIUS Server to implement access control over Cisco devices. This section prepares you to run and debug the FreeRADIUS server. The command to run the FreeRADIUS server is radiusd. The radiusd command offers various CLI switches that can override the options specified in configuration files. A partial list of options is shown in Table 3-15.
Before starting the FreeRADIUS server, always verify the configuration using the radiusd command with the -c option, as follows: [root@Linuxbox raddb]# radiusd -c Sat Aug 28 11:44:21 2004 : Info: Starting - reading configuration files ... Follow the messages to rectify any errors. To verify that the server is running, use the ps command, as follows: [root@Linuxbox raddb]# ps -ef | grep radius root 20099 1 0 11:44 ? 00:00:00 radiusd -c root 20106 19872 0 11:44 pts/0 00:00:00 grep radius The changes made to the configuration files do not take effect until the FreeRADIUS server is restarted. In such cases, to stop the service, use the kill pid command, where pid is the ID of the server process as identified using the ps -ef command. The command example is as follows: [root@Linuxbox raddb]# kill 20099 After verifying the configuration files, restart the FreeRADIUS server in debug mode. Based on the options listed in Table 3-15, the command for running FreeRADIUS in debug mode is radiusd -xxyz. Using the radiusd -X command produces the same result as the radiusd -xxyz command. After starting in debug mode, test the server by sending authentication requests from a Cisco device. (The configuration of Cisco devices, specifically IOS devices, CatOS switches, and PIX Firewalls, as RADIUS Clients is discussed in later sections of this chapter.) The server displays the transactions to and from the clients that request authentication. The debug messages are helpful in troubleshooting both server and client issues. The output of the radiusd -xxyz command is shown in Example 3-15. Example 3-15. Output of the radiusd Command in Debug Mode [root@linuxbox root]# radiusd -xxyz Starting - reading configuration files ... Using deprecated naslist file. Support for this will go away soon. Module: Loaded exec rlm_exec: Wait=yes but no output defined. Did you mean output=none? Module: Instantiated exec (exec) Module: Loaded expr Module: Instantiated expr (expr) Module: Loaded PAP Module: Instantiated pap (pap) Module: Loaded CHAP Module: Instantiated chap (chap) Module: Loaded MS-CHAP Module: Instantiated mschap (mschap) Module: Loaded System Module: Instantiated unix (unix) Module: Loaded eap rlm_eap: Loaded and initialized type md5 rlm_eap: Loaded and initialized type leap rlm_eap: Loaded and initialized type gtc rlm_eap: Loaded and initialized type mschapv2 Module: Instantiated eap (eap) Module: Loaded preprocess Module: Instantiated preprocess (preprocess) Module: Loaded realm Module: Instantiated realm (suffix) Module: Loaded files Module: Instantiated files (files) Module: Loaded Acct-Unique-Session-Id Module: Instantiated acct_unique (acct_unique) Module: Loaded detail Module: Instantiated detail (detail) Module: Loaded radutmp Module: Instantiated radutmp (radutmp) Initializing the thread pool... Listening on authentication *:1812 Listening on accounting *:1813 Listening on proxy *:1814 Ready to process requests. rad_recv: Access-Request packet from host 192.168.0.10:1645, id=102, length=78 NAS-IP-Address = 192.168.0.10 NAS-Port = 1 NAS-Port-Type = Virtual User-Name = "spope" Calling-Station-Id = "192.168.0.100" User-Password = "something" rlm_unix: [spope]: invalid password rad_recv: Access-Request packet from host 192.168.0.10:1645, id=102, length=78 Sending Access-Reject of id 102 to 192.168.0.10:1645 Cisco-AVPair = "shell:priv-lvl=15" rad_recv: Access-Request packet from host 192.168.0.10:1645, id=103, length=78 NAS-IP-Address = 192.168.0.10 NAS-Port = 1 NAS-Port-Type = Virtual User-Name = "spope" Calling-Station-Id = "192.168.0.100" User-Password="password123" Sending Access-Accept of id 103 to 192.168.0.10:1645 Service-Type = Administrative-User Cisco-AVPair = "shell:priv-lvl=15" rad_recv: Accounting-Request packet from host 192.168.0.10:1646, id=104, length=94 NAS-IP-Address = 192.168.0.10 NAS-Port = 1 NAS-Port-Type = Virtual User-Name = "spope" Calling-Station-Id = "192.168.0.100" Acct-Status-Type = Start Acct-Authentic = RADIUS Service-Type = NAS-Prompt-User Acct-Session-Id = "0000006D" Acct-Delay-Time = 0 Sending Accounting-Response of id 104 to 192.168.0.10:1646 rad_recv: Accounting-Request packet from host 192.168.0.10:1646, id=105, length=106 NAS-IP-Address = 192.168.0.10 NAS-Port = 1 NAS-Port-Type = Virtual User-Name = "spope" Calling-Station-Id = "192.168.0.100" Acct-Status-Type = Stop Acct-Authentic = RADIUS Service-Type = NAS-Prompt-User Acct-Session-Id = "0000006D" Acct-Terminate-Cause = User-Request Acct-Session-Time = 32 Acct-Delay-Time = 0 Sending Accounting-Response of id 105 to 192.168.0.10:1646 Tip If you do not have a Cisco device configured as a RADIUS Client, you can use the radtest command to test authentication on the FreeRADIUS server. The syntax is as follows:
Output from the radtest command is as follows: root@linuxbox:~# radtest spope password123 127.0.0.1 10 testing123 Sending Access-Request of id 84 to 127.0.0.1:1812 User-Name = "spope" User-Password = "password123" NAS-IP-Address = linuxbox NAS-Port = 10 rad_recv: Access-Accept packet from host 127.0.0.1:1812, id=84, length=20 After verifying the configuration and running the server in debug mode, start the FreeRADIUS server by using the radiusd command, as follows: [root@Linuxbox raddb]# radiusd Sat Aug 28 12:25:21 2004 : Info: Starting - reading configuration files ... The server is now ready for deployment. Configuring a Microsoft IAS Server as a RADIUS ServerWithin the realm of access control using a RADIUS Server in a Cisco network, this discussion focuses on the use of a Windows-based Internet Authentication Service (IAS) server. IAS is a built-in RADIUS server within a Windows server. Microsoft Windows 2000 IAS is the Microsoft implementation of a RADIUS Server. IAS is fully compliant with RFC 2138 and RFC 2139. To provide backward-compatibility, IAS uses UDP ports 1812 and 1645 for authentication and UDP ports 1813 and 1646 for accounting. Although an earlier version of IAS was included in the NT 4.0 option pack, a newer version is shipped as part of the Windows 2000 and 2003 servers. Windows 2000 IAS server for RADIUS provides the following advantages to the Netadmin:
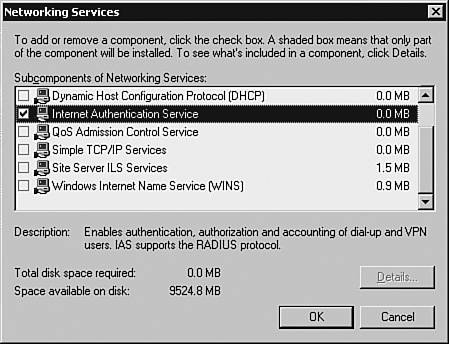
The first step in deploying an IAS server is installing it over a Windows server. Next, you must add RADIUS Clients and configure policies and accounting parameters in the IAS server. Installing the Microsoft IAS-Based RADIUS ServerThe IAS service can be added to any existing Microsoft Windows 2000 or 2003 server as long as enough resources are available to support the installed applications. Follow these steps to install a Microsoft IAS-based RADIUS Server:
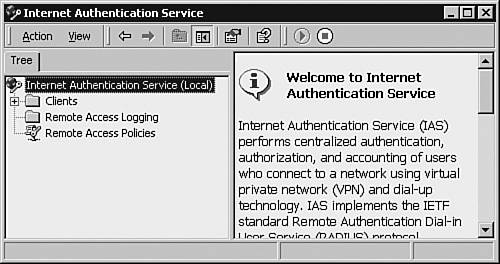
Configuring the Microsoft IAS-Based RADIUS ServerAfter IAS has been added to your Microsoft server, you must configure it. The IAS MMC, as shown in Figure 3-4, is the graphical user interface (GUI) for administration and configuration of IAS services. To open the IAS MMC, choose Start > Programs > Administrative Tools > Internet Authentication Service. Figure 3-4. IAS MMC The configuration of the IAS server can be best described by using the sample scenario shown in Figure 3-5. The Windows server (with host name DALLAS-RADIUS) is running the IAS service and is part of the Active Directory domain IASTEST. The network users and groups are already defined in the MS Active Directory with the group memberships shown in Table 3-16. DALLAS-RADIUS responds to RADIUS queries from the router and firewall. Note that the configuration of Cisco routers, switches, and PIX Firewalls as RADIUS clients is discussed in the following sections of this chapter. Figure 3-5. Network with IAS Server
Note Domain Admins and Domain Users are the default groups created within the MS Active Directory. The groups (Netadmin and Helpdesk) and users (spope and jkeith) were created using the Active Directory Users and Computers MMC snap-in. To open this snap-in in the MMC, choose Start > Programs > Active Directory Users and Computers. The steps involved in configuring the IAS server are as follows:
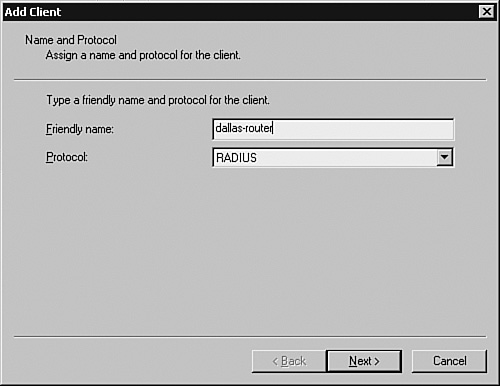
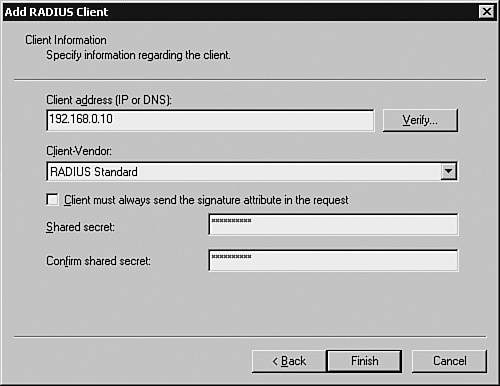
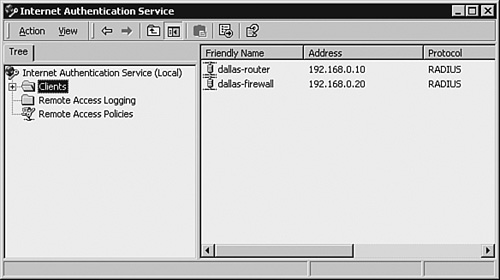
Adding the ClientsThe first task in configuring the IAS server is to add the RADIUS Clients to the IAS server using the IAS MMC. Based on the scenario shown in Figure 3-5, the Cisco network devices (Dallas-Router and Dallas-Firewall) are the clients that would be querying the IAS server for authentication. The steps for adding these RADIUS Clients are as follows:
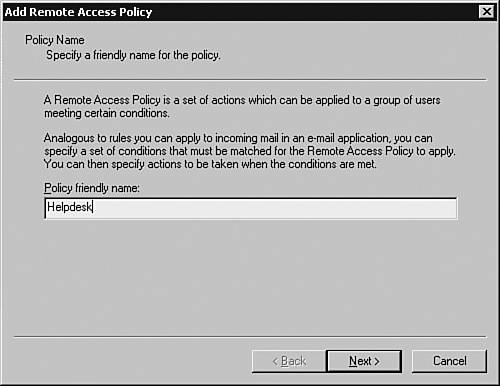
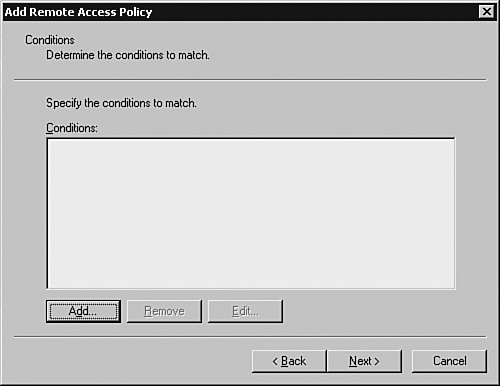
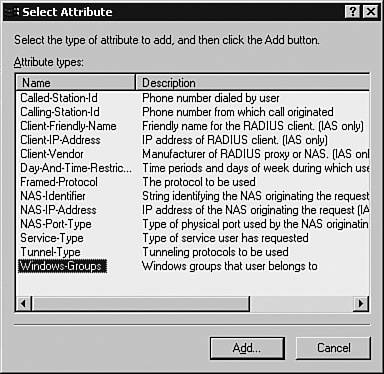
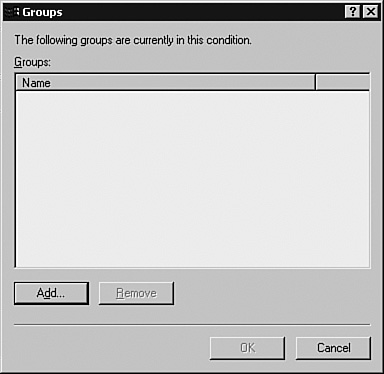
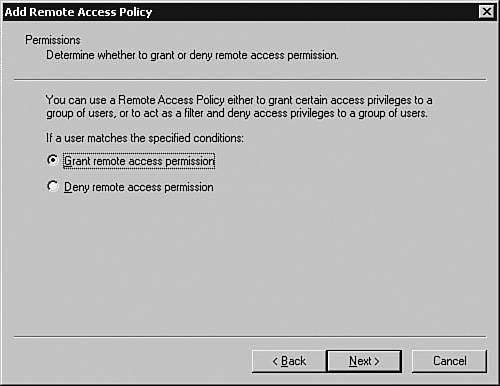
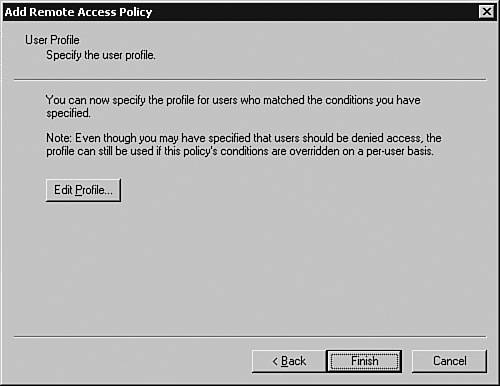
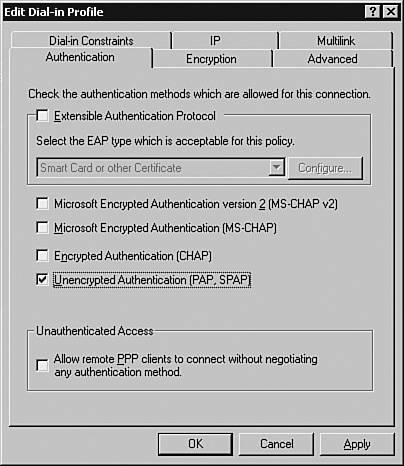
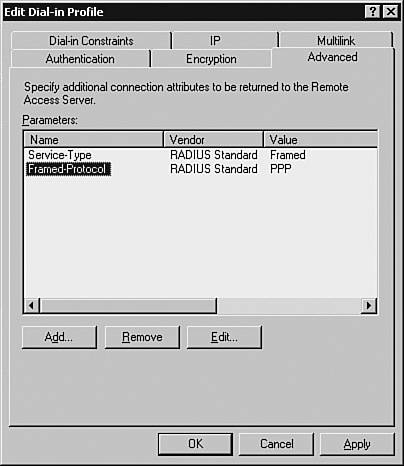
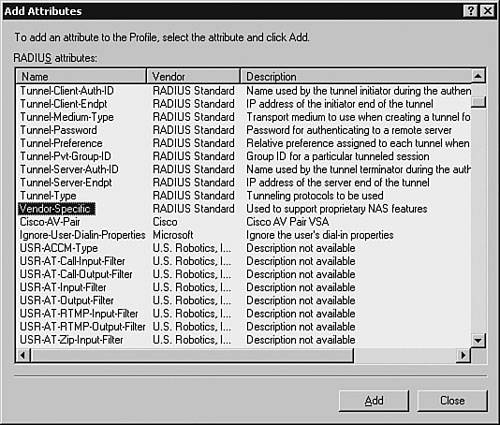
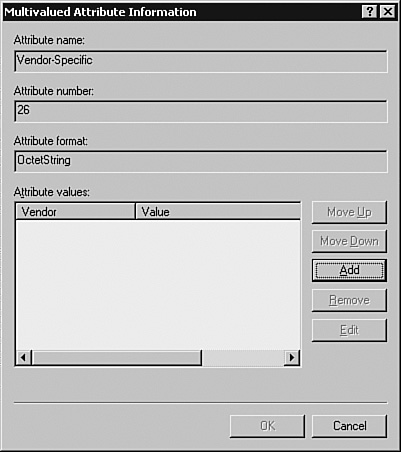
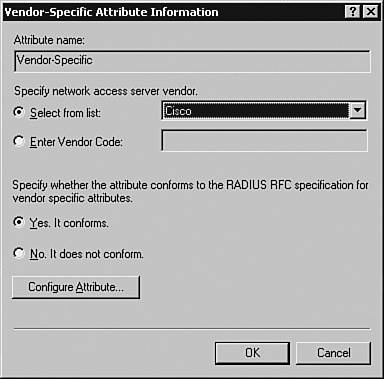
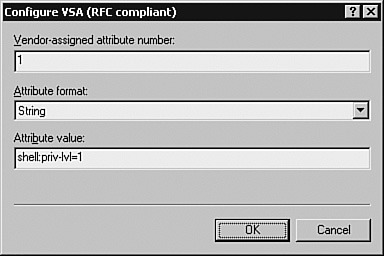
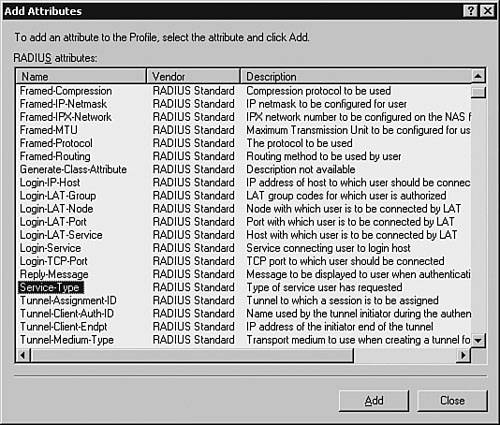
Configuring Remote-Access PoliciesRemote-access policies determine the authentication and authorization permissions to be assigned to the authenticating users. Referring to the scenario shown in Figure 3-5, the two users, spope and jkeith, belong to the groups Netadmin and Helpdesk, respectively. The privilege levels assigned to the groups Netadmin and Helpdesk are 15 and 1, respectively. Consequently, when the members of the Helpdesk Active Directory group log in to the network devices, they would be authenticated using their Active Directory passwords and assigned a privilege level of 1. Similarly, the Netadmin group would be assigned privilege level 15. To implement such a scenario, you must create two remote-access policies, one each for Helpdesk and Netadmin. Follow these steps to create the policies:
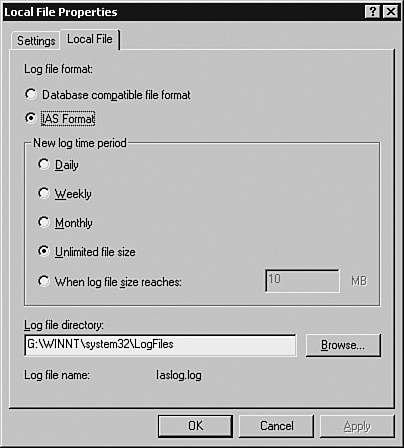
Configuring Accounting ParametersThe accounting parameters are configured through the Remote Access Logging window. The default location of the logs is the %WINDOWS%/system32/Logfiles directory. To view or change the default accounting parameters through the IAS MMC, select the Remote Access Logging option and choose Local File > Properties to open the Local File Properties window, as shown in Figure 3-24. Figure 3-24. Local File Properties As shown in Figure 3-24, by default, the New log time period section is set to the Unlimited file size option. This results in a single log file that can grow considerably. For ease of administration, you should limit the log file either by size or by frequency. For example, choosing the Monthly option creates a new log file every month. Always restart the IAS server after making any changes. To restart, choose Start > Run. Enter services.msc and click the OK button. Right-click the Internet Authentication Service option and choose Restart. The Systems section of the Windows Event Viewer provides helpful information for troubleshooting an IAS server. For authentication issues related to a particular user, verify the user's membership. Note In the MS Active Directory, the Remote Access Permission option for a new user is, by default, set to Deny access. This setting prevents the user from logging in to a networking device. You must manually change this setting to Allow access. To make this change, right-click the user in the Active Directory User and Computers snap-in and choose Properties. In the Properties window, select the Dial-in tab and choose Allow access in the Remote Access Permission (Dial-in or VPN) section. Click the OK button to save the settings. The Microsoft IAS RADIUS server is now ready to provide AAA services to Cisco clients. Configuring a Cisco Router for RADIUSThe steps involved in configuring a Cisco IOS-based routers for RADIUS-based AAA are almost identical to those of TACACS+-based AAA. However, RADIUS-based AAA requires an additional step of defining the UDP ports numbers to be used by the IOS devices to communicate with the RADIUS Server. This step is required to avoid incompatibility issues arising because of differences in the versions of RADIUS. Some RADIUS vendors are using the old UDP ports of 1812 and 1813 for authentication and accounting, respectively, while others are using UDP 1645 and 1646. The global-configuration-mode command for specifying a RADIUS Server, UDP ports, and the encryption key on an IOS device is as follows:
Use the auth-port and acct-port options, respectively, to specify the UDP port for authentication and accounting. Example 3-16 shows the configuration of an IOS device configured as a AAA Client using RADIUS. The RADIUS Server is configured with following parameters:
Example 3-16. IOS Device with RADIUS-Based AAA ConfigurationDallas-Router# show running-config Building configuration... ! version 12.1 hostname Dallas-Router ! aaa new-model authentication login default group radius local enable authorization exec default group radius local none authorization commands 0 default group radius local none authorization commands 1 default group radius local none authorization commands 15 default group radius local none accounting exec default start-stop group radius accounting commands 0 default start-stop group radius accounting commands 1 default start-stop group radius accounting commands 15 default start-stop group radius enable password 7 03075218050070 ! username admin privilege 15 password 0 s3curepassword ! interface Ethernet0 ip address 192.168.0.10 255.255.255.0 ! interface Serial0 ip address 172.16.2.2 255.255.255.252 ! ip classless ip route 0.0.0.0 0.0.0.0 192.168.0.20 !This entry is for using Linux FreeRADIUS server radius-server host 192.168.0.30 auth-port 1812 acct-port 1813 key testing123 ! This entry is for using MS-IAS based RADIUS server radius-server host 192.168.0.40 auth-port 1812 acct-port 1813 key testing123 radius-server retransmit 3 ! line con 0 line vty 0 2 password 7 030752180500 line vty 3 4 password 7 13061E010803 ! end Configuring a Cisco Switch for RADIUSThe configuration steps involved in enabling RADIUS on CatOS-based switches are similar to those for TACACS+. However, RADIUS lacks authorization on CatOS. No command exists to enable RADIUS exec authorization. The workaround is to set the Service-Type (RADIUS attribute 6) to Administrative (a value of 6) in the RADIUS Server to place the user in enable mode. If the Service-type is set for anything other than Administrative (for example, 1-login, 7-shell, or 2-framed), the user arrives at the switch exec prompt, not the enable prompt. Example 3-17 shows the configuration of the switch as a AAA Client using RADIUS. Example 3-17. Cisco Switch Configuration for RADIUS-Based AAAset radius server 192.168.0.30 set radius key testing123 set authentication login radius enable set authentication enable radius enable set accounting exec enable start-stop radius Configuring Cisco PIX Firewalls for RADIUSJust as in IOS and CatOS, the commands used to configure RADIUS-based AAA on PIX Firewalls are similar to those used for TACACS+. However, an additional step is involved, that is, to specify the port numbers used by RADIUS. Table 3-17 lists the commands involved in configuring RADIUS-based authentication on PIX.
Based on these commands, Example 3-18 shows the configuration of the PIX Firewall for authentication. The RADIUS Server details are grouped under the tag MYAAA and are then applied to authenticate access to the firewall console through Telnet and the serial interface. Example 3-18. Configuring PIX for Authenticationc:\windows\system32> telnet 192.168.0.20 User Access Verification Password: Type help or '?' for a list of available commands. Firewall-Dallas> enable Password: Dallas-Firewall# conf t Dallas-Firewall(config)# aaa-server MYAAA protocol radius Dallas-Firewall(config)# aaa-server MYAAA (inside) host 192.168.0.30 testing123 Dallas-Firewall(config)# aaa-server radius-authport 1812 Dallas-Firewall(config)# aaa-server radius-acctport 1813 Dallas-Firewall(config)# aaa authentication telnet console MYAAA Dallas-Firewall(config)# aaa authentication ssh console MYAAA Dallas-Firewall(config)# exit The PIX Firewall is now ready to be accessed using the username and password defined in the RADIUS Server. Caution Unlike the IOS AAA feature set, PIX does not offer local authentication as a fallback feature in the same aaa authentication statement. Hence, it is good administrative practice to configure the serial console of the PIX for local authentication. This avoids denial to the serial console because of problems with the AAA server or misconfigurations. The suggested configuration to enable local authentication on the PIX serial console is as follows: username admin password somepassword privilege 15 username helpdesk password someothepassword privilege 1 aaa-server LOCAL protocol local aaa authentication serial console LOCAL |


EAN: 2147483647
Pages: 106
- Integration Strategies and Tactics for Information Technology Governance
- Measuring and Managing E-Business Initiatives Through the Balanced Scorecard
- Measuring ROI in E-Commerce Applications: Analysis to Action
- Technical Issues Related to IT Governance Tactics: Product Metrics, Measurements and Process Control
- Managing IT Functions