Basic Configuration After Installation
After the installation, you should verify the basic operation of SQL Server. SQL Server 2000 is mostly self-configuring. Many options are available for fine-tuning the configuration, but these are necessary for specialized purposes only. I'll discuss configuration in detail in Chapter 17. Initially, you should leave the default configuration alone unless you have a particular reason to change it.
Starting the SQL Server Service
After a successful installation, start SQL Server. The most common way to do this is to use the SQL Server Service Manager. From the Start menu, choose Programs, Microsoft SQL Server, and then Service Manager. The installation program also puts the SQL Server Service Manager in the startup group for the operating system, so after you reboot your machine, an icon for the SQL Server Service Manager will appear on the taskbar, in the corner near the clock. You can also use the Services applet in Windows NT and Windows 2000. In Windows NT, you can get to the applet from Control Panel. In Windows 2000, you choose Programs/Administrative Tools/Services from the Start menu. From the Microsoft Management Console, you can then find the service name for any SQL Server instance in the right pane. You can use SQL Enterprise Manager to start a SQL Server instance, or you can issue a NET START MSSQLSERVER command from a Windows NT or Windows 2000 console (command prompt). If you're starting a named instance, you must supply the instance name. You can also configure any instance of SQL Server to start automatically, either by using the Services applet or by editing the properties of SQL Server in Enterprise Manager.
After SQL Server is running, you can use one of the most basic applications, SQL Query Analyzer, to make sure that you can connect. Initially, the only available SQL Server login name (sa) has a null password, so you can leave sa in the Login Name text box and leave the Password text box blank. Or you can choose the Windows Authentication option so that no login name or password is required. Then you change your database to the pubs sample database, and run a couple of simple queries (for example, SELECT * FROM authors ORDER BY au_lname) to make sure that SQL Server is running correctly.
Changing the System Administrator Password
During installation, you are given the option of setting up Windows Authentication Mode only or using Mixed Mode security. If you choose Mixed Mode security, you are asked to specify a password for the SQL Server login sa. If you want the password to be blank, you must specify this by using a check box, and the installation screen lets you know that this is not recommended. If you did choose a blank password during installation, after you verify that SQL Server is running and responding to queries, you should change the password for the sa account. From the Query Analyzer, use sp_password to change the sa password. Be sure to pick a password you'll remember, because by design there is no way to read a password (it is stored in encrypted form)—it can only be changed to something else.
Using Query Analyzer from the master database to change the password to Banks_14, you'd issue the following command:
sp_password NULL, 'Banks_14', sa
Using Enterprise Manager, you can change the password from the server's Security folder. Choose Logins, and then double-click sa in the right pane.
Note that the actual password is stored in a table as SQL Server data. So if you've chosen a case-sensitive sort order, passwords will also be case sensitive and must be entered exactly as defined.
SQL Enterprise Manager vs. SQL Statements
You can do nearly any task with SQL Server by directly executing SQL Server statements (including stored procedure calls) using tools such as SQL Query Analyzer. However, in some cases it is simpler to use Enterprise Manager, which provides a front end for these commands and frees you from needing to know exact steps and syntax. Administrators who are proficient with Microsoft Visual Basic for Applications (VBA) might choose to use simple VBA scripts that use the SQL Server database administration object model, known as SQL-DMO (SQL Distributed Management Objects), or the Windows Management Instrumentation (WMI) interface.Since this book is geared toward database developers and administrators, I'll typically show the SQL statements and stored procedures that are used to accomplish a task and simply reference the easier methods. I'll also tell you what to do without providing step-by-step directions. You can consult the SQL Server documentation for the exact syntax of all options. This book is meant to complement, but not replace, the product documentation.
Configuring SQL Server's Error Log
A new error log is created each time the SQL Server service is started. If you want to start a new error log without stopping and restarting SQL Server, you can use the sp_cycle_errorlog system stored procedure. Keep in mind that the new error log created when you execute this procedure will not contain all the normal boot messages that are put in the error log when SQL Server starts up. You'll have to refer to an older copy of the error log to see these messages. However, if you execute sp_cycle_errorlog too many times, you might not have any copies that contain the boot messages. By default, SQL Server retains copies of the previous six error logs and gives the most recent copy (prior to the currently active error log) the extension .1, the second most recent copy the extension .2, and so on. The current error log has no extension. You can change the number of error logs maintained by editing the Registry for any instance. For the default instance, find the key HKEY_LOCAL_MACHINE\SOFTWARE\Microsoft\MSSQLServer\MSSQLServer and edit it by adding a new value. Define the value with the name NumErrorLogs, and the type REG_DWORD. Supply any initial value desired, but keep in mind that the value you enter when editing the Registry will be in hexadecimal format.
For a named instance, you need to find the key HKEY_LOCAL_MACHINE\SOFTWARE\Microsoft\Microsoft SQL Server\<SQL Server Instance Name>\MSSQLServer. Again, use the Edit feature of the Registry to add a new value with the name NumErrorLogs of type REG_DWORD, and supply an initial value in hexadecimal format.
Working with Multiple Instances
As mentioned earlier, in order to connect to a named instance, you must specify both the server name and the instance name. To use the OSQL command line utility to connect to an instance named SQL2000, you use this command:
osql /U sa /S KALESSIN\SQL2000
SQL Server 2000 includes a property function called SERVERPROPERTY that allows you to programmatically find out information about your SQL Server instance. SQL Server Books Online lists all the parameters of the function, but the ones relevant to multiple instances are InstanceName, MachineName, and ServerName. I can run the following three commands:
SELECT SERVERPROPERTY('InstanceName') SELECT SERVERPROPERTY('MachineName') SELECT SERVERPROPERTY('ServerName') On my machine called RAKAM, with my instance named SQL2000, I get the following results:
SQL2000 RAKAM RAKAM\SQL2000
Other parameters of SERVERPROPERTY allow you to determine which licensing mode you're running under, what service pack you're using, and what the operating system process ID is. The latter can be very important if you need to access one instance through the Windows Task Manager. The process image name will be sqlservr.exe for all instances, but the column labeled PID (process ID) will allow you to distinguish between multiple instances.
As mentioned earlier, each SQL Server instance has its own path for the executable program files and its own default location of data files. If you have more than a couple of instances, it can become quite a chore to remember the location of each instance. Fortunately, there is a tool in the Windows NT 4 Resource Kit and the Windows 2000 Support Tools that can help you. You need to know the name of the Registry key where the information about each instance is stored, but if you know that, you can use the utility called reg.exe to find out the file paths used. To find the program file path for a named instance, you can type the following in a command window, all on a single line:
REG QUERY "HKLM\Software\Microsoft\Microsoft SQL Server\<InstanceName>\ Setup\SQLPath"
To find the default data file path, change SQLPath at the end of the key name to SQLDataRoot:
REG QUERY "HKLM\Software\Microsoft\Microsoft SQL Server\<InstanceName>\ Setup\SQLDataRoot"
The old DB-Library API doesn't work with named instances because the code that looks for your server name does not recognize the Servername\InstanceName specification. Microsoft has been saying for years that DB-Library will not continue to be supported, and now they're showing us that they meant it. This means that you cannot use the ISQL command line tool to connect to a named instance. At least, by default you cannot connect, but as is frequently the case, there's a way around it. For those of you who refuse to give up your DB-Library, you can use the Client Network Utility to alias your named instance to a one-part server name that ISQL will recognize. When specifying the properties of this alias, you must specify the TCP port number. If this instance has its port number dynamically determined, you can check the box that says to dynamically determine the port for the alias as well, as shown in Figure 4-4.
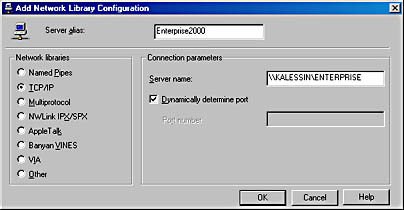
Figure 4-4. Using the Client Network Utility to alias a named instance of SQL Server.
EAN: 2147483647
Pages: 179