Creating a Report Programmatically
Now that I have shown you all the reasons for not programmatically creating reports, let me show you how to do it on the off chance that you may need to do it for a project.
We are going to look at this in stages.
Creating an Empty Report
Access has a method of the Application object for creating an empty report: CreateReport. As the name implies, it creates an empty report with a page header, Detail section, and page footer. It is not attached to any database table and contains no controls. However, it is the first stage for programmatically building a report. It will also assign the report the default name of Report1, Report2, Report3, and so on.
In the following code, we set a variable as type Report, call the CreateReport method, and then save the results:
Sub NewReport() Dim rpt As Report Set rpt = createReport DoCmd.Close , , acSaveYes End Sub
If you were to run this method, it would create the report. Then the DoCmd.Close call would save the report. As stated a moment ago, a default name is assigned. Figure 13-19 shows the results. If you opened Report1 in Design View, you would see something like Figure 13-20.

Figure 13-19: Report object Report1
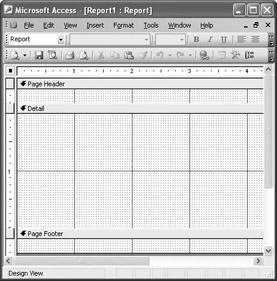
Figure 13-20: Report1 in Design View
You can modify the previous code to allow the user to create his or her own name, as follows:
Sub NewReport() Dim rpt As Report Dim strReportName As String strReportName = InputBox("Enter the report name", "Report Name") Set rpt = CreateReport DoCmd.Save , strReportName DoCmd.Close , , acSaveYes End Sub If you were to go ahead and run this method, you would get the input box shown here:
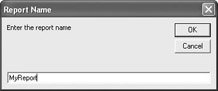
In this example I used MyReport as the name. Figure 13-21 shows that it was added as a report object to the database.
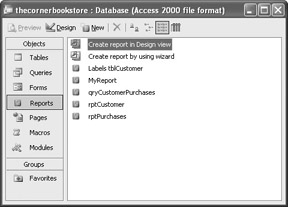
Figure 13-21: Report objects with MyReport added
Adding Controls to the Report
To add controls to the report, you use another method of the Application object called CreateControlReport. In this example, we are going to create a simple report in order to show how to add controls using this method.
We will do this in stages so that you understand each step of the process. Let’s start by adding variables to handle the report’s labels and textboxes, and a variable for handling width:
Sub NewReport() Dim rpt As Report Dim strReportName As String Dim txtReportColumns As Access.TextBox Dim lblReportLabel As Access.Label Dim intWidth As Integer
The next thing to do is to set up the SQL for the record source:
strReportName = InputBox("Enter the report name", "Report Name") Set rpt = CreateReport rpt.RecordSource = "SELECT * FROM tblCustomer" You could use any of the SQL concepts discussed in previous chapters.
We now need to add the controls to the report. We will add the column headings to the page header and the bound controls to the Detail section. While using ADO, the Detail section is the default section.
It is strongly suggested that you set the size of your Detail section. If you don’t, the spacing between records could be abnormally large. VBA uses a measurement unit called a TWIP. One inch equals 1440 TWIPS.
To set the Detail section to be about a quarter of an inch, add the following code:
rpt.Section("Detail").Height = 350 Now we want to add the txtCustNumber column to the Detail section of the report with the following code:
Set txtReportColumns = CreateReportControl(rpt.Name, acTextBox, _ , , "txtCustNumber")
Again, it is not necessary to indicate that you want this in the Detail section, because that is where the default placement is.
Let’s now add a header for the customer number. We will put it in the page header, make it bold, and set the width and height:
Set lblReportLabel = CreateReportControl(rpt.Name, acLabel, _ acPageHeader) lblReportLabel.Name = "lblCustNumber" lblReportLabel.Caption = "Customer Number" lblReportLabel.Width = 2000 lblReportLabel.Height = 300 lblReportLabel.FontBold = True
Notice that you need to set the width and height because the default setting is 0.
We are now going to repeat the process for the Last Name column. The only difference is that we are going to adjust the position by an additional 3000 TWIPs:
Set txtReportColumns = CreateReportControl(rpt.Name, acTextBox, _ , , "txtCustLastName", 3000)
Likewise, you can use the same techniques to add a column heading with the following code:
Set lblReportLabel = CreateReportControl(rpt.Name, acLabel, _ acPageHeader, , ,3000) lblReportLabel.Name = "lblLastName" lblReportLabel.Caption = "Last Name" lblReportLabel.Width = 2000 lblReportLabel.Height = 300 lblReportLabel.FontBold = True
You can repeat the process for the First Name as follows:
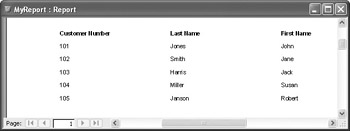
Set txtReportColumns = CreateReportControl(rpt.Name, acTextBox, _ , , "txtCustFirstName", 6000) Set lblReportLabel = CreateReportControl(rpt.Name, acLabel, _ acPageHeader, , , 6000) lblReportLabel.Name = "lblFirstName" lblReportLabel.Caption = "First Name" lblReportLabel.Width = 2000 lblReportLabel.Height = 300 lblReportLabel.FontBold = True DoCmd.Save , strReportName DoCmd.Close , , acSaveYes DoCmd.OpenReport strReportName, acViewPreview End Sub
If you were to run the report, either programmatically or within Access, you would see a result that looks something like this:
EAN: 2147483647
Pages: 214