Chapter 12: Forms
Most database applications focus around forms, to edit or add data, and reports, for the presentation of the data. The forms serve as the interface between the user and the data. For that reason, a discussion of form design is essential to a discussion of VBA programming in the Microsoft Access environment.
In this chapter we are going to examine forms and their controls. You’ll learn how ADO builds the recordsets that the forms use and how forms handle a one-to-many relationship with just a few simple settings in Access. You will also see how VBA can interact with the controls on the forms.
Forms and Data
Building a form in Access has never been a particularly difficult job. You have an AutoForm button and, for fancier forms, a Form Wizard. As a matter of fact, if you click once on the tblCustomer icon, located under table objects in the Database window, and select AutoForm from the toolbar, you will have a form that looks something like Figure 12-1.
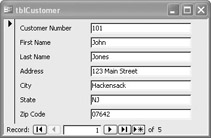
Figure 12-1: A simple form built with AutoForm
As you can see, the form has fields for each of the columns of the tblCustomer table object and a nice set of navigation buttons at the bottom. Since this form is connected to the table object tblCustomer, we say that it is bound to the tblCustomer and that each field on the form is bound to the columns in the table.
The fields in the form will also take on the properties of the columns in the table. This offers a certain measure of type safety and data validation. You can, for instance, only input numeric data into controls bound to numeric columns, and data input into controls bound to date fields must contain valid dates.
You can also base a form on a query so that each time you open the form, the query will run. Beginning with Access 2002, if the record source of the form has a one-to-many relationship, AutoForm will automatically build a subform. As an example, if you have Access 2002 or Access 2003, let’s use the Database window and go to Tools | Relationships. We will use the tblCustomer and tblPurchases table objects.
Draw a line establishing a relationship between txtCustNumber in tblCustomer and txtNumber in tblPurchases. You should see a dialog box in which you can select Referential Integrity, as shown in Figure 12-2. (I have turned the options on in the figure.)
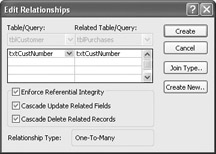
Figure 12-2: Edit Relationships dialog box
Referential Integrity assures that you do not have a customer number appearing on the many side, tblPurchases, that was not first entered on the one side, tblCustomer. If you permitted that, you would probably lose the whole purpose behind having a relational database. Without it, the database would probably turn into a useless mess quickly. A record appearing on the many side that does not have a parent record on the one side is called an orphan.
You also want to use the two Cascade options that are shown in Figure 12-2. That way, if you change or delete a customer number in tblCustomer, all the records in tblPurchases related to that customer number will subsequently be changed or deleted.
You can select Create, then save and close the Relationships window. If you now click on tblCustomer, and use the AutoForm, it should look like Figure 12-3. The outer form is tblCustomer, and the inner form holds the related records of tblPurchases. Each has its own navigation bars.
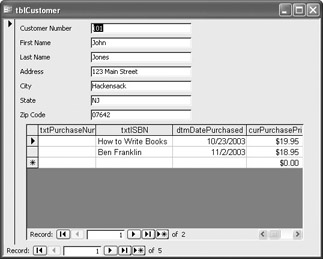
Figure 12-3: Form/subform using AutoForm
| Note | This feature of AutoForm is available in Access 2002 or 2003. If you have Access 2000, this can also be done, just not automatically. |
Access allows you to base forms on either tables or queries. However, beginning with Access 2000, you can build SQL statements and recordsets directly into the form structure. As an example, let’s switch the form we just created and saw in Figure 12-1 to Design View. Once there, select View | Properties. The resulting dialog box, with the All tab selected, is shown in Figure 12-4. You can see that the Record Source is tblCustomer.
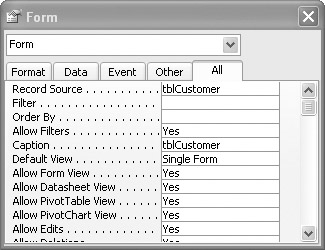
Figure 12-4: Form properties
You could easily select a different source from the drop-down list. However, for this example, let’s click on the Query Builder button (with the three ellipses) located to the right of the Record Source field. You should get the following message box:
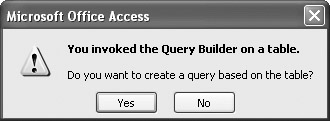
If you select Yes, you are taken to familiar territory: the query grid that you have used so many times already.
Let’s assume that you want this form to see only the records for customers who live in New Jersey. As you have done in the past, set it up with all of the fields, and set the criteria for the txtState column to be NJ, as shown in Figure 12-5.
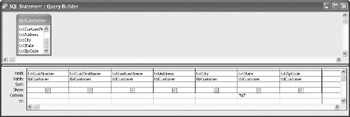
Figure 12-5: Query Builder grid
If you then go to close this grid, you are presented with a message box that asks if you want to apply this to the Record Source of the form. After selecting Yes, the Record Source of the form now contains a SQL string, as Figure 12-6 shows. The entire string appears as follows:
SELECT tblCustomer.txtCustNumber, tblCustomer.txtCustFirstName, tblCustomer.txtCustLastName, tblCustomer.txtAddress, tblCustomer.txtCity, tblCustomer.txtState, tblCustomer.txtZipCode FROM tblCustomer WHERE (((tblCustomer.txtState)="NJ"));
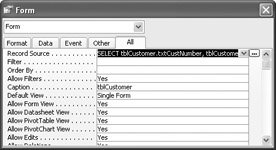
Figure 12-6: The form’s property box with SQL string
If you now run the form, it should only bring up records for customers in New Jersey.
It is this feature, combined with the DoCmd object, that is going to make forms easy to work with in VBA.
Let’s assume we saved the example form object as frmCustomer and that our database is now located in C:\BegVBA. You can write the following code in VBA to use the form:
Sub runForm() Dim con As ADODB.Connection Set con = New ADODB.Connection con.Open "Provider=Microsoft.Jet.OLEDB.4.0;" & _ "Data Source=C:\BegVBA\thecornerbookstore.mdb;" DoCmd.OpenForm "frmCustomer" End Sub
After opening the database connection, as you have done in the previous chapters, you use the OpenForm method of the DoCmd object and specify the string that is the name of the form.
| Note | When you run this procedure, the form may open in a different window, to which you will need to switch. |
All of the SQL is already built into the form’s structure, and based on the query that you built earlier, you should only see the records where txtState = “NJ”.
You may find it easier, especially if you have a lot of coding and the form’s name is longer, to assign the name of the form to a string variable and use that in lieu of the full form name.
EAN: 2147483647
Pages: 214