Flylib.com

Books Software


The Debug, Edit, and UserForm Toolbars


The Debug, Edit, and UserForm Toolbars

In addition to the menu commands, you will be using several toolbars in your work. Besides the Standard toolbar, the Debug, Edit, and UserForm toolbars will be referred to throughout the rest of this book. Let’s take a look at them here.

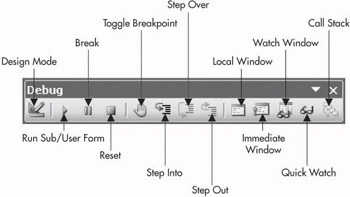
The Debug toolbar, of course, is used in debugging: It contains one-click shortcuts for all of the items on the Run menu, as well as selected items on the Debug and View menus .

click to expand

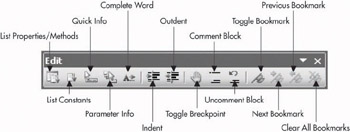
The Edit toolbar provides tools for editing code. Its buttons duplicate options found mostly on the Edit menu, like List Properties/Methods, Indent, and Outdent. In addition, it contains a Toggle Breakpoint button, which is also found on the Debug menu. Finally, it has a Comment Block button to comment out lines of code so that they do not execute, and an Uncomment Block button to remove comments from lines of code so that they do execute. These two buttons have no menu equivalent:

click to expand

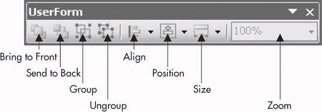
You use the UserForm toolbar to create a GUI object to facilitate the end user’s interaction with the system: It contains buttons to order, group , and align objects on user forms.

click to expand


The Project Explorer

You can quickly get to various files and modules in your VBA project using the Project Explorer window. Figure 7-3 shows the Project Explorer window with its buttons .

  • The View Code button opens the code for a selected object if it isn’t already open .

  • The View Object button opens the selected object in Access.

  • The Toggle Folders button switches the Project Explorer’s display between the objects grouped by their classification type and the objects in alphabetical order without regard to their type.

    click to expand
    Figure 7-3: Project Explorer window

In Folder view (grouped by classification), you can open and close the folders by clicking on the [+] and [-] just to the left of the folder. As stated earlier, you will see all of the files associated with your project; including the modules, documents, forms, and reports .


Managing Modules

There are a variety of ways to manage your modules in the VBA Editor.  The following sections cover inserting and deleting, and importing and exporting modules.

Inserting and Deleting a Module

A new module can be created from within the Project Explorer by selecting the project name , which is usually the first item in the hierarchy, and clicking the right mouse button. From the menu that appears, you select Insert and the type of module (Module or Class Module) you want to insert. This is shown in Figure 7-4.

click to expand
Figure 7-4: Insert a module

You can also select the command from the Insert menu or select the second button on the Standard toolbar, as shown here:

click to expand

If you use the Insert button on the Standard toolbar, you can click on the down arrow immediately to the right of the button to select either a Module or a Class Module.

You delete a module by first selecting it in the Project Explorer and right-clicking. Once in the menu, select Remove (module name):

When you select the Remove command, you will have the option of saving, or exporting, the module to an external file:

You can also access the deleting and exporting feature by selecting the File menu option.

Importing and Exporting Modules

In computer terminology, the word “ persisting ” means saving something after the computer is turned off. In a VBA project, you would save a module as part of a project. As a matter of fact, if you make changes to the code in the module and close the VBA Editor, you will not be prompted to save the changes. However, if you then close Access itself, it will prompt you to save whatever module you made the changes to.

Saving the module with the project is certainly handy. However, what happens if you want to use the module in another project? Or if you want to send it to someone else to use?

The VBA Editor gives you the option of exporting or importing the module. You can access this option by either right-clicking on the module name in the Project Explorer, or selecting File Export File. Class modules are assigned a file extension of .cls, while modules are assigned a file extension of .bas.

Note 

Exporting the module does not affect the original in the project. It just creates a copy of it in an external text file.

Likewise, we can import a module from an external text file into a project by either selecting File Import File or right-clicking on the project name in the Project Explorer window. This will make the module from an external location part of the project.

As stated earlier, this feature offers two important benefits:

  • The ability to back up your work to a remote location

  • The ability to reuse modules in other projects, thus not having to retype code where needed