Chapter 4: Customizing theAccess Environment
As stated in Chapter 3, it is a good idea to do as much as possible in Microsoft Access without programming. This will greatly reduce potential problems and bugs. In Chapter 3, we examined a few techniques that will help you achieve that end.
In this chapter, we are going to focus on some customization techniques that you can use in Access. We will look at the command bars and how to manipulate and customize them, and I’ll show you how to create customized ones. We will be doing many of the same things to shortcut menus: building and manipulating these menus. Most importantly, you will learn a lot of the terminology that will be necessary for you to use VBA to accomplish the same tasks.
Interacting with Access
As a user, you interact with most programs through the use of menus and toolbars. Both menu bars and toolbars come under the broad category of command bars. Figure 4-1 shows a typical Access menu.
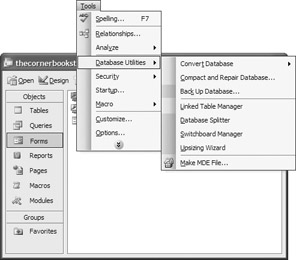
Figure 4-1: A typical Access menu
Each item on the menu, such as Spelling, Relationships, and so on, is a menu command. When necessary, the menu command will branch into a submenu. These are indicated by the right-pointing arrows next to some menu commands.
In some cases, Microsoft Office products have shortcut menus that can be activated when you right-click over a certain part of the screen. These shortcut menus are context sensitive depending on what task is going on and where you right-click on the screen.
Another important command bar is the toolbar. Toolbars are icon representations of many of the menu commands. For example, the toolbar that opens when you start the program is called the Database toolbar. This has icon representations of the commands File | New, File | Open, File | Save, and so on. You can see the other toolbars by selecting View | Toolbars.
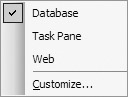
The toolbars that are available on the menu will vary depending on what tasks you are performing. If you are in the Database window, the Database toolbar will be available, as shown here.
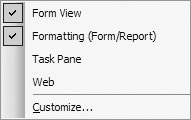
However, in a form, you will have access to the Form View toolbar and the Formatting (Form/Report) toolbar, as shown here.
You can use the View | Toolbars menu to switch toolbars on and off. It is worth spending some time examining the toolbars that are available for each task that you do.
Most of the time, you leave the command bars docked. This means they are in a fixed position on the screen (usually along the top). On the left side of the toolbar, you usually have a move handle to reposition the toolbar wherever it is needed.
The following illustration shows a command bar moved with the mouse pointer over the move handle. The command bar can be easily redocked by double-clicking on its title bar. Using these techniques, you can place the command bars where you want them on the screen.
![]()
Two toolbars are always available, no matter what task you are performing. One is the Task pane, shown here.
The other is the Web toolbar, shown here.
![]()
Customizing a Command Bar
You can see a complete list of all the toolbars available by selecting View | Toolbars | Customize, as seen in Figure 4-2.
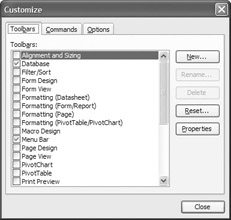
Figure 4-2: You can customize your toolbars.
Here you can customize a toolbar, delete a customized toolbar, or reset an existing toolbar to its default settings. The toolbars with a check to the left are being displayed at the moment.
While you are in the Customize dialog box, you can select a button on a displayed toolbar and remove it from the toolbar by simply dragging it off. If you want to put a new button on the toolbar, you first select the Commands tab in the Customize dialog box, as shown in Figure 4-3.
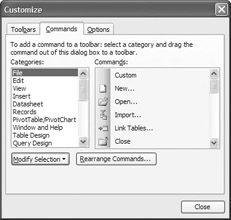
Figure 4-3: Adding a button to a toolbar
Select the general type of command button you want in the Categories list on the left, and then drag the specific command button from the list on the right onto the toolbar. If there is no corresponding icon, the command bar will just hold the text.
You may have noticed that in most of the Office programs, the menus come up in a partial format. Microsoft is taking a guess as to what you want to do. As your mouse has the menu open, it expands after a few seconds to show all the menu options.
Some people do not like that option. If you want to shut it off, go to the Options tab in the Customize dialog box and check the Always Show Full Menus option, as shown in Figure 4-4.
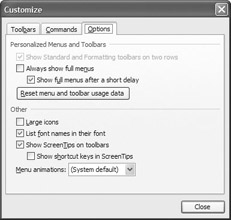
Figure 4-4: Customizing your options
You can also customize a toolbar by selecting the down arrow located at the right end of the bar. If you’re working with the Database toolbar, for example, you can click the arrow and then select Add or Remove Buttons | Database. You should see the button list shown in Figure 4-5.
Figure 4-5: Add or Remove Buttons
To change the properties of the buttons themselves, you must use the Customize dialog box. You can change the icon, colors, name, and many other properties. As an interesting example, with the Customize box open, right-click on the Paste icon on the Database toolbar. You should see the following menu:
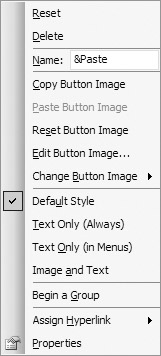
Notice that you can change the name associated with a button. For instance, &Paste means the name Paste with the P underscored. (Note that the underscore appears anywhere there is the “&” symbol.)
If you select the Text Only (Always) option, the icon will appear as text:
![]()
Go ahead and turn it back to an icon by selecting the Default Style option.
You can also set the button image and colors. It is worth your time to explore some of the options available. Of particular interest is the Assign Hyperlink option, which opens the dialog box shown in Figure 4-6. Here you can assign the button a link to a file, web page, or even an email address. This will come in handy when you build a customized toolbar.

Figure 4-6: The Assign Hyperlink: Open dialog box
Creating a Customized Toolbar
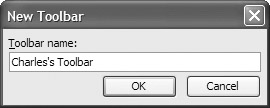
To create a new toolbar, with the Customize dialog box open and the Toolbars tab selected, select New. Here you can name your new toolbar:
Once you select OK, you get an empty toolbar. You can then switch to the Commands tab and drag the buttons that you want onto the bar. Once that is done, you can use all of the options discussed throughout this chapter to do any sort of customization you want.
You can delete the customized toolbar by selecting it in the Customize dialog box and selecting the Delete button on the right side of the box.
EAN: 2147483647
Pages: 214