Connecting with Other Microsoft Office Products
In order to connect with Word, Excel, and Outlook, you need to create a reference to them. Open Tools | References, as shown in Figure 17-2.
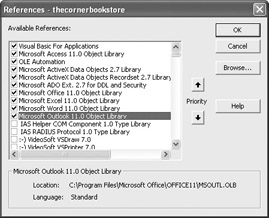
Figure 17-2: The References dialog box
Notice that there are references for
-
Microsoft Office 11.0 Object Library
-
Microsoft Excel 11.0 Object Library
-
Microsoft Word 11.0 Object Library
-
Microsoft Outlook 11.0 Object Library
All of these need to be activated, and then select OK.
For data access between Access and the other Office applications, Office relies on a set of ISAM drivers. Up to this point, the only drivers we have been using are those connected with an ODBC database. However, these drivers are made available in order to connect with non-ODBC sources such as Word or Excel. There are even third-party ISAM drivers to connect with other non-Microsoft programs. As an example, Borland has ISAM drivers that allow you to connect Paradox with Word or Excel.
The syntax for various ISAM drivers may vary a bit depending on the driver. Even within the Microsoft Office environment you will see some variations. For that reason, you will see some variations in syntax between connections with Outlook, Word, and Excel. As you work through the various examples, the differences will be obvious. In most cases, you can use the syntax verbatim in your projects.
There is one common factor, however: in the background, you are not actually working within Word, Excel, and Outlook. You are actually going to create new instances, or objects, of the application. You will see variations on two function calls: CreateObject and GetObject. Why do you need to do this? If you did not have this capability, you would need to have the application open in order to work with it. However, by creating an object, the application can be open or closed. As you look at the following code examples, you will see this.
Connecting with Excel
In my experience, the connection between Access and Excel is the most common. It is not unusual to use data from both sources within a project.
Many times, you may want to create your recordset from an Excel spreadsheet rather than from an Access table. The implications of this are enormous. Now you can handle data within Access from another source and treat it, in essence, the same way. As you will see, it is not that much different from opening an internal Access table.
Included with the download for this chapter’s files is a worksheet called myCustomers.xls. I will assume you put it in a directory called BegVBA. Each of the column headers will serve as a field name.
One thing, while not essential, is highly recommended: you should give the dataset on the Excel sheet a range name. In our sheet, I called it “customers.”
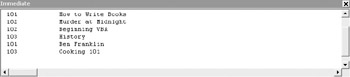
Here is a simple example that will open the Excel worksheet, myCustomers.xls, create a recordset with the data in the sheet, and then print it in the Immediate window.
Sub openWorksheet() Dim con1 As New ADODB.Connection Dim rec1 As ADODB.Recordset con1.Open "Provider=Microsoft.Jet.OLEDB.4.0;" & _ "Data Source=C:\BegVBA\myCustomers.xls;" & _ "Extended Properties=Excel 8.0;" Set rec1 = New ADODB.Recordset rec1.Open "customers", con1, , , adCmdTable Do Until rec1.EOF Debug.Print rec1("txtNumber"), rec1("txtBookPurchased") rec1.MoveNext Loop End Sub As I stated at the beginning of this section, there are variations in syntax of the ISAM drivers with Word, Excel, and Outlook. In this one, there are three arguments separated by a semicolon. The first argument is the provider, which, in this case, is Microsoft.Jet.OLEDB.4.0. The second is the data source. The final argument extends the Excel 8.0 engine to include the ISAM driver. Excel versions 97 through 2003 use the 8.0 engine.
As stated at the outset, it is easier to use the worksheet if you use a range name in the worksheet. While you could indicate the range manually, any changes to the sheet could easily cause the data to fall out of that range.
Beyond that, everything is quite the same as if you had opened it in Access, with the result in the Immediate window, as shown here:
As we have in the past, we could also set a variable and perform calculations. However, the results of the calculation cannot be written back to the worksheet. The recordset is, by default, read only.
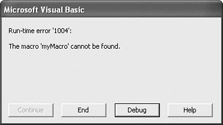
You can also use the GetObject method discussed earlier. This will allow you to actually run a macro in an Excel worksheet. While open, you can treat it as if you had opened the actual application. Let’s look at an example. (Note: This code is for example purposes; you will need to create the Excel macro first.)
Sub runWorkbook() Dim myWorkBook As Excel.Workbook Set myWorkBook = GetObject("c:\BegVba\myCustomers.xls") myWorkBook.Application.Run "myMacro" End Sub. If, for some reason, Access cannot find the Excel macro, you will get the following error message:
After the macro has done its job, you can save and close the workbook with the following code:
myWorkBook.Application.Activeworkbook.Save myWorkBook.Application.Quit
Connecting with Outlook
As you may know, Outlook has a number of folders in which it stores various categories of information. It has folders for calendars, deleted items, emails, contacts, and so on. In addition, you can create custom folders to suit any need. You can use VBA to access information contained within these folders.
| Note | The code in this section assumes that you are working with the standard Outlook folders. If there is any sort of customization (such as creating your own work folders and putting them in your own directories), you will need to make the appropriate adjustments to the code. In addition, I strongly suggest that you back up your Outlook folders before attempting to test this code. It could change your live data. |
When working with the folders, you would first need to create a library to hold the folder information. This library is referred to as a namespace. All the information is then sent to that namespace where the individual items can be referenced.
Let’s look at the following code example for clarity.
Sub myAddressBook() Dim myOutlook As Outlook.Application Dim myInformation As Namespace Dim mycontacts As Items Dim myItems As ContactItem Set myOutlook = CreateObject("Outlook.Application") Set myInformation = myOutlook.GetNamespace("MAPI") Set mycontacts = myInformation.GetDefaultFolder(olFolderContacts).Items For Each myItems In mycontacts Debug.Print myItems.FirstName, myItems.LastName, myItems.Email1Address Next End Sub You first reference a new instance of an Outlook object, which is called myOutlook. Then set up the namespace, or library, to hold the information. This is called myInformation. However, like any library, the information is not just tossed in there randomly. It needs a record. In this case, the record is an Item called myContacts. And then, within the Item, you put the details of the contact with the ContactItem. This is where you list the individual fields of the contact.
VBA uses a namespace protocol called MAPI. VBA then uses the GetDefaultFolder method to locate the contacts folder (called olFolderContacts) and then retrieve the Items within that folder. If you use customized folders, you need to define them here and not use the GetDefaultFolder method.
The final part just prints out the information in the Immediate window.
The thing to remember is that we created an instance of Outlook, as we did with Excel earlier, and used it to retrieve information.
With just a slight modification, you could add a contact through VBA. We will use the method CreateItem():
Sub AddAContact() Dim myOutlook As Outlook.Application Dim myItems As ContactItem Set myOutlook = CreateObject("Outlook.Application") Set myItems = myOutlook.CreateItem(olContactItem) With myItems .FirstName = "John" .LastName = "Smith" .Email1Address = "johnsmith@smith.com" .Save End With End Sub If you were to look at your contacts now, you should see the record for John Smith. Of course, you could have gotten elaborate and created input forms in order to type the information in.
Deleting a record is a little more involved. You have to enter criteria for deleting and then loop through all the records to see if they meet that criteria. However, as you will see in the following code, it is still just a variation on what we have been doing:
Sub DeleteaContact() Dim myOutlook As Outlook.Application Dim myInformation As Namespace Dim myContacts As Items Dim myItems As ContactItem Set myOutlook = CreateObject("Outlook.Application") Set myInformation = myOutlook.GetNamespace("MAPI") Set myContacts = myInformation.GetDefaultFolder(olFolderContacts).Items For Each myItems In myContacts If myItems.Email1Address = "johnsmith@smith.com" Then myItems.Delete End If Next End Sub As you can see, this is just a slight variation of the code using the .Delete method for the ContactItem.
Again, once VBA has accessed the data, it can easily be manipulated and used as necessary.
Connecting with Word
Because of Microsoft Word’s ability to open and merge with Access data, the need to use VBA is limited. In many cases, using a macro within Word and then calling it up, as shown in the Excel section, will do the trick quite nicely. However, let’s take a look at a few techniques should the occasion arise to use them.
Let’s take a look at printing a form letter using the data from an Access table. To clear up a misconception, you would not use VBA to create the form letter, but just to create the link to the data. The form letter itself would need to be created in Word using standard mail-merge techniques before running VBA.
Sub MailmergeLetter() Dim myLetter As Document Documents.Open FileName:="C:\BegVBA\myFormLetter.doc" Set myLetter = Documents("myFormLetter.doc") myLetter.MailMerge.OpenDataSource _ Name:="C:\BegVBA\thecornerbookstore.mdb", _ Connection:="TABLE tblCustomer" End Sub The process is pretty straightforward. With the ISAM driver, you open the document and, within the document, open the data source. Within the data source, you specify the table to be connected to.
If you wanted to, you could specify that you want the document merged to a new document and use only records 1 to 3, as follows:
Sub MailmergeLetter() Dim myLetter As Document Documents.Open FileName:="C:\BegVBA\myFormLetter.doc" Set myLetter = Documents("myFormLetter.doc") myLetter.MailMerge.OpenDataSource _ Name:="C:\BegVBA\thecornerbookstore.mdb", _ Connection:="TABLE tblCustomer" With myLetter.MailMerge .Destination = wdSendToNewDocument With .DataSource .FirstRecord = 1 .LastRecord = 3 End With .Execute End With End Sub Notice in this that we had to issue the .Execute command. If you did not issue that, you would end up with the dataset from the previous merge. The .Execute triggers the new merge with the new parameters.
EAN: 2147483647
Pages: 214