Most home video tapes have several sessions on them, recorded at different times for different events. Roxio Media Import provides an extremely useful tool to help you capture each session individually. Instead of having to import the entire tape or cue up each individual session, you can use the Smart scan feature to scan the tape and identify each session for you, creating thumbnails for each one. You can then choose which sessions to import.
The following steps describe how to import individual recording sessions from a digital camcorder using Roxio Media Import.
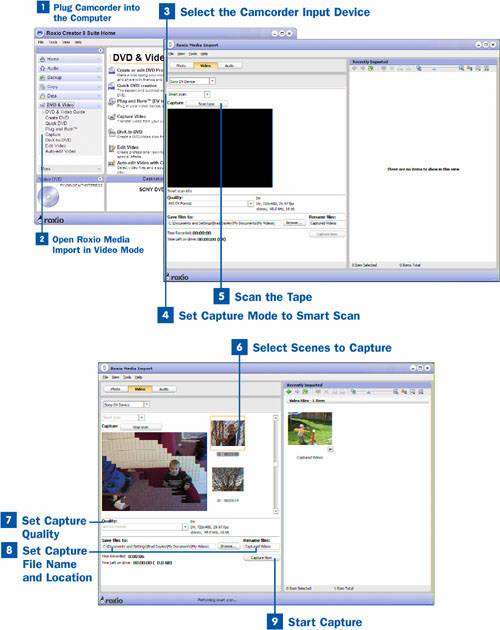
 Plug Camcorder into the Computer
The first step in capturing video from your camcorder is to attach the camcorder to the computer using a FireWire or USB cable. After the camcorder is plugged into the computer, turn it on and it should be recognized by the system as a new device.
 Open Roxio Media Import in Video Mode
After the camcorder has been attached to the computer, you can start Roxio Media Import in one of two ways, depending on which is easiest for you. If you have the Roxio Home page up, simply click on Video and then select Capture from the DVD & Video submenu. You can also open Roxio Media Import by selecting Programs, Roxio Easy Media Creator 8, DVD and Video, Media Import from the Start menu in Windows.
 Select the Camcorder Input Device
From Roxio Media Import, select the camcorder from the device drop-down menu.
 Set Capture Mode to Smart Scan
After you have selected the camcorder, the camcorder capture controls appear. Set the capture mode to Smart scan in the Capture mode drop-down list.
 Scan the Tape
After you set the Capture mode to Smart scan, you see the Scan tape button. Click the Scan tape button and your camcorder is rewound to the beginning and scanned for scenes. This process takes several minutes.
 Select Scenes to Capture
After the scenes have been detected, you see thumbnails showing the first frame of the scene. Select the thumbnails you want to capture by clicking on them while holding down the Control key.
 Set Capture Quality
After you have selected the scenes to capture, set the quality for your captured video. You can capture either at AVI DV or MPEG-2.
The advantage of using the MPEG-2 format is that the size of the captured video file is significantly smaller. If you are going to view the files on the computer or send them via email, use the MPEG-2 format.
The advantage of using the AVI DV format is that the quality is better. Unless you are pressed for storage space, it is always best to capture and edit in the highest quality possible; each time your editing program has to convert and compress your video, you lose quality. If you plan to use the video to make a movie and export it to a DVD, use the AVI DV format.
 Set Capture File Name and Location
Video files are extremely large and take a lot of time to copy from one hard disk to another. Set the destination location in the Save files to box to the location in which you want to keep the captured file permanently, so you do not have to take the time to move the file from one location to another.
After you have set the destination location, set the prefix you want to use for the captured files in the Rename files text box. The captured file names will begin with that prefix and end in a number. For example, if you are capturing using the AVI DV format and specify MyVideo for the prefix, the captured files would be named MyVideo001.avi, MyVideo002.avi, and so on.
 Start Capture
After the destination and prefix has been set, click the Capture Now button to capture the scenes.
Note
You must have the date and time set properly on your camcorder for Smart scan to work. The date and time must also be embedded into the tape you are trying to scan.