The first task in editing your video or burning it to disc is to capture it. A few camcorders record directly to a DVD, and compact hard disks are also available that connect to DV camcorders and record video as it is shot, but most digital camcorders record to a miniDV tape. Using a FireWire cable to connect your digital camcorder to your computer, you can easily download your video and edit it into a fun-to-watch production.
Plug the camcorder into a power supply to save battery life.
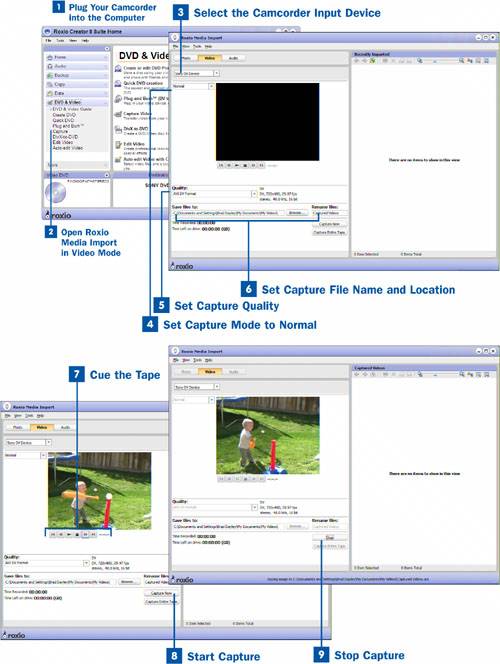
 Plug Your Camcorder into the Computer
The first step in capturing video from your camcorder is to attach the camcorder to the computer using a FireWire or USB cable. After the camcorder is plugged into the computer, turn it on. It should be recognized by the system as a new device.
 Open Roxio Media Import in Video Mode
After the camcorder has been attached to the computer, you can start Roxio Media Import in one of two ways, depending on which is easiest for you. If you have the Easy Media Creator Home page up, simply click on Video and then select Capture from the DVD & Video submenu. You can also open Roxio Media Import by selecting Programs, Roxio Easy Media Creator 8, DVD and Video, Media Import from the Start menu in Windows.
 Select the Camcorder Input Device
From Roxio Media Import, select the camcorder from the device drop-down menu.
 Set Capture Mode to Normal
After you have selected the camcorder, the camcorder capture controls appear. Set the capture mode to Normal in the Capture mode drop-down list.
 Set Capture Quality
After you have set the Capture mode, set the quality for your captured video. You can capture either at AVI DV or MPEG-2.
The advantage of using the MPEG-2 format is that the size of the captured video file is significantly smaller. If you are going to view the files on the computer or send them via email, use the MPEG-2 format.
Key Term
MPEG-2 The video file format used for DVD videos. This file format is more compressed than the AVI DV formats and therefore slightly inferior.
The advantage of using the AVI DV format is that the quality is better. Unless you are pressed for storage space, it is always best to capture and edit in the highest quality possible; each time your editing program has to convert and compress your video, you lose quality. If you plan to use the video to make a movie and export it to a DVD, use the AVI DV format.
Key Term
AVI DV The largest and highest quality video file format. Captured on a MiniDV tape as a DV file and imported into the computer as an AVI file.
 Set Capture File Name and Location
Video files are extremely large and take a lot of time to copy from one hard disk to another. Set the destination location in the Save files to box to the location in which you want to keep the captured file permanently, so you do not have to take the time to move the file from one location to another.
Tip
Save the captured files to a drive other than C: if you are planning to use the video file in VideoWave or another editor. Most editors use the C: drive to store temporary files when they are rendering or doing other intensive tasks. Having the video files on a different drive improves performance and speeds up rendering times.
After you have set the destination location, set the prefix you want to use for the captured files in the Rename files text box. The captured file names will begin with that prefix and end in a number. For example, if you are capturing using the AVI DV format and specify MyVideo for the prefix, the captured files would be named MyVideo001.avi, MyVideo002.avi, and so on.
 Cue the Tape
After you have set the destination location and the captured filename prefix, you need to cue the tape before capturing the video. You can cue the tape by using the controls on the camcorder itself or by using the controls on the capture screen of Roxio Media Import.
 Start Capture
When the tape is cued, click the Capture Now button to begin capturing video.
Tip
When using the Normal mode, the camcorder automatically starts and stops when you start and stop the capture.
 Stop Capture
When you have captured as much video as you want, click the Stop button.