Computer Extensible Policies
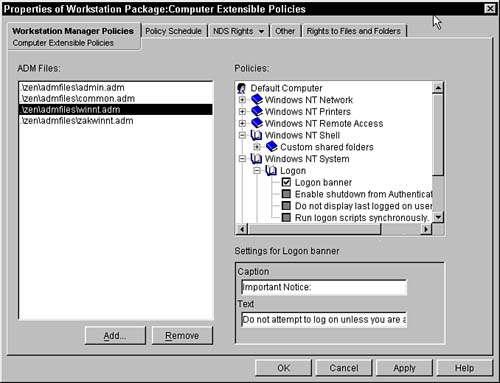
Microsoft requires that software packages that bear the Windows approved logo be capable of being configured through .POL files. The poledit program enables you to edit these extensible policies and include them in the system .POL file. ZENworks also enables the policies that are stored in eDirectory to accept these additional extensible polices and provide them to all of the users who are associated with these policies. The User Extensible policy enables you to import these special .ADM files into the eDirectory tree and administer and disperse them to the users associated with the policy package. Once these .ADM files have been imported into the tree, they can be administrated and associated to users in the eDirectory tree. These settings are applied like the User System Policies. The NDS Rights, Other, and Rights to Files and Folders pages are described in the "Setting Up a Workstation Policy Package" section. Computer Extensible Policies PageWhen you first bring up the Computer Extensible Policies page, you are presented with the Computer Extensible Policies page. An example of this page is displayed in Figure 9.5. Figure 9.5. Computer Extensible Policies page of the User Extensible Policies policy.
This page is split into three areas: ADM files, Policies, Policy specific window in the bottom-right corner. The files in the ADM file list are the policies that are applied to the users associated with this policy. To add a policy file to the list, simply press the Add button. You are presented with a file dialog box where you can browse and select the file. Remember that this file should reside on the server, as it is stored there for retrieval by the policy managers. When you browse and select a file, make sure it is on the server, and that the drive that you use is mapped correctly for all users who are associated with the policy. You can enter a UNC path in the filename field of the dialog box and thereby get a UNC path for the ADM file; however, if you browse and then select, the program puts a drive letter into the path, thus necessitating that each user have the same drive mapping. When this policy is initialized, four .ADM files are automatically pulled in by the plug-in into ConsoleOne. These include ADMIN.ADM, COMMON.ADM, WINNT.ADM, and ZAKWINNT.ADM. Each of these files is stored in the ConsoleOne\1.2\bin\zen\admfiles directory and they are considered the default packages. NOTE Other .ADM files are available depending on which version of Windows you are running on your workstation. For example, Windows 2000 clients also include SYSTEM.ADM; there is an INETRES.ADM file for restricting Internet Explorer. NOTE The .ADM file must be stored on a server on which users have access. The policy references the .ADM file and needs to retrieve it to apply it to the users and to enable the administrators to modify the settings. It's recommended, therefore, that you use a UNC path to specify the location of the file. You delete the .ADM file from the applied set by selecting the file and pressing the Remove button. You can also modify the settings of the .ADM files by selecting the file in the ADM files windows. When you select the file, its Registry content is displayed in the Policies window. The user interface for this window mimics the poledit program available from Microsoft. The small window underneath the Policies box displays information about the selected Registry setting along with any subsetting categories. Double-click the key in the policies window to populate this details field. You can browse through the ADM files and turn them on, turn them off, or leave them as set in the Registry as you can in the poledit program. Once you have made your changes, press Apply or OK to update the ADM files on the server. Policy Schedule PageThe Policy Schedule page enables you to customize (outside of the package default schedule) when you want the ADM files applied to the user's workstation/desktop. This page enables you to select when the package should be applied: Event, Daily, Weekly, Monthly, or Yearly. Once you have selected when you want the package applied, you have additional fields to select in the lower portion of the screen. The following sections discuss the various options. EventWhen you choose to have the ADM files applied on an event that occurs in the workstation, you have the additional need to select which event affects the changes. You can select from one of the following events:
DailyWhen you choose to have the ADM files applied daily on the workstation, you need to indicate when the changes are made. This schedule requires that you select the days when you want the policy applied. You select the days by clicking on the days you desire. The selected days appear as pressed buttons. In addition to the days, you can select the times the policies are applied. These start and stop times provide a range of time where the policies are applied. To keep all workstations from simultaneously accessing the servers, you can select the Randomly Dispatch Policy During Time Period option. This causes each workstation to choose a random time within the time period when they will retrieve and apply the policy. You can have the policy also reapplied to each workstation within the timeframe every specified hour/minute/second by clicking the Repeat the Action Every Field and then specifying the time delay. This results in a scheduled action being run on every associated user's workstation for the selected repeat time. WeeklyYou can alternatively choose that the policies be applied only weekly. In this screen, you choose which day of the week you want the policy to be applied. You can select only one day at a time. Once you have selected the day, you can also select a time range. To keep all workstations from simultaneously accessing the servers, you can select the Randomly Dispatch Policy During Time Period option. This causes each workstation to choose a random time within the time period when they retrieve and apply the policy. MonthlyUnder the monthly schedule, you can select which day of the month the policy should be applied or you can select Last day of the month to handle the last day because all months obviously do not end on the same calendar date. Once you have selected the day, you can also select the time range. To keep all workstations from simultaneously accessing the servers, you can select the Randomly Dispatch Policy During Time Period option. This causes each workstation to choose a random time within the time period when they will retrieve and apply the policy. YearlySelect a yearly schedule when you want to apply the policies only once a year. On this screen you must choose the day that you want the policies to be applied. You do this by selecting the calendar button to the right of the Date field. This brings up a monthly dialog box where you can browse through the calendar to select the date you want. This calendar does not correspond to any particular year and might not take into account leap years in its display. This is because you are choosing a date for each year that will come along in the present and future years. Once you have selected the date, you can also select the time range for the policy. To keep all workstations from simultaneously accessing the servers, you can select the Randomly Dispatch Policy During Time Period option. This causes each workstation to choose a random time within the time period in which they will retrieve and apply the policy. Advanced SettingsOn each of the scheduling pages you have the option of selecting the Advanced Settings button. It affords you some additional control on the scheduled action that is placed on each user's workstation. When first displayed, the Completion tab is activated. The following sections describe each field on the tabs and how they relate to the action. CompletionThe Completion tab enables you to specify what should happen on the workstation once the scheduled action has completed. You can choose any of the following by selecting the check box next to the appropriate items:
FaultThis tab enables you to specify what should occur if the scheduled action fails in its completion. The following choices are available to failed actions:
ImpersonationThese settings enable you to specify the account that should be used when running the action. The following choices are available for the user type that is used to run the scheduled item:
PriorityThis tab enables you to specify at which level you want the action to run on the workstation. The following choices are available within the priority schedule:
Time LimitThis tab of the scheduled advanced settings enables you to specify how long the service should be allowed to run before it is terminated. This can be used to protect yourself from having the action run for long periods of time on the workstation. Terminating the action, though, might prevent the action from completing properly. Therefore, because you usually want the action to fully complete, this tab is not normally used. |
EAN: 2147483647
Pages: 198