Modifying an Image
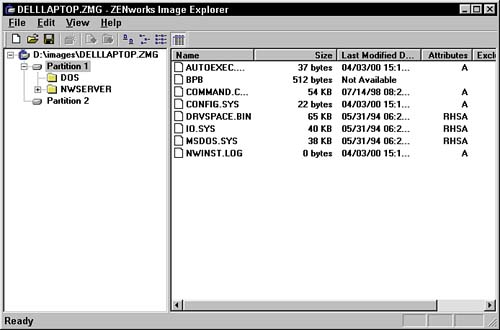
Once an image has been taken on the system and stored on the imaging server, you can examine the contents of an image by running the ZENworks for Desktops 4 Image Explorer (\zenworks\imgexp.exe). When you launch the Image Explorer, you are placed in a Windows program. From there you go to the File menu and open the .ZMG file that holds the workstation image. Figure 14.2 shows a sample of an image in the Image Explorer. Figure 14.2. ZENworks Image Explorer.
As you can see in the example, you can browse the image and discover the partitions and files in the image. You can also, using the Image Explorer, look at the information gathered from the workstation such as the hardware configuration. To look at this information, select the .ZMG file in the image editor. Go to File, Properties or right-click and select Properties. When you do so, the dialog box in Figure 14.3 is displayed. Figure 14.3. Image properties from an image in the ZENworks Image Explorer.
As you can see, this dialog box displays the description of the image, including all of the hardware information on the workstation where the image was captured. (You can use this information to help you construct your rules in the Image server policy.) Other fields include when created, the author, and any comments. If you want to modify any of the Description, Author, or Comments fields, just move the cursor to these fields and type the information you desire. From within the Image Explorer, you can add files or a directory of files to the image. ZENworks also allows you to create up to 10 versions of the file set for the image. This is extremely useful for tailoring your images once they have been created or creating an image from scratch. For example, you might want to have two separate versions of the same workstation images, one for the user's local workstation and one for your remote workstation. Use the following steps to add files and/or directories to an image object in Image Explorer:
Use the following steps to create a new directory in an image object from within Image Explorer:
Image Explorer also allows you to add a Windows Registry file to an image. This is necessary to add additional Registry entries that you might need to update an image. Use the following steps to add a Registry file to an image object from within Image Explorer:
The files and directories you selected will be added to the image. You can remove files from an image as well as mark files and place them into image sets. These sets consist of a group of files that can then be referenced from the imaging server (for example, place all files in set 1 from image A onto this workstation). By default, all files in the image are included in all sets. NOTE When the imaging engine requests an image from the imaging server, it automatically requests all files from the image in set 1. Use the following steps to exclude files from a file set:
You can also click Edit from the pop-up menu; a dialog box similar to the one in Figure 14.4 is displayed and you can specify which sets you want to exclude the file from. This is much faster if you need to specify multiple file sets to exclude the file from. Figure 14.4. The Exclude from File Sets dialog box in the ZENworks Image Explorer.
When you create a Workstation Image object in the directory, and associate it with the image file, you can specify, in the object, which set of files to use. See the discussion on image objects in the previous section, "Image Objects." |
EAN: 2147483647
Pages: 198