Setting Up Workstation Inventory
Now that you understand how workstation inventory works, you need to know how to set it up and configure it for your network. Once you have installed the appropriate components and you have your workstation inventory tree design completed, you are ready to begin configuring your network to start scanning workstation data and storing it into the inventory database. The following sections describe the configuration process necessary to implement your tree design. Configuring the Settings for the Inventory Service ObjectThe first step in configuring workstation inventory is to configure the settings for the inventory service object. The inventory service object controls how, when, and where the inventory server collects inventory scan data. The following sections discuss how to configure the inventory service object. Configuring the Inventory Service Object PropertiesThe first thing you must configure for the inventory service object is the roll, scan data time, and path in the Inventory Service object properties page. From within ConsoleOne, right-click the inventory service object, click Properties, and then click the Inventory Service Object Properties tab as shown in Figure 13.4. From the Inventory Service Object property page, you can configure the options discussed in the following sections. Figure 13.4. The Inventory Service Object Properties tab for Inventory Service objects in ConsoleOne.
Modify the Role for the Inventory Service ObjectBased on the servers that you have deployed for scanning inventory, you must specify the role of the server. You can select Root Server, Intermediate Server, Leaf Server, or Stand-alone Server based on your inventory configuration. Discard Scan Data Files at the Specified Date and TimeSet the time at which you want any scan data files (.ZIP files) to be discarded. The scan data files are removed from the server at the time specified in this field. This can be useful in keeping your servers from running out of disk space. Modify the Path for the Scan FilesWhen you install ZENworks for Desktops, you specify the volume on the server for storing the scan data files. If required, you can modify the volume or the directory of the Scan Directory (SCANDIR) setting from the Inventory Service Object property page. To modify the setting, type the location of the new SCANDIR directory path on the server format of the Scan Directory Path, as follows: \\server_name\volumename\path NOTE You cannot modify the server name specified in the SCANDIR path. If you modify the directory, the directory must already exist. Enable Scanning of WorkstationsYou must select the Enable Scanning of Workstations option in order to scan the workstations associated with the policy. By default, the scanners collect only hardware information of the workstations. Enforce Full ScanWhen scanning the workstation for the first time the Scanner collects the complete inventory of the workstation. A complete inventory scan of the workstation is referred as a full scan. After the workstation is inventoried, the next time the scanner runs, it compares the current inventory data to the history data that it maintains. If any changes to the workstation exist, the Scanner creates a delta scan, which collects the changes in inventory since the last scan was reported. The delta scan setting is the default scan operation for each successive scan after the first scanning of the workstation. If the status log reported by the inventory component indicates that the scanning on the workstation is not successful, you can force a full scan. This policy's settings are applicable for all workstations associated with it. To override this policy, you set this option for an individual workstation. Configuring the Inventory Service Sync ScheduleOnce you have configured the settings on the Inventory Service Object Properties page, you need to configure the sync schedule for the inventory service. The Inventory Sync Service runs on all inventory servers that have inventoried workstations attached to them. The Inventory Sync Service is loaded by the Inventory Service Manager. It removes the redundant or obsolete inventoried workstations from the Inventory database. Use the following steps in ConsoleOne to configure the Inventory Sync Service Schedule to schedule the Inventory Sync Service to run:
Configuring the Roll-Up Policy of Scan DataIf your workstation inventory tree design includes multiple levels, you need to configure roll-up of scan data in your inventory setup. You need to specify the details, such as the next-level server for roll-up in the Roll-Up Policy that is contained in the Server Policy Package. Use the steps discussed in the following sections to create and configure a role-up policy for scan data. Create a Server Package That Contains the Roll-Up Policy for Identifying the Next-Level Server for Roll-Up
Enable the Roll-Up Policy in the Server Package and Associate the Server Package
Schedule the Roll-Up Time
NOTE While scheduling the roll-up of data in the Inventory Policies, the roll-up frequency should be at least one day. It is likely that if the roll-up frequency is too often, for example less than one hour, there might be some performance degradation of the Inventory server. Configuring the Policies for the DatabaseThe installation program creates the database object for Sybase and configures the database server. However, you need to set up the associations for the database server. If you are maintaining the inventory database in Oracle or MS SQL Server, you need to perform the tasks in the following sections before making the associations. Configure the Database Server Options of the Database Object
Ensure That the JDBC Driver Properties Are Correct As Per Your Database Configuration.
Once you have completed the steps for creating the inventory database in Oracle or MS SQL, or if you are simply using the Sybase database, use the following steps to associate the server. Create the Service Location Package to Associate the Database Object with this Package.You must set up the ZENworks database policy to establish the location of the database; otherwise, no information can be logged to the database. To establish the service location of the database, use the following steps:
Configure the Service Location Policy and Associate the Database with the Policy
Configuring the Inventory Policies for WorkstationsOnce you have configured the server database and service location policies, you need to configure the inventory policies for the workstation. In the Workstation Inventory Policy, you configure the following settings for scanning workstations:
Use the following steps to configure the Workstation Inventory Policy. First, you need to create a policy package for the workstations:
Enable and Associate the Workstation Inventory Policy
Specify the Inventory Server to Which the Scanner Will Send the Workstation Scan Data
Schedule the Time for Activating the Scanning at the Workstations
Ensure That Scanning Is Enabled
Once you have finished configuring the workstation inventory policies for workstations, make the following checks in your environment to make certain that the inventory scanning process can complete properly:
Configuring the Workstation Inventory PolicyThe Workstation Inventory Policy allows you to configure which inventory service that workstations associated with this workstation policy package use. It also allows you to enable and configure hardware and software scanning. To configure the Server Inventory Policy for a workstation policy package, follow these steps:
The following sections discuss how to configure the Workstation Inventory Policy from this window. Configure General Settings for the Workstation Inventory PolicyThe first step in configuring the Workstation Inventory Policy is to configure which inventory service that workstations associated with this policy will use. Select the General tab in the Workstation Inventory Policy panel as shown in Figure 13.6 and configure the following settings:
Figure 13.6. General settings in the Workstation Inventory Policy panel.
Configure Hardware ScanNext, you need to configure hardware scanning by selecting the Hardware Scan tab, shown in Figure 13.7, and setting the following options:
Figure 13.7. Hardware inventory settings for the Workstation Inventory Policy.
Configure Software ScanNext, you need to configure software scanning. From the Software Scan tab, shown in Figure 13.8, you can enable the following software inventory options:
Figure 13.8. Software Scan settings for the Workstation Inventory Policy for a Workstation Policy Package.
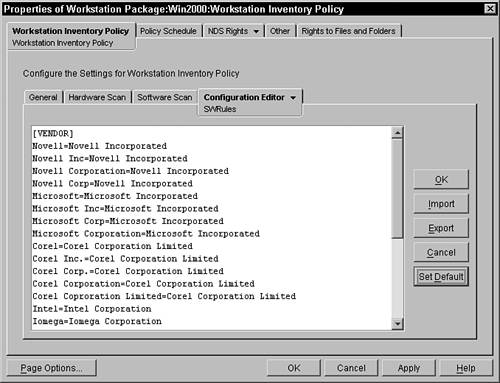
Configure the Configuration EditorOnce you have enabled and configured software scanning, you can modify the .INI file that ZENworks for Desktops 4 uses when reporting software inventory. Do this by selecting the Configuration Editor tab, shown in Figure 13.9. You can edit the SWRules file by clicking on the Set Default button to open the default file and then modifying the entries. ZENworks will use this file when you create inventory reports. Figure 13.9. Configuration Editor for the Workstation Inventory Policy for a Workstation Policy Package.
If you are modifying the Workstation Inventory policy for Windows, the Configuration Editor tab will have a drop-down arrow allowing you to modify the entries in the .INI files for Zipped Names. This allows you to specify the manufacturer of software being used to zip files as well as the identifiers that they are using for the zipped files. You can also modify the entries in the .INI file for Asset Information. You can specify the DMI classnames and attributes for things such as a workstation model, model number, serial number, and computer type. |
EAN: 2147483647
Pages: 198