Moving a Limb
Making and Moving the FigureThe Figure class carries out three main tasks:
Building the FigureThe construction of the figure starts in Figure( ): //globals private ArrayList limbs; // Arraylist of Limb objects, indexed by limb number private HashMap limbNames; // holds (limb name, limb number) pairs private TransformGroup figureTG; // the top-level TG for the entire figure public Figure( ) { yCount = 0; // the figure is on the floor initially t3d = new Transform3D( ); // used for repeated calcs toMove = new Transform3D( ); toRot = new Transform3D( ); limbs = new ArrayList( ); limbNames = new HashMap( ); // construct the figure from connected Limb objects buildTorso( ); buildHead( ); buildRightArm( ); buildLeftArm( ); buildRightLeg( ); buildLeftLeg( ); printLimbsInfo( ); buildFigureGraph( ); // convert figure into a Java 3D subgraph } // end of Figure( )The figure's Limb objects are stored in the limbs ArrayList. Each Limb object has a unique ID (its limb number), which is used as its index position in the ArrayList. The other important data structure is the limbNames HashMap. The HashMap stores (limb name, limb number) pairs, with the name being the key and the limb number the value. At runtime, the HashMap is employed to determine a limb's number when a name is supplied in a limb command. Figure 20-8 shows the limbs that comprise the figure, labeled with their names and numbers. Only moveable limbs have names, which exclude the neck and bottom (bottom as in derriere). Invisible limbs are nameless and are marked as dotted lines in the figure. Two short invisible limbs link the legs to their feet (labeled as 16 and 21 in Figure 20-8). The small gray circles in Figure 20-8 are the joints, the points where limbs connect to each other, and they are positioned to make the limbs overlap. Figure 20-9 shows the articulated figure again but with emphasis given to the joints. Each arrow shows the positive y-axis in the limb's local coordinate space. A limb's shape extends from the joint, following the arrow's direction. The first joint in the figure is j0, which is the starting location of the bottom. The chest limb begins at joint j1, the neck at j2, the upper-left arm at j9, the lower-left arm at j10, and so on. The side view of the lower-left leg shows the invisible joint that begins at j20 and extends downward. The foot is attached to it via j21. The arrows on the joints show that the local y-axis for a limb can be rotated significantly Figure 20-8. The Figure's limbs, named and numbered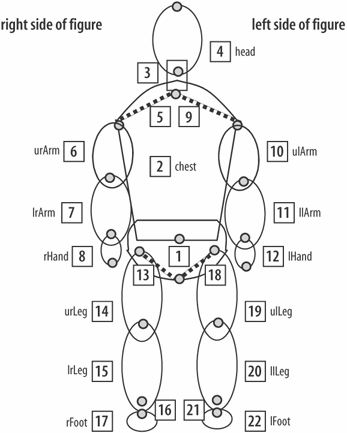 when viewed in world coordinates. For example, the base of the upper-left arm is at j9, and the limb's positive y-axis is pointing almost straight down. Several limbs can be attached to one joint. For instance, j0 is the starting point for the bottom limb, as well as two invisible limbs which extend up and to the left and right, respectively. Each limb utilizes two joints. In the joint's local coordinate system, the start joint begins at (0,0) on its XZ plane. The limb's shape is placed at the start joint location and oriented along the positive y-axis. The end joint is positioned along the limb's y-axis, 90% of the way toward the end of the limb's shape. For example, the upper-left arm's start joint is j9, and its end joint is j10. The lower-left arm's start joint is j10, thereby linking the lower arm to the upper. A limb's joints are encoded in Java 3D as transformGroups. The start joint TRansformGroup of a child limb is the end joint transformGroup of its parent, so linking the child to the parent. Figure 20-10 shows the articulated figure again but in terms of the transformGroups that encode the joints. The thick gray lines denote the limbs and hide several transformGroups and other Java 3D nodes. The visible transformGroups are for the joints, and are labeled with their joint name and TG. For instance, the limb for the upper-left arm (ulArm) starts at Figure 20-9. The Figure's joints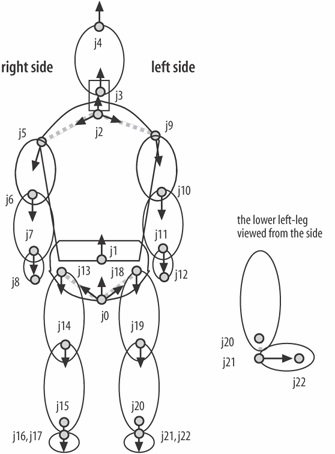 joint j9, and its end joint is j10. The limb for the lower-left arm (llArm) is attached to the transformGroup for j10 and becomes its child.
Figure 20-10 shows the top-level TRansformGroups for the figure: figureTG and offsetTG. figureTG represents the origin for the entire figure and is located on the floor, initially at (0,0). figureTG is affected by figure commands. offsetTG is a vertical offset, up off the floor, which corresponds to the j0 start joint. The details of Limb creation in the Figure object depend on the type of Limb being created. Figure 20-11 shows the hierarchy for Limb and its subclasses. Limb defines the appearance of a limb (using a lathe shape) and how it is connected to a parent limb via a joint (TRansformGroup). The limb's initial orientation is fixed. Limb and EllipticLimb cannot be moved and do not use limb names. Figure 20-10. The Figure's TransformGroups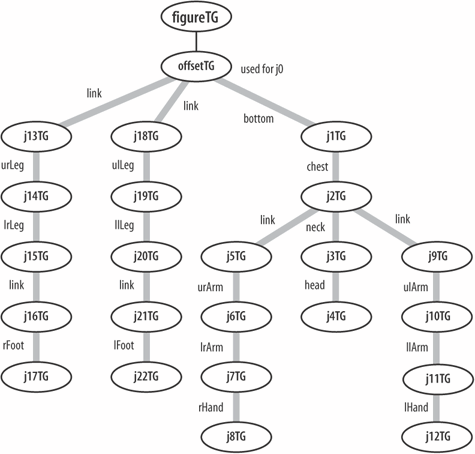 Figure 20-11. The Limb class hierarchy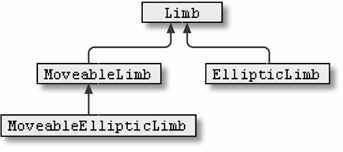 The MoveableLimb and MoveableEllipticLimb classes are moveable. They have limb names and x-, y-, and z-axis rotation ranges. If a range is not specified, then it is assumed to be 0 (i.e., rotation is not possible around that axis). The lathe shape used in a Limb or MoveableLimb object has a circular cross-section but is elliptical in EllipticLimb and MoveableEllipticLimb.
buildTorso( ), from the Figure class, shows the use of EllipticLimb and MoveableEllipticLimb to create the bottom and chest for the figure. The bottom is not moveable, but the chest is: private void buildTorso( ) { // the figure's bottom double xsIn1[] = {0, -0.1, 0.22, -0.2, 0.001}; double ysIn1[] = {0, 0.03, 0.08, 0.25, 0.25}; EllipticLimb limb1 = new EllipticLimb( 1, "j0", "j1", Z_AXIS, 0, xsIn1, ysIn1, "denim.jpg"); // no movement, so no name or ranges //the figure's chest: moveable so has a name ("chest") // and rotation ranges double xsIn2[] = {-0.001, -0.2, 0.36, 0.001}; double ysIn2[] = {0, 0, 0.50, 0.68}; MoveableEllipticLimb limb2 = new MoveableEllipticLimb("chest", 2, "j1", "j2", Z_AXIS, 0, xsIn2, ysIn2, "camoflage.jpg"); limb2.setRanges(0, 120, -60, 60, -40, 40); // x range: 0 to 120; y range: -60 to 60; z range: -40 to 40 limbs.add(limb1); limbs.add(limb2); limbNames.put("chest", new Integer(2)); // store (name,number) } // end of buildTorso( )The arrays of coordinates passed to the limb1 and limb2 objects define the lathe curves for the bottom and chest. Figure 20-12 shows the graph of points making up the curve for the bottom (limb1). Figure 20-12. The lathe curve for the figure's bottom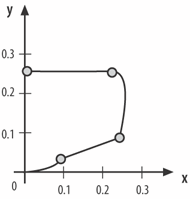 A limb requires a limb number, its start and end joint names, an axis of orientation and angle to that axis, and lathe shape coordinates and texture. The lathe shape and texture can be omitted, to signal that the limb should be invisible, but a limb length must be supplied instead. If the limb is moveable (i.e., a MoveableLimb or MoveableEllipticLimb object), then it also requires a name and x-, y-, and z-ranges to restrict its movements. The bottom limb is defined as: EllipticLimb limb1 = new EllipticLimb( 1, "j0", "j1", Z_AXIS, 0, xsIn1, ysIn1, "denim.jpg"); This is a nonmoveable limb, so it has no name. Its limb number is 1, it starts at joint j0, and its end joint is called j1. It is rotated around the z-axis by 0 degrees (i.e., not rotated at all), and has a lathe shape covered in denim. These details can be checked against the information in Figures 20-9 and 20-10. The chest limb is: MoveableEllipticLimb limb2 = new MoveableEllipticLimb("chest", 2, "j1", "j2", Z_AXIS, 0, xsIn2, ysIn2, "camoflage.jpg"); limb2.setRanges(0, 120, -60, 60, -40, 40); // x range: 0 to 120; y range: -60 to 60; z range: -40 to 40This moveable limb is called chest, limb number 2. Its start joint is j1 (the end joint of the bottom), so it will become a child of the bottom limb. Its end joint is called j2. It is rotated around the z-axis by 0 degrees (i.e., not rotated at all), and has a lathe shape covered in a camouflage pattern. The permitted ranges for rotation around the x-, y-, and z-axes are set with a call to setRanges( ). The end of buildTorso( ) shows the two limbs being added to the limbs ArrayList. A limb numbered as X can be found in the list by looking up entry X-1. The limb names (in this case only chest) are added to a limbNames HashMap together with their limb numbers. This data structure is used when a limb is referred to by its name, and its corresponding number must be found. Limb names aren't needed, but they're a lot easier for a user to remember than numbers. Orientating LimbsThe construction of the left arm illustrates how the initial orientation of a limb can be adjusted. Figure 20-13 shows the construction of the left arm, including the angles between the limbs. The relevant code is in buildLeftArm( ): private void buildLeftArm( ) { // invisible limb connecting the neck and upper-left arm Limb limb9 = new Limb(9, "j2", "j9", Z_AXIS, -95, 0.35);Figure 20-13. The left arm in detail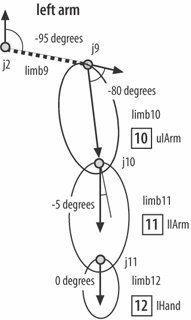 // upper-left arm double xsIn10[] = {0, 0.1, 0.08, 0}; double ysIn10[] = {0, 0.08, 0.45, 0.55}; MoveableLimb limb10 = new MoveableLimb("ulArm", 10, "j9", "j10", Z_AXIS, -80, xsIn10, ysIn10, "leftarm.jpg"); limb10.setRanges(-60, 180, -90, 90, -30, 90); // lower-left arm double xsIn11[] = {0, 0.08, 0.055, 0}; double ysIn11[] = {0, 0.08, 0.38, 0.43}; MoveableLimb limb11 = new MoveableLimb("llArm", 11, "j10", "j11", Z_AXIS, -5, xsIn11, ysIn11, "skin.jpg"); limb11.setRanges(0, 150, -90, 90, -90, 90); // left hand double xsIn12[] = {0, 0.06, 0.04, 0}; double ysIn12[] = {0, 0.07, 0.16, 0.2}; MoveableEllipticLimb limb12 = new MoveableEllipticLimb("lHand", 12, "j11", "j12", Z_AXIS, 0, xsIn12, ysIn12, "skin.jpg"); limb12.setRanges(-50, 50, -90, 40, -40, 40); limbs.add(limb9); limbs.add(limb10); limbs.add(limb11); limbs.add(limb12); limbNames.put("ulArm", new Integer(10)); limbNames.put("llArm", new Integer(11)); limbNames.put("lHand", new Integer(12)); } // end of buildLeftArm( )The invisible limb, limb9, is made 0.35 units long and rotated around the z-axis by 95 degrees: Limb limb9 = new Limb(9, "j2", "j9", Z_AXIS, -95, 0.35);The rotation turns the y-axis of limb9 clockwise by 95 degrees. However, the actual orientation of the limb in world coordinate space depends on the overall orientation of the y-axis specified by its ancestors. In this case, none of its ancestors (bottom and chest) have been rotated, so its world orientation is the same as its local value. The limb for the upper-left arm is defined as: MoveableLimb limb10 = new MoveableLimb("ulArm", 10, "j9", "j10", Z_AXIS, -80, xsIn10, ysIn10, "leftarm.jpg");This rotates the y-axis of limb10 clockwise by 80 degrees, which when added to the ancestor rotations (bottom, chest, limb9) means that the shape is almost pointing downward, with a total rotation of 175 degrees. The lower arm (limb11; llArm) is rotated another 5 degrees to point straight down (180 degrees). The left hand (limb12; lHand) has no rotation of its own, so it points downward. Creating the Scene GraphThe buildXXX( ) methods (e.g., buildTorso( ), buildLeftArm( )) create the limb objects and specify how they are linked in terms of joint names. The creation of the scene graph outlined in Figure 20-11 is initiated by buildFigureGraph( ) after all the limbs have been initialized: private void buildFigureGraph( ) { HashMap joints = new HashMap( ); /* joints will contain (jointName, TG) pairs. Each TG is the position of the joint in the scene. A limb connected to a joint is placed in the scene by using the TG associated with that joint. */ figureTG = new TransformGroup( ); figureTG.setCapability( TransformGroup.ALLOW_TRANSFORM_READ); figureTG.setCapability( TransformGroup.ALLOW_TRANSFORM_WRITE); TransformGroup offsetTG = new TransformGroup( ); Transform3D trans = new Transform3D( ); trans.setTranslation( new Vector3d(0, 1.24, 0)); // an offset from the ground to the first joint offsetTG.setTransform( trans ); joints.put("j0", offsetTG); // store starting joint j0 /* Grow the subgraph for each limb object, attaching it to the figure's subgraph below offsetTG. */ Limb li; for (int i = 0; i < limbs.size( ); i++) { li = (Limb)limbs.get(i); li.growLimb(joints); } figureTG.addChild(offsetTG); } // end of buildFigureGraph( )buildFigureGraph( ) initializes figureTG and offsetTG. offsetTG will be the TRansformGroup for the first joint, j0, and its name/transformGroup pair is stored in a HashMap called joints. A for loop iterates through the Limb objects stored in the limbs ArrayList and calls each limb's growLimb( ) method, passing in the joints HashMap. growLimb( ) creates a Java 3D subbranch for the limb and attaches it to the transformGroup corresponding to the limb's start joint. This joint/transformGroup correspondence is found by searching the joints HashMap.
Processing Limb-Related OperationsThe Figure class uses the limbNames HashMap, which contains limb name/limb number pairs to check if a user-supplied limb number is used by the figure and to convert limb names into numbers. If the number or name isn't correct, then an error message is printed and the associated operation is ignored. The operations are carried out by checkLimbNo( ) and findLimbNo( ). updateLimb( ) is called with a legal limb number, an axis of rotation, and a rotation angle and passes the request on to the limb in question: public void updateLimb(int limbNo, int axis, double angle) { Limb li = (Limb) limbs.get(limbNo-1); li.updateLimb(axis, angle); // pass on axis and angle }reset( ) is called by CommandsPanel when the user presses the reset button. The reset request is sent to every limb: public void reset( ) // restore each limb to its original position in space { Limb li; for (int i = 0; i < limbs.size( ); i++) { li = (Limb)limbs.get(i); li.reset( ); } }Figure MovementFigure commands, such as forward and clock, are converted into transforms applied to the figureTG TransformGroup at the root of the figure's subgraph. doMove( ) converts a move request into a translation vector, which is applied in doMoveVec( ): private void doMoveVec(Vector3d theMove) // Move the figure by the amount in theMove { figureTG.getTransform( t3d ); toMove.setTranslation(theMove); // overwrite previous trans t3d.mul(toMove); figureTG.setTransform(t3d); }toMove and t3d are global transform3D variables reused by doMoveVec( ) to avoid the overhead of object creation and garbage collection. doRotateY( ) converts a rotation request into a rotation around the y-axis, which is carried out by doRotateYRad( ): private void doRotateYRad(double radians) // Rotate the figure by radians amount around its y-axis { figureTG.getTransform( t3d ); toRot.rotY(radians); // overwrite previous rotation t3d.mul(toRot); figureTG.setTransform(t3d); }toRot is a global TRansform3D variable.
|

EAN: 2147483647
Pages: 340