Beyond Mask Basics
| [ LiB ] |
Beyond Mask Basics
Recall that a mask is a layer that makes areas of a lower layer or group of layers appear transparent. A mask's data is represented as a greyscale bitmap. You use black, white, and shades of grey to paint on a mask. Black produces total masking, white no masking, and grey partial masking. You can use just about any of Paint Shop Pro's tools and operations to edit a mask, including the drawing and painting tools, the warping tools, selection tools, effects, and the adjustments that affect brightness and contrast.
Loading and Saving Masks
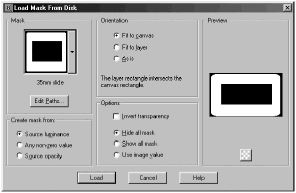
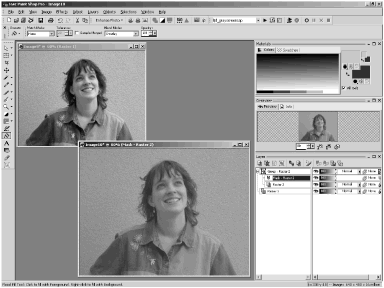
To load a mask from disk, choose L ayers > Load/ S ave Mask > L oad Mask From Disk (or click the Load Mask From Disk button in the Layer palette) and then choose the file name of the mask you want. Click Load and your mask will be loaded onto the current active layer. Figure 5.5 shows Mask002.jpg being loaded from disk.
Figure 5.5. Loading a mask from disk.
To save a mask to disk, choose L ayers > Load/ S ave Mask > Save M ask To Disk and save the mask in whatever folder you select.
You can also save a mask to an alpha channel, an option that offers several advantages. For example, you might want to save a mask to an alpha channel so that you can reuse it in another image. Or maybe you want to end your current editing session, but you also want to be able to edit the mask later. Saving the mask to an alpha channel sometimes is a good thing to do before merging the mask with affected layers. After a merge, you can't get the mask back later on. But if you first save the mask to an alpha channel, you have the option of reloading the mask and modifying it, even in a later editing session. As you'll see later in this chapter, saving to an alpha channel also gives you the option of later loading the saved mask as a selection. (Saving a mask to disk is best when you want to reuse the mask in images other than the one in which the mask was created.) Saving a mask to an alpha channel is similar to saving a selection to an alpha channel.
First, choose L ayers > Load/ S ave Mask > Save Mask To Alpha C hannel. Then, in the Save To Alpha dialog box, you'll see a black-and-white representation of the mask in the Preview window. Name the mask and click Save .
You also load a mask from an alpha channel much as you would load a selection. Choose L ayers > Load/ S ave Mask > Load Mask From A lpha Channel, and then choose the alpha channel from the Load Mask From Alpha dialog box.
NOTE
 NOTE
NOTE
A selection that you load from disk or an alpha channel always has the same dimensions as the original selection. You have some leeway with masks loaded from disk or an alpha channel, though. Choose Fit to canvas to stretch or shrink the mask to conform to the target image's image canvas. Choose Fit to layer to make the mask conform to the size of the target image's active layer. To keep the mask the same size that it was originally, choose As is.
What You Can Do with Masks
Here are a few examples of things you can do with masks:
-
Add a decorative edge to your image. You can also create your own decorative edges by hand using masks. For example, here's how to make the edge shown in Figure 5.6:
Figure 5.6. A handmade decorative edge.
-
Open a photo.
-
Add a new raster layer and fill it with white.
-
Add a mask above the white layer.
-
Use the Selection tool set to Ellipse to define a selection on the mask layer.
-
Fill the mask with black and deselect.
-
On the mask layer, apply the Wave effect (Effec t s > D istortion Effects > Wa v e) and then apply a Gaussian Blur ( A djust > Bl u r > G aussian Blur). For each effect, use whatever settings give you the look that you want.
-
-
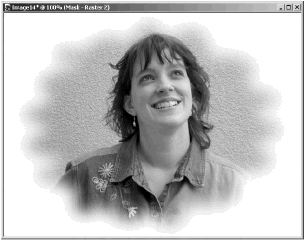
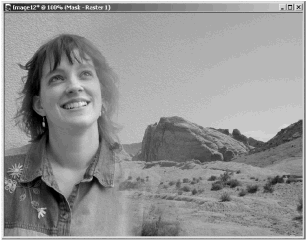
Isolate a figure. A mask can be used to isolate a figure and place it on a new background. For example, in Figure 5.7 a layer below the portrait layer was filled with a pattern, and then a gradient was added to the pattern layer with the Flood Fill tool with Blend mode set to Overlay. A mask was added to the portrait layer to hide the old background.
Figure 5.7. A figure placed on a new background.
-
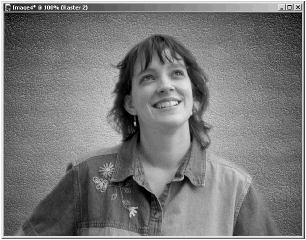
Restrict effects. Duplicate a layer, select the part that you want the effect to be applied to, and then add a mask with L ayers > N e w Mask Layer > S how Selection. Deselect with Ctrl+D, and then apply the effect to the duplicated layer. An example is given in Figure 5.8.
Figure 5.8. An effect applied only to unmasked areas.
In this case, the portrait layer was duplicated, and the duplicate layer was blurred. The figure on the blurred layer was then hidden with a mask, letting the unblurred original version show through. The advantage of using a mask here instead of a selection is that you can modify the boundaries of where the effect shows up and that you can, if you like, adjust the opacity of the duplicated layer to fade the effect.
-
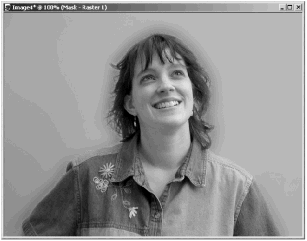
Create a mask from an image. As you saw in Chapter 4, an image can serve as the basis for a mask. For example, you can open the image you want to use as a mask and open a new image filled with a dark solid color. Add a raster layer above the colored layer and fill it with white or some other light color . Add a new mask with L ayers > N e w Mask Layer > From I mage. Choose Source luminance as the source for creating the mask and click OK. You'll get a result like the one in Figure 5.9. (The final result is also shown in the color plate section.)
Figure 5.9. Using a mask created from an image.
-
Blend two or more images together. You can blend images together using masks. For example, you can place one image above another and add a mask layer to the upper layer, filling the mask with a black-and-white gradient. Refine the edges a bit, and you get something like what you see in Figure 5.10, where the portrait is blended together with a landscape.
Figure 5.10. Blending images together with a gradient mask.
| [ LiB ] |