Selections
| [ LiB ] |
Selections
In Chapter 3, "Being Selective," you already explored how to use the selection tools and how to add to and subtract from a selection. In this section, you'll take a closer look at how a selection is represented in Paint Shop Pro and how you can edit, save, and load selections.
Editing, Saving, and Loading Selections
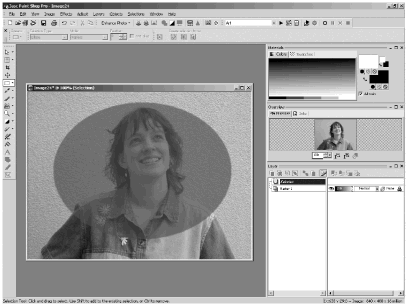
A selection can be represented as a greyscale bitmap, with fully selected areas represented as white, feathered areas as grey, and unselected areas as black. If you have a selection and choose S elections > E dit, this becomes clearer: The Available Colors panel in the Materials palette changes to a palette of 256 shades of grey, and the selection data is displayed with an overlay, as in Figure 5.1.
Figure 5.1. Selection data revealed in Edit Selection mode.
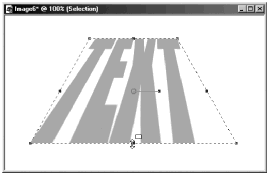
As with an adjustment layer or a mask, a selection in Edit Selection mode can be modified by painting on it or by applying operations that you can normally apply to a greyscale image. For example, Figure 5.2 shows a text selection being modified with the Deform tool.
Figure 5.2. Text selection being modified with the Deform tool.
You can use Edit Selection mode to add to or subtract from the selection, to create special effects, or to warp the selection's shape. You can even paint your selection entirely by hand. Simply choose S elections > Select A ll followed by S elections > E dit Selection. You could then paint with black or grey to remove areas from the selection. Or for something a bit more intuitive, eliminate the S elections > Select A ll step and begin with S elections > E dit Selection. You could then paint with white and grey to create your selection.
Another consequence of a selection being represented as a greyscale bitmap is that you can save it to a special channel called an alpha channel. The purpose of an alpha channel is to store noncolor information so that you can reuse it or edit it later, either in the original image or in another image. To save a selection to an alpha channel, choose S elections > L oad/Save Selection > Save Selection To Alpha C hannel. The Save Selection To Alpha dialog box appears, as shown in Figure 5.3.
Figure 5.3. The Save Selection To Alpha dialog box.
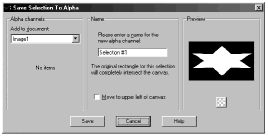
In the dialog box's Preview window, you see a black-and-white representation of the selection. If you have more than one image open , you can select which image to add the selection to. Name the selection, if you want to, or keep the default name that Paint Shop Pro suggests, and then click Save.
A selection can also be saved to disk by choosing S elections > L oad/Save Selection > S ave Selection To Disk. In the Save Selection To Disk dialog box, enter a name for the selection file (which is automatically given an extension of .PspSelection) and click the Save button.
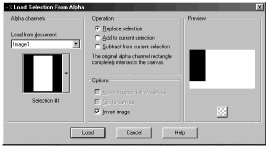
To load a selection from an alpha channel, choose S elections > L oad/Save Selection > Load Selection From Alpha C hannel to access the Load Selection From Alpha dialog box (see Figure 5.4).
Figure 5.4. The Load Selection FromAlpha dialog box.
NOTE
 NOTE
NOTE
Why save a selection to disk? To reuse it later, either in its original source image or in another image.
Paint Shop Pro comes with several saved selections, some in standard video display sizes and some in common Web element sizes.
In the Load Selection From Alpha dialog box, you can choose any open image that has an alpha channel as the source image. A black-and-white representation of the alpha channel is displayed in the Preview window. If you want, you can choose to invert the selection. Click the Load button, and the alpha channel is loaded in the active image as a selection.
NOTE
NOTE
When a loaded selection is added to the active image, the loaded selection has the same dimensions as the original selection.
Suppose that you then want to reposition the selection marquee in the active image. Choose the Mover tool, right-click within the selection area, and right-drag until the selection area is where you want it.
To load a selection from disk, choose S elections > L oad/Save Selection > Load Selection From D isk. In the Load Selection From Disk dialog box, select the selection file you want, and then click Load. As with a selection loaded from an alpha channel, the selection is loaded into the active image in the same dimensions as the original selection. If you want to reposition the selection marquee in the active image, just right-drag with the Mover tool.
NOTE
NOTE
When you load a selection that is larger than the image you're loading to, you'll have the option to clip the selection to the image canvas. If you select this option, portions of the selection that don't fit in the image canvas are clipped off.
NOTE
 TIP
TIP
Although you'll usually use a PspSelection file as the source for a selection to load to disk, you can use any greyscale or color image as the source for your selection. The only limitation is that the image must be in one of the selection folders specified in Paint Shop Pro's File Locations.
When you create a selection from an image, you can choose to base the selection on Source luminance , Any non-zero value , or Source opacity . (With Any non-zero value , all pixels that are not black are selected.)
| [ LiB ] |