| With your Wi-Fi card in place, and its software installed, its time to configure your Wi-Fi card so that it will run with your network. Fundamentally, this is a matter of setting the SSID (the name of the network you are connecting to) and the encryption key (if there is one). Each Wi-Fi card from a different manufacturer has slightly different software that accomplishes this, but as a general matter the software all does the same thing. So I'm going to show you how this works with one Wi-Fi card, but the order in which you enter information (and the appearance of the dialogs shown in the figures) might look slightly different depending on your actual Wi-Fi card. Don't worry, just enter the information requested. It's really quite simple. Maybe you'd want to use your Wi-Fi enabled laptop with more than one network (this is actually quite likely). For example, you might want to surf the Web at Starbucks, and also connect to your Wi-Fi network at home. The network configuration for each of these two situations is different: The SSIDs (or network names) are different, and there is no encryption at Starbucks, but you should use encryption for my home network. Each set of configuration data for a wireless network is called a configuration profile. Most software for Wi-Fi cards allows you to store the information for multiple configuration profiles, and to switch between them. This makes it easy to connect at the coffee shop and at the home or office: You just switch between configurations. Most software places an icon in the Windows system tray that can be used to fire up the configuration utility. If not, the Wi-Fi configuration utility can be started by clicking the program name using the Start, Programs menu. The Wi-Fi configuration utility, also sometimes called a Client Manager because the Wi-Fi card makes the laptop a "client" on a network, will look something like the program shown in Figure 8.6. Figure 8.6. A typical Wi-Fi Client Manager (configuration) utility. 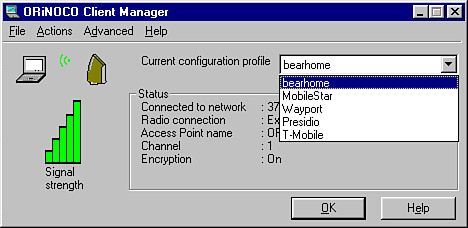
The software shown in Figure 8.6 lets you choose from existing Wi-Fi configurations using the drop-down list shown at the upper right of the window. The configuration manager also provides an overview of the signal strength of a selected network, illustrated by the bars shown on the left of the window. If you have no profiles set up (or need to add a profile to the existing ones, or to edit an existing profile), the thing to do is to choose Add/Edit Configuration Profile from the Actions menu. The Add/Edit Configuration Profile window will open, as shown in Figure 8.7. Figure 8.7. The Add/Edit Configuration Profile window is used to select an existing configuration to edit or to add a new configuration. 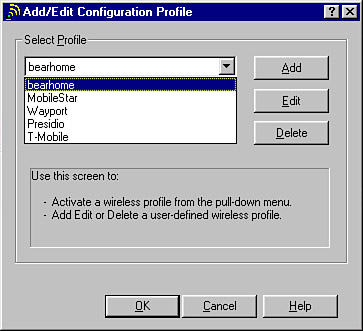
Click Add to add a new configuration. The Edit Configuration window will open, with the Profile Name box empty. Enter a Profile Name of your choice, as shown in Figure 8.8, ABGtoWiFi. Figure 8.8. Enter a new configuration name in the Edit Configuration window to provide information for a new network profile. 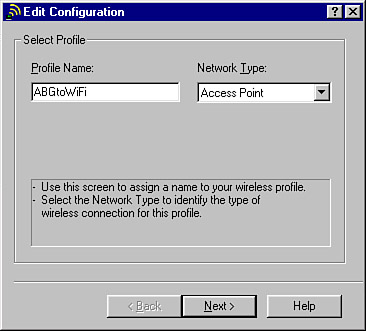
The Edit Configuration window, shown in Figure 8.8, is also used to set the Network Type. The most common choice for Network Type is access point. This works both for most SOHO (small office/home office) situations and also at public hotspots like the one T-Mobile provides in Starbucks. But you can also choose to connect on a peer-to-peer basis, which you can use to enable Microsoft workgroup functionality such as file and printer sharing without full-fledged network support. See Part IV, "Creating a Wi-Fi Network,"for more information about this distinction. With a Profile Name provided, and the Network Type set to Access Point, click Next to continue adding profile information. In the next step, shown in Figure 8.9, you will be asked to identify your network. Figure 8.9. The most important piece of information is the name identifying the network you want to connect to. 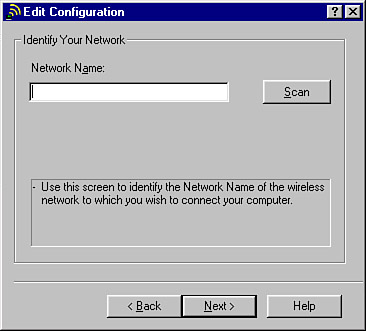
You may happen to know the network name (the SSID), particularly if you are setting up a profile for a hotspot belonging to a public network. tip  | The Network Name for hotspots on the T-Mobile Hotspot Network, which is the infrastructure that serves Starbucks, is tmobile. |
If you don't know the network name, the thing to do is to click the Scan button. Your card will scan the spectrum and produce a list of Wi-Fi networks broadcasting within range as shown in Figure 8.10. Figure 8.10. The Wi-Fi card scans the spectrum for Wi-Fi networks that are broadcasting within range. 
Pick the network name you are looking for and click OK. The next window lets you enter the security settings (see Figure 8.11). Figure 8.11. If your network is secured with encryption, you will need to enter the key. 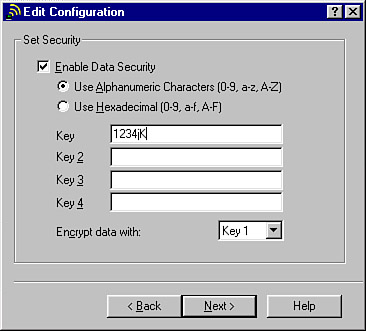
You'll then need to click Next to finish with the Wizard and accept the new settings. The software that comes with some Wi-Fi cards doesn't support scanning. This bad idea was introduced to save us from ourselves; the thought was to aid security by stopping users from scanning for networks. If you are unlucky enough to own a Wi-Fi card whose software does not allow scanning, the good news is that you can download free scanning software. One good source is Boingo Networks, www.boingo.com. (You'll learn more about Boingo in Chapter 12, "Working with National Wi-Fi Networks.") If you are connecting to a public network, such as a T-Mobile hotspot, most likely encryption will not be required. In this case, the Enable Data Security check box shown in Figure 8.11 should be unchecked, and the rest of the data entry fields shown in Figure 8.11 will be disabled. If you are connecting to a private network, encryption should be enabled. Encryption is the first line of defense against unauthorized access. However, all too often people don't bother with encryption. This can be a big mistake. See Part V, "Securing Your Wi-Fi Computer and Network," for more information about how to use encryption and other techniques to practice safe computing with Wi-Fi. The great words of wisdom about encryption keys on a private network are, "Check with your network administrator to find out the proper encryption settings." This is undoubtedly good advice if you have a network administrator, but what if you don't? You'll need to check the documentation that came with your access point to learn the default encryption key, and how to change the default if you desire. (For more information about setting up an access point on a private network, see Chapter 14, "Setting Up Your Access Point.") tip | The default encryption key for an access point is often the network name with its first character omitted. For example, if the network name is 177fg9, the default encryption key is likely to be 77fg9. |
With the security settings omitted if encryption is not required (for example, at a T-Mobile hotspot), or the encryption key correctly entered, click Next. A window allowing you to choose power management settings for the Wi-Fi card will appear (see Figure 8.12). Figure 8.12. Setting the Power Management features for a Wi-Fi card. 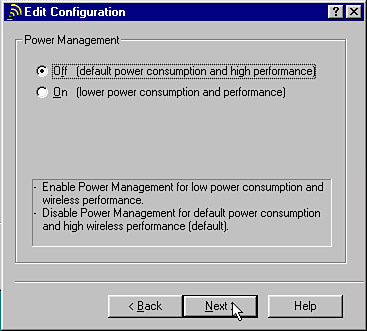
As a general matter, the more power a Wi-Fi card uses, the greater its transmission range. However, when higher power is used, the laptop's battery drains faster an important concern when you are mobile. So you'll have to decide depending on your circumstances whether to opt for more power consumption (meaning more range but less battery life) or lower power consumption (meaning less range but less battery drain). After you have made your Power Management selection, click Next. You will be asked whether your laptop should renew its IP (Internet Protocol) address when the configuration profile is selected (see Figure 8.13). Figure 8.13. The Wi-Fi card can be set to renew its IP address when the configuration profile is selected. 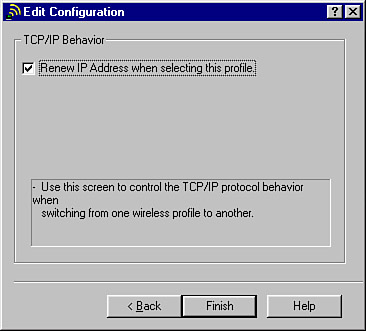
It's hard to go wrong with renewing IP addresses when a new configuration profile is selected. This setting, while it may cause a slight delay, is less likely to lead to problems because a network client is "holding onto" an invalid IP address. So check the Renew IP Address When Selecting This Profile box. (For more information about IP Addresses on a network, see Chapter 15, "Configuring Your Wi-Fi Network.")  | An IP address is the identification number used for a computer connected to a network or the Internet. Each computer that is connected to the Internet needs to have an IP address in order to be able to interact with the servers on the Web, although this IP address can be assigned dynamically, which means that it changes and is not fixed. (A fixed IP is called a static IP in techno-speak.) |
You're done! Click Finish. The main window of the Client Manager will open with your new profile selected as shown in Figure 8.14 and the Signal Strength bars (hopefully) showing a good connection. Figure 8.14. The newly created profile is shown selected in the main Client Manager window. 
Although you're ready now to start surfing, it's a good idea to test your card before you start. I'll show you how in the next section. |