Using the Network Setup Wizard
| The New Connection Wizard described in "Working with the New Connection Wizard" dovetails seamlessly into the Network Setup Wizard. It is here in the Network Setup Wizard that you will make choices that set several important Windows network settings, including
Doing the same tasks manually would require you to go to four different places to set Windows network parameters. The Network Connection Wizard enables you to specify all the settings in just one place. If you are moving straight through this chapter of the book, you arrived at this section because you ran the New Connection Wizard described earlier. If not, there are two easy shortcuts you can use to get to the Network Setup Wizard. Here is the first way:
Here is the second way:
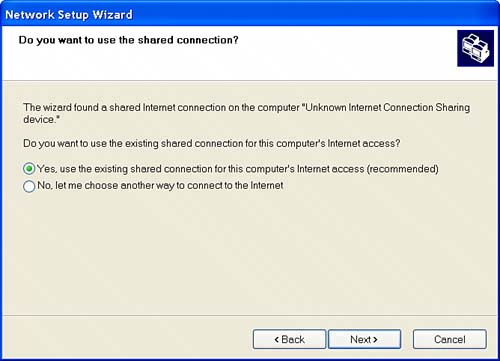
Regardless of how you got there, the first screen of the Network Setup Wizard is a friendly welcome message that summarizes what the wizard will do. When you see the Welcome to the Network Setup Wizard pane, click Next to continue. The Before You Continue pane opens. Here you are asked to review a checklist for creating a network, to install network cards and cables, to turn on all computers, and to make sure you are connected to the Internet. Perhaps you've noted the references in this list to things such as network cards and cables. However, with a Centrino laptop, we don't need no stinkin' wires! So ignore the references to old-style hardware, and boldly and bravely click the Next button. Now you might see a panel informing you that the wizard found disconnected network hardware. This is likely to be the case if your Centrino laptop has a network card intended for use with a wired network (in addition to its wireless capability). The right strategy here is once more to ignore that which doesn't apply. Be sure the Ignore Disconnected Network Hardware box is checked, and click Next to continue. What you see next depends on how your network is configured. If you are just starting out and there is no device on your network that already has a connection to the Internet (or if Windows can't detect it), you will see the Select a Connection Method pane shown in Figure 3.5. If this is the case, select the middle optionThis Computer Connects to the Internet Through a Residential Gateway or Through Another Computerand then click Next. Figure 3.5. The Network Setup Wizard will display this pane if it cannot detect an existing shared connection to the Internet.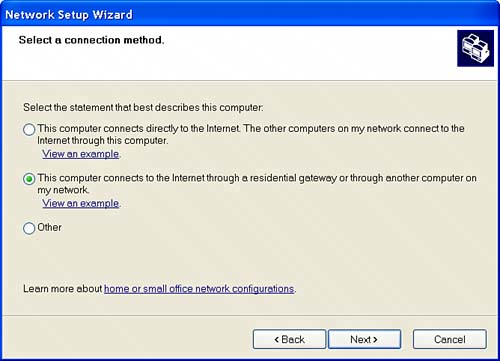 If you did not see the Select a Connection Method pane, you will see the Do You Want to Use the Shared Connection pane in Figure 3.6. In this case, select Yes, Use The Existing Shared Connection, and then click Next. Figure 3.6. The Network Setup Wizard will display this pane if a shared Internet connection is found.
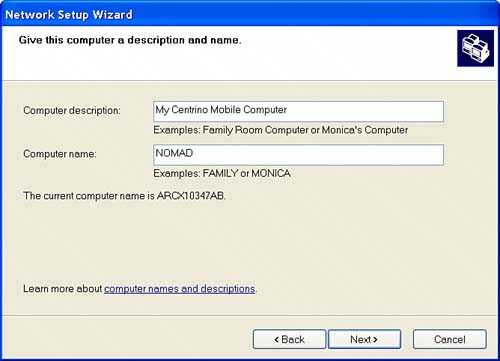
The next step is shown in Figure 3.7. In the Give This Computer a Description and Name pane you will specify how your computer is identified (just as you would if you were using a regular, old wired network). Give the computer a name, along with an optional description. This is your chance to replace a cryptic name that might have been assigned by your laptop manufacturer, such as ARCX10347AB, with something a bit more personal and descriptive. Click Next to continue. Figure 3.7. Give your computer a meaningful and unique name on the network.
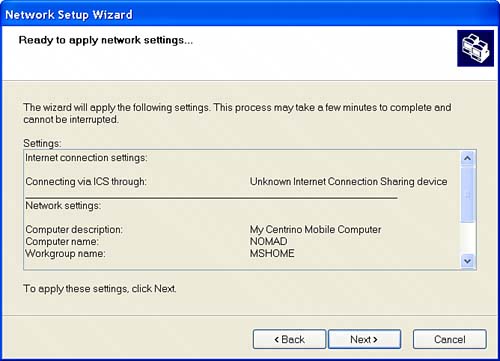
In the next wizard pane, you will be asked to specify your workgroup name. All the computers, wired and unwired, that are part of your network should most likely be part of the same workgroup, so that workgroup name is what should be entered here. If you don't know what workgroup name to use, you can use an existing computer on your network to find out. On the computer that is already connected to your network, click the Windows Start button. Next, highlight My Computer. Right-click My Computer, and choose Properties from the context menu. The System Properties window will open. Click the Computer Name tab. The name of the workgroup that the computer is part of will be displayed about midway down the Computer Name tab. With the workgroup name entered, click Next. You will now be asked for your file and printer sharing preference. I recommend you turn off file and printer sharing for now. This is the most secure way for you to start out. Don't worry; you can easily enable file and printer sharing later if you need to. Click Next to continue. The wizard now displays a summary of the information you've entered so far, as you can see in Figure 3.8. Figure 3.8. The wizard gives you a chance to review the computer name and workgroup settings before applying them.
The next pane displayed by the wizard statesperhaps a little optimisticallythat "You're almost done..." On this pane, you are asked to choose from four options:
The assumption behind this list of choices is that now that you've set up one computer on your network, you might need to use the same settings for other computers on the network. But our task has been to simply add a computer to an existing network; we don't need to change the settings on any other computer. Choose Just Finish the Wizard, and click Next. The wizard will inform you that you have successfully set the computer up for networking and suggest that you might want to change the settings for file and folder sharing. It's important to know that the way you have sharing set up has security implications. For some sharing considerations and suggestions, and for information about how to change these settings, see Chapter 18, "Securing Your Wi-Fi Network." Click Finish to close the wizard. If you are informed you need to reboot your computer, be sure all your files are saved and your applications are closed, and then click Yes to restart now. You probably won't be surprised to note that although we have successfully named our computer, and (in theory) added it to a workgroup, we don't have wireless connectivity yet. I'll show you how to engage wireless connectivity with your Centrino laptop in the next section, "Understanding the Network Connections Window." |
EAN: N/A
Pages: 204