Access ControlYour LAN
| Access control facilities that are built in to your access point router combination have a powerful capability to control many aspects of the way your private network, or LAN, operates. The most important of these aspects have to do with the security of your LAN and how computers within your LAN connect to it. This section explains the mechanics of the most important access control settings, using the D-Link and Linksys access point router combo units as fairly typical examples. Note that overall security concerns (and checklists regarding the actions you should take) that impact a wireless network are discussed in Chapter 18, "Securing Your Wi-Fi Network." Note In the case of the D-Link, firmware must be updated using a wired (not a wireless) connection. This is pretty typical. Be careful with firmware updates: Generally all the settings in the access point are lost, and it is returned to its original, factory default state. So make sure that you've noted all important settings, such as information needed to connect with the Internet, before you perform a firmware update. It's also a good idea to make sure that you archive and keep previous firmware updates until you are sure that the new one is working perfectly. Changing the Administrative PasswordIn Chapter 13 I advised you not to worry about the administrative password for your wireless access point when first getting your wireless network working. The rationale behind this was it was important to get your network up and running without adding complications. I advised you to leave the password at the default, usually blank or admin. Now that your wireless network is up and running, rundo not walkto change the administrative password associated with your access point. Being able to make administrative changes to your access point effectively gives an intruder the ability to manipulate your private network (and even potentially to lock you out of it). So you should change the administrative password. The good news is that to gain access even to an unprotected access point first requires the ability to access your network. The wired part of your network is protected to some degree by being on your premises and under your control. The unwired portion of your network should also have some level of protection if you've implemented encryption as I suggest. This "perimeter" defense should not make you feel warm and gushy inside. An unprotected access point is still a security risk. It is very easy to change the password, as you can see in Figure 15.8, which shows the D-Link unit's Administrator Settings page. There's very little downside other than the need to remember your administrative password. Figure 15.8. You should change the administrative password of your access point once your network is up and running.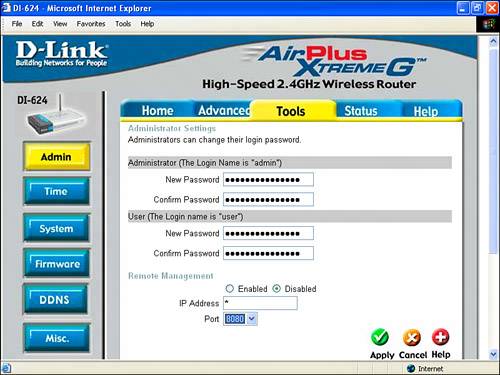 For example, to change the administrative password for the D-Link unit, open the Web-based administrative utility. Next, click the Tools tab. Enter your new password for the administrator, confirm it, and click Apply. As you likely know, you should be careful to choose a password that cannot be guessed too easily. Good passwords contain both letters and numerals, with no recognizable patterns or phrases. For more information about choosing a "good" password, see Chapter 17, "Protecting Your Mobile Wi-Fi Computer." Understanding Wireless SecurityWireless security primarily consists of two components: authentication and encryption. As I've previously mentioned, I highly recommend that you protect your wireless network by using encryption, which is the process of encoding to prevent an unauthorized user from reading or changing data. This section explains some of the encryption options available for your wireless network and your wireless computer. Figure 15.9 shows the Wireless Settings panel, used to configure encryption for the D-Link wireless router. Figure 15.9. The Wireless Settings panel in the D-Link administrative utility is used to set encryption.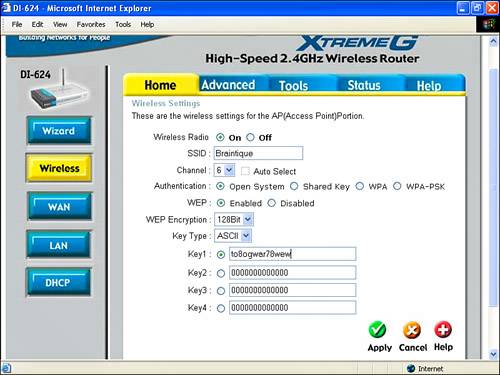 To open the Wireless Settings panel, with the administrative application running, first click the Home tab, and then click the Wireless button on the left side of the screen. Authentication is the process of ensuring that an individual is who he or she claims to be; note that authentication confers no access rights as such to an individual. (Access rights are handled by the security process known as authorization.) As you can see in Figure 15.9, there are a number of different authentication options for encryption for your wireless access point. In Open System authentication, the access points checks to see that a wireless computer connected to it "knows" the encryption key to authenticate it. Encryption keys can be entered as hexadecimal or ASCII strings of text. The wireless computer must enter the key expected by the access point, as shown in Figure 15.10, to be authenticated and to connect. Figure 15.10. A wireless computer must enter the key expected by the access point to be authenticated.
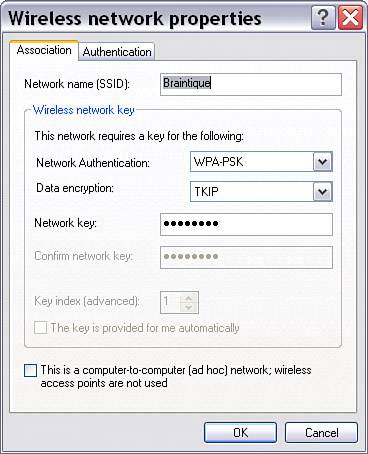
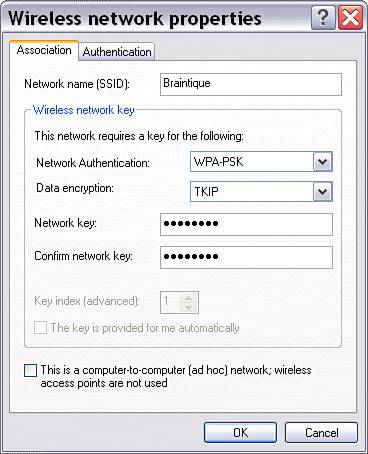
Shared Key authentication works in much the same way as Open System authentication, except that the authentication process is a bit more complex: The access point sends out random bytes, which the wireless computer requesting access must encrypt using the shared key and send back to the access point. The access point then decrypts using the shared key and verifies that the result matches the original. The advantage of the shared key scheme is that it proves the wireless computer is using the same key. However, it does give someone with snooping tools more information about your encryption key; so in the context of a wireless network, it is potentially less secure than the simpler Open System authentication. Shared Key authentication works in the same way as Open System authentication, with a key being entered in the access point (similar to that shown in Figure 15.9 except that Shared Key is selected as the authentication method) and the same key being entered in the Centrino laptop (similar to that shown in Figure 15.10) except that Shared is selected from the Network Authentication drop-down list rather than Open. WPA, or Wi-Fi Protected Access, authenticates users based on a key that changes automatically at a regular interval using a special server called a Radius server. To use WPA, you need to provide your access point with the location of the Radius server on your network as shown in Figure 15.11. Figure 15.11. To use WPA, you must provide the location of the Radius server on your network.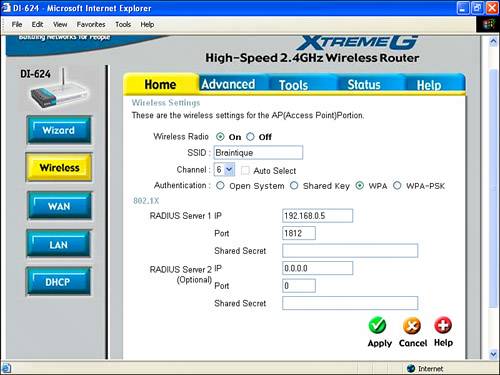 Of course, you must configure the Radius server used for authentication. Finally, you set the Network Authentication drop-down list to WPA in the Wireless network properties window of your laptop. If all this sounds like overkill for a small home or office networkparticularly buying, configuring, and maintaining a separate server for authenticating wireless clientsyou're right; it probably is. So WPA authentication should probably only be considered for situations in which security is important and the resources are available. WPA is probably not the right choice for protecting your Quicken data files, photographs, and Word documents, supposing that you are not a professional network security administrator. The final authentication choice is WPA-PSK, short for Wi-Fi Protected AccessPre-Shared Key mode. This is probably the best choice for a home wireless network if all the devices on the network support WPA-PSK. WPA-PSK is sometimes referred to as WPA home version or WPA lite. As opposed to WPA, it does not require a server. When WPA-PSK is selected as the authentication type, you enter a passphrase using your access point's administrative program as shown in Figure 5.12. In the Wireless network properties window of your Centrino laptop, select WPA-PSK as the Network Authentication type, TKIP as the Data encryption type, and enter the same passphrase, as shown in Figure 15.13. Figure 15.13. A wireless computer must enter the passphrase expected by the access point to be authenticated using WPA-PSK.
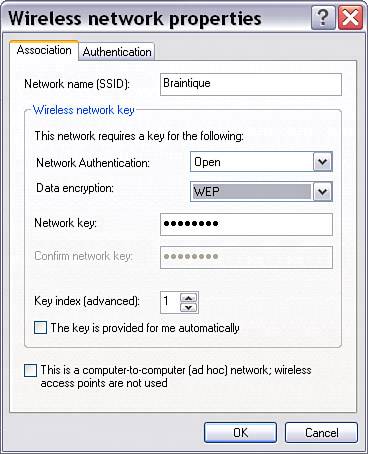
WPA-PSK uses the preset passphrase for authentication and dynamically generated keys, negotiated between your access point and the wireless computers using it, for encryption. It is probably the best choice for authentication short of full WPA. If you don't want to use WPA-PSKone reason might be because some older wireless computers do not support itOpen System is the best bet. If you do choose Open System authentication, make sure that WEP is enabled in your access point (as shown in Figure 15.9). Unless you have older computers using your wireless network that only support 64-Bit encryption, you should select 128-Bit encryption. (It is a little harder to crack.) Figure 15.12. To use WPA-PSK, you set a passphrase in the access point.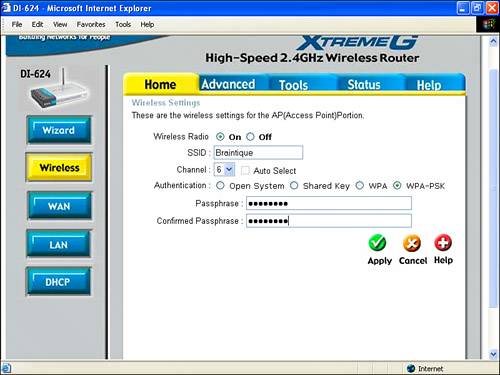 Finally, multiple keys are used with Open System and Shared Key WEP to vary the encryption key automatically. If you enter multiple encryption keys in your access point, you will need to do so for each wireless computer as well. Note WPA offers the most authentication and encryption protection, but it is too much hassle and expense for anyone but a corporate user. WPA-PSK and Open System WEP are the next best choices, but you should realize that they do not provide complete protection from a motivated and knowledgeable intruder and consider some of the other security measures outlined in Chapter 17. Don't Broadcast the SSIDYou can choose not to broadcast the network name (or SSID) of your wireless station. By not broadcasting the SSID, your network will not automatically appear in the Available or Preferred networks list in the Wireless Network Connections Properties window of your Centrino laptop. This provides an additional smidgen of securitywith SSID broadcasting blocked, it's easy to connect to your wireless network if you know its name, but you must know its name in advance and can't just scan for it. On the D-Link unit, to turn off SSID broadcasting, with the administrative program open, click the Advanced tab. Next, click the Performance button on the left. The Wireless Performance pane, shown in Figure 15.14, will open. Choose SSID Broadcast: Disabled (shown about midway down Figure 15.14). Click Apply. Figure 15.14. If you disable SSID broadcasting, users must know your network name to access your wireless network.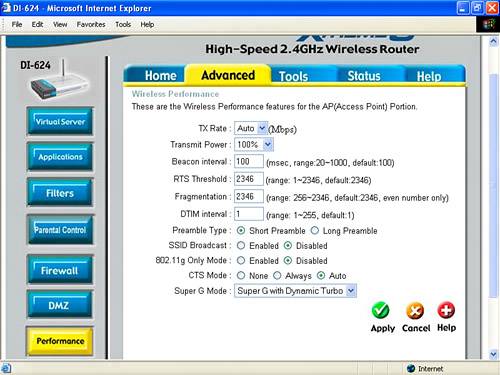 Note The default arrangement is usually to broadcast your SSID to make it easier to connect to a wireless access point. If you open the Wireless Network Connection's Choose a Wireless Network window on your Centrino laptop, as you can see in Figure 15.15, the SSID that was turned off in Figure 15.14 is not listed. (It was named Braintique.) Figure 15.15. With SSID broadcasting turned off, you won't see the network name in the Choose a Wireless Network list.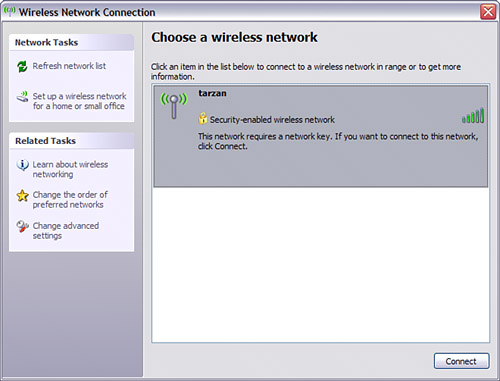 TIP You might need to search your access point's configuration utility to determine how to disable SSID broadcasting for your particular model. TIP You should now be able to connect to a new profile containing the station that doesn't broadcast its SSID. You might have to refresh the list of wireless networks (by clicking Refresh Network List on the Choose a Wireless Network pane of the Wireless Network Connection window). If this still doesn't do the trick, try rebooting your laptop to get it to connect to the wireless network whose SSID is not broadcasting. To add a wireless network that doesn't broadcast its SSID, perform the procedure described in "Connecting To the Wi-Fi Network" in Chapter 13. When you get to the Wireless Network Properties window, shown in Figure 15.16, type in the wireless network's SSID and other required information (see "Understanding Wireless Security" earlier in this chapter). Figure 15.16. You can enter the name for a wireless network whose SSID does not show in the Choose a Wireless Network list.
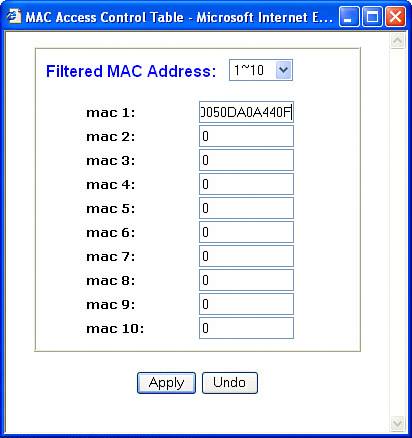
Remote Management and Providing Virtual ServicesRemote management is shown in its usual default state (which is disabled) in Figure 15.17 on the Administrator Settings page of the D-Link's configuration utility. Figure 15.17. By default, Remote Management is usually turned off.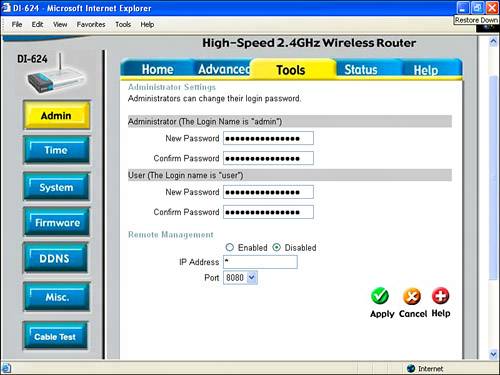 Remote management provides the ability to administer your wireless access point remotely, from the Internet. Obviously, this can be useful in some situations. Equally obvious, allowing your private network settings to be changed introduces a security risk. Note Some wireless access points provide an additional remote management feature that disables access to the access point administrative utility except from wired computers (and not from wireless computers). This provides a measure of security because wired computers must be physically connected to your network, whereas wireless computers can be operating outside your premises. To remotely manage an access point, it needs to be assigned a fixed IP address (so that it can be accessed). This IP address is entered in the field shown in Figure 15.17. In other words, you are unlikely to be able to use remote management if your ISP provides you with a dynamic IP rather than a fixed one. Setting up a virtual server is a way to provide users with access to some of the functionality available on your private network without exposing a security hole quite as egregious as allowing Internet administration of your access point. Figure 15.18 shows the D-Link administrative mechanism for settings up virtual servers. Figure 15.18. You can set up virtual servers to allow external users "safe" access to some of the functionality offered by your private network.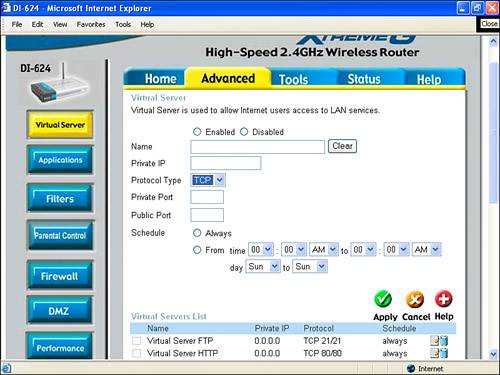 You'll find the Virtual Server interface on the Advanced tab of the D-Link administrative utility. This interface allows you to enable various common kinds of services you might want to provide, such as FTP, HTTP, and NetMeeting. By enabling virtual services, calls directed to the public IP of your access point are redirected to appropriate private IP within your network that can handle the request. For example, FTP requests are redirected to whatever IP you have set up within your private network as an FTP server. Although providing virtual services necessarily introduces security risks to the assets within your provide network, making these services available in a gated fashion helps contain the risk. In the context of your network and needs, you'll have to decide whether the risk is worth it. On balance, it is unlikely that most small home or office users will want to set up virtual services, but you should know that the possibility exists. TIP For a virtual service to be very useful, the public face of your network should be reached via a static (rather than a dynamic) IP. Otherwise, users of the virtual service won't be able to find it! Using MAC FilteringA friend of mine who professionally administers wireless networks has told me that his preferred method of securing access to his wireless networks is to deploy MAC filtering. MAC filtering is a way to enforce security on a Wi-Fi network at a deeper level than any authentication scheme. It's problematic to administer if you expect to often add nodes on your networkfor example, when a friend visits with a wireless laptop. Each device on a Wi-Fi network has a MAC (Media Access Control) address, or unique identification number baked in to the hardware. (See Appendix A, "Wireless Standards," for more information about the MAC layer.) As a matter of fact, every device on your network has a MAC address. In addition to the wireless radio baked in to your Centrino laptop, this goes for your wired network cards, your access point itself, any hubs or switches on your network, USB Wi-Fi devices, and so on. Note MAC filtering is a great security tool. But as an administrative matter, it would probably get out of hand if you have more than a handful of devices using the Wi-Fi network or if you added and deleted devices regularly because of the nuisance of adding and deleting all those MAC addresses. The idea behind MAC filtering is to tell the Wi-Fi access point that it can only communicate with the devices on your network that are explicitly identified to it by their MAC address. You go into the access point/router's administrative application and say, "Use these MAC addresses and no others!" The only trick to this is that you've got to round up the MAC addresses for all the devices you want to be able to connect to your Wi-Fi network. The good news is that it is usually pretty easy to determine the MAC address for a device. For one thing, if you buy a Centrino computer or a wireless device, it is likely that the packaging or documentation will tell you the MAC address of your wireless device. Running Ipconfig, as explained in Chapter 14 and shown in Figure 15.19, will provide a MAC address for the wireless hardware in a Centrino laptop running Windows XP Home edition. Figure 15.19. You can use Ipconfig to determine the MAC address of a network device on your computer.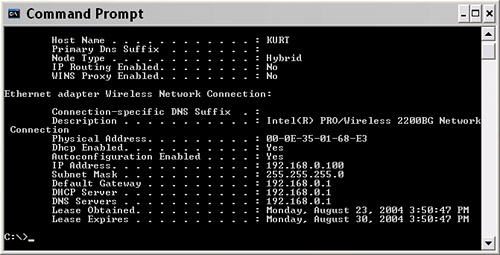 Windows XP Professional edition also provides a utility, getmac, that shows the MAC addresses of all the network devices on your system. (It is a bit dicey knowing which is which if you have more than one.) To run getmac, choose Command Prompt from the Accessories group in the Start menu to open a command window. With the command window open, type getmac at the prompt and press Enter. As you can see in Figure 15.20, the program will display the MAC addresses of the devices on your system. Figure 15.20. The getmac program displays the MAC addresses for the devices on your Windows XP system.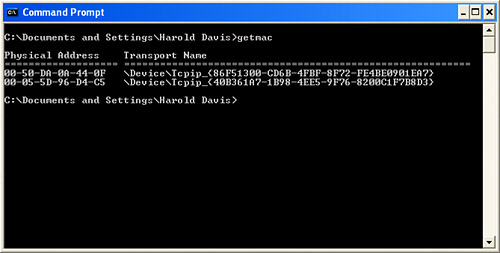 Note You can use Ipconfig, explained in Chapter 14, to find the MAC address of devices on your current computer. In contrast, getmac gives you a way to find the MACs for all active devices on your network. You can also use getmac to find the MAC addresses of devices running remotely on your network by supplying the program with the IP or network name of the remote device. After you've gathered the MAC addresses for the wireless devices that will use your Wi-Fi network, the next step is to enter them in to the Wi-Fi access point/router. Obviously, this will vary depending on the specific piece of equipment. Using the Linksys Wireless Broadband Router, open the administrative application. Next click the Advanced tab. In the Filters pane of the Advanced setup, go down to the Private MAC filter item, and click the Edit button. The MAC Access Control Table, shown in Figure 15.21, will open. Figure 15.21. The MAC Access Control Table is used to enter the MAC addresses of the devices that are allowed access.
Enter the MAC addresses of the devices that are to be allowed access in the table, and click Apply when you are done. With the D-Link unit, to set MAC filtering, first click the Advanced tab in the D-Link's administrative program. Next, click the Filters button on the left side. Finally, choose MAC Filters (rather than IP Filters) at the top of the pane. The MAC Filters interface, shown in Figure 15.22, has considerable power and flexibility. Figure 15.22. The MAC Filters interface can be use to allow or deny access based on the MAC address; it can also automatically clone the MAC addresses of devices connected to your access point.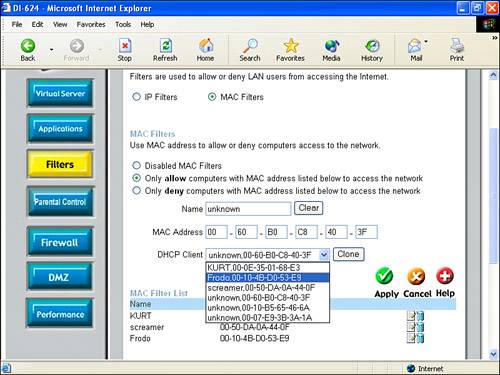 TIP The MAC Access Control Table shown in Figure 15.21 uses a drop-down list to enter more addresses if you need to add more than 10 MAC addresses. The D-Link MAC Filters interface can be used to allow or deny access to your private network based on MAC address. The DHCP Client drop-down list, shown in Figure 15.22, provides a list of the MAC address of all devices currently connected to your access point. You can use this list to add devices to be allowed (or denied) access by the MAC address. Select a device in the DHCP Client drop-down list. Next, click the Clone button. As you can see in Figure 15.22, the MAC address information for the cloned device now appears in the MAC Address fields. Next, click Apply. The device will be added to the list of devices allowed or denied access using MAC filters (provided that MAC filtering is turned on). |
EAN: N/A
Pages: 204