Defining a Logical Datacenter for the StockBroker Applications
Figure 3-2 was provided as a gentle introduction to logical datacenter design, based on a real-life data-center described in terms of zones, servers, and connections. Now we'll devise a logical datacenter against which we can validate the deployment of the StockBroker running example that was designed using Application Designer in Chapter 2. For this one, we'll tell you how to draw the diagram yourself and then we'll use it to introduce some more advanced ideas.
First, you need to add a Logical Datacenter Diagram to your solution, which you can do by right-clicking the solution in Solution Explorer and choosing Add ![]() New Item. Select the Logical Datacenter Diagram from the Distributed System Diagrams category and name the new diagram StockBrokerDatacenter.ldd.
New Item. Select the Logical Datacenter Diagram from the Distributed System Diagrams category and name the new diagram StockBrokerDatacenter.ldd.
| Note | Note that because logical datacenter diagrams are stored as separate files with the extension .ldd, these files could be signed and versioned in a real-life scenario as base-lined representations of the datacenter. These diagrams may be created in—or imported to—any Visual Studio solution. They aren't limited to "Distributed System" solutions such as our StockBroker solution. |
The application design from Chapter 2 includes not only our own suite of applications—the StockBroker, the StockQuoteApp, and the DealingApp—but also representations of what could be third-party applications (the MarketMaker and the StockMarket) that we need to interface with. For a complete picture, we'll specify in the LDD how we expect those third-party applications to be hosted, and that will be our starting point.
The MarketMaker Zone
In the preceding chapter, we suggested that the MarketMaker application would most likely be an external application. Though technically outside our control, we have created a representation of that application within the application design and we need to show it hosted somewhere.
We'll create a zone named MarketMakerZone containing a server named MarketMakerServer. Let's be clear that as a third-party hosted application, the server and zone in which it is hosted would really be outside our control, but from an operational point of view we'll need to understand—or indeed specify—the constraints of that hosting if we are to be able to connect to the application.
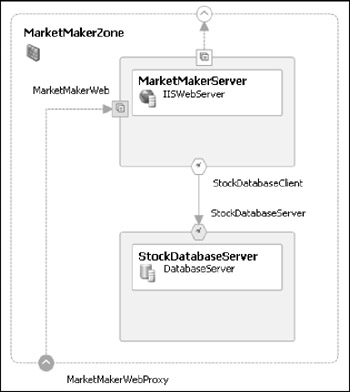
Figure 3-4 shows our design for the MarketMakerZone, or rather, what we expect the third-party zone to look like. We expect there to be an IISWebServer (which we've named MarketMakerServer) supporting incoming communication to a WebSiteEndpoint (which we've named MarketMakerWeb) through a zone endpoint (which we've named MarketMaketWebProxy) via HTTP so that we can invoke the Web services.

Figure 3-4
In our application design, we envisioned that the MarketMaker application would communicate with a StockDatabase, so for completeness we've shown a SQLServer named StockDatabaseServer. We've used the names StockDatabaseClient and StockDatabaseServer to distinguish the client and server endpoints of the database connection.
Figure 3-4 demonstrates that a zone may include one or more servers—in this case, a database server as well as a web server.
To draw the MarketMakerZone, first drag a zone prototype from the toolbox onto the diagram. Initially it will have one incoming endpoint and one outgoing endpoint, as indicated by the arrows. It will also have a default name—such as Zone1—that you can change to MarketMakerZone.
Next, drag an IISWebServer prototype from the toolbox to inside the zone boundary. Be sure to place this item inside the zone boundary, not outside of it. Change the name of this server to MarketMakerServer.
Click the solid provider endpoint on the MarketMaker server and choose Show Label from the pop-up menu. Whatever text appears (most probably WebSiteEndpoint1) change it to MarketMakerWeb. Now hover over that endpoint and press the Alt key until the connection cursor appears; click and drag a connection to the incoming endpoint on the MarketMaker zone. You could also relabel that zone endpoint as MarketMakerWebProxy to match our diagram.
What you've just done is indicate that clients can communicate with the MarketMaker IISWebServer through the zone via HTTP.
Now you should drag a DatabaseServer prototype into the MarketMaker Zone. Rename it to StockDatabaseServer, rename its solid provider endpoint to StockDatabaseServer, and connect it to the MarketMaker server. Make a connection to the MarketMaker server itself, not to the existing hollow consumer endpoint that we'll make use of shortly. Relabel the new database consumer endpoint that appears to StockDatabaseClient, and show its label.
You've now enabled direct communication between the MarketMaker web server and the StockDatabase database server within the zone, not from outside the zone. The only communication allowed into the zone from the outside is HTTP.
To complete this picture, you can connect the spare consumer endpoint of the MarketMaker server to the spare outgoing zone endpoint. This shows that we'll be communicating from the MarketMaker server, out through the zone, via HTTP. Although it's not crucial for this design, for completeness we'll be showing how this server may ultimately become a client of the StockMarket server, described next.
| Note | You can resize zones and servers, and move endpoints around their peripheries, to make your diagrams look better. You can also zoom out to see the complete picture as your diagram grows. |
Your result should match what is shown in Figure 3-4.
The StockMarket Zone
For the StockMarket zone, we'll adopt the same rationale we used for the MarketMaker zone. While the StockMarket application—which we modeled as a generic application in Application Designer—will be outside of our control, we'll allocate a zone to it and specify the characteristics of that zone in order to complete the infrastructure picture.
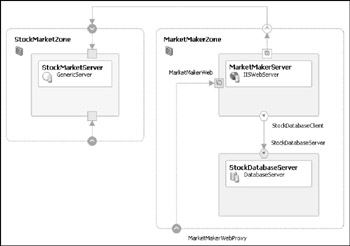
Figure 3-5 shows the StockMarket zone alongside the MarketMaker zone created in the previous step. Because we modeled the StockMarket application as a generic application in Application Designer, all we need to host it is a GenericServer.

Figure 3-5
We'll anticipate that this server will accept two kinds of incoming communications:
-
One from the MarketMaker, which will presumably need to communicate with the StockMarket at some point, though the exact details are outside of our core application design
-
One from the StockBroker, for which we've not yet provided a host in the figure, but for which we've shown a spare incoming endpoint in anticipation
Drawing the StockMarketZone is much simpler than the previous example. The steps to complete the drawing of that zone are as follows:
-
Drag a new zone onto the design surface and rename it StockMarketZone.
-
Ensure that the zone has only two incoming endpoints, if necessary, by dragging ZoneEndpoint prototypes from the toolbox.
-
Drag a new GenericServer prototype from the toolbox onto the zone, rename it StockMarketServer, and make sure it has two provider endpoints, if necessary, by dragging GenericServerEndpoints from the toolbox onto the server, or by using the Properties window to change the Communication Flow property of one of the default endpoints from Outbound to Inbound.
-
Connect each of the zone endpoints to one of the provider endpoints you've just created.
We won't display the endpoint labels on this zone and server, or rename them, because—to be frank—our knowledge of the StockMarketServer is sketchy and we're only showing this server and zone for illustration and to complete the overall picture. The minimum we need to show is that there will be some kind of generic server, located within its own zone and accepting connections from two other zones: the MarketMaker zone (described previously) and the StockBroker zone (described next).
Your result should match Figure 3-5.
The StockBroker Zone
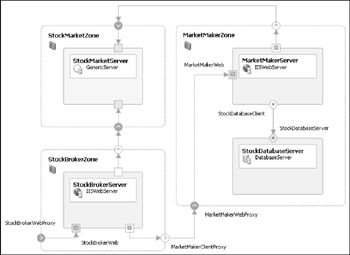
Our Web services application, the StockBroker, will be hosted by a StockBroker IISWebServer within a StockBroker zone over which we have complete control. The Stockbroker Server will communicate out of its zone and into the MarketMaker zone via HTTP, as you would expect because the StockBroker application (defined previously using Application Designer) will invoke Web services of the MarketMaker application (also defined using Application Designer). It will also communicate with the StockMarket server via some other generic protocol that has not yet been specified.
Finally, the StockBroker server will accept incoming Web services requests as HTTP via a WebSiteEndpoint named StockBrokerWeb, the clients of which we have not yet specified (see Figure 3-6).

Figure 3-6
The steps to complete the drawing of the StockBroker zone are as follows:
-
Drag a new zone onto the design surface and rename it StockBrokerZone.
-
Ensure that this zone has two outgoing endpoints, if necessary, by dragging ZoneEndpoint prototypes from the toolbox, or by changing the Communication Flow property of one of the default endpoints from Inbound to Outbound. Rename one of them MarketMakerClientProxy.
-
Ensure that the zone has one incoming endpoint named StockBrokerWebProxy.
-
Drag a new IISWebServer prototype from the toolbox into the StockBroker zone and rename it StockBrokerServer.
-
Ensure that this server has a WebSiteEndpoint, if necessary, by dragging one from the toolbox. Rename it StockBrokerWeb and connect it to the StockBrokerWebProxy endpoint on the zone.
-
Ensure that the server has a HTTPClientEndpoint, if necessary, by dragging one from the tool-box. Rename it MarketMakerClient and connect it to the MarketMakerClientProxy endpoint on the zone.
-
Finally, ensure that the server has a GenericClientEndpoint, if necessary, by dragging one from the toolbox. Connect this endpoint to the unlabeled outgoing endpoint on the zone.
Your result should match Figure 3-6.
The Client Zone
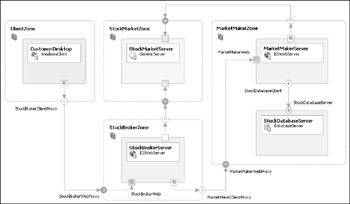
Our final zone will be a ClientZone to represent the scope of our client deployments. As our application design includes a Windows application, we'll populate the ClientZone with a WindowsClient server—named CustomerDesktop—which will host that application. As shown in Figure 3-7, client applications will connect from the ClientZone, through the StockBroker zone, to the StockBroker server via HTTP.

Figure 3-7
That completes the picture of our Logical Datacenter.
| Note | Although we've used only one-to-one connections between provider and consumer endpoints, the notation does not mandate this. It would be perfectly possible, but not advisable in this case, to connect the HTTPServer endpoint of the MarketMaker to the ClientZone, thereby establishing two consumer endpoints for the same provider endpoint. |
You should be able to draw the Client zone easily by now. The final steps to complete this logical data-center diagram are as follows:
-
Drag a new zone onto the diagram and rename it ClientZone, ensuring that this zone has only one outgoing endpoint named StockBrokerClientProxy.
-
Drag a new WindowsClient prototype from the toolbox onto the ClientZone, renaming this server CustomerDesktop.
-
Ensure that this server has an outgoing HTTPClientEndpoint (add one if necessary) connected to the endpoint on the Zone.
-
Finally, ensure that the StockBrokerClientProxy endpoint of the ClientZone is connected to the StockBrokerWebProxy endpoint of the StockBrokerZone.
| Important | The logical datacenter that we have drawn represents just one possible deployment scenario for the StockBroker suite of applications. You could create another logical datacenter diagram to reflect an alternative deployment scenario, and you could even try embedding one zone within another, which is certainly possible. |
EAN: 2147483647
Pages: 220