Extensibility and Customization Overview
Windows SharePoint Services provides many options for customizing and extending your team portal. Customization involves changing settings on an existing control or feature. Extensibility involves creating a brand new feature for the portal.
Creating and Extending Custom Web Parts
Web Parts are preprogrammed page elements on a SharePoint site enabling those who are unfamiliar with Web design and programming to make changes to the portal. Writing custom Web Parts for SharePoint Services can be a challenge for the uninitiated. There are three strategies you can currently take for integrating custom Web Parts:
-
You can create a custom Web Part using ASP.NET 1.1 and Visual Studio.NET 2003. The creation of Web Parts with .NET 1.1 is very difficult and involved. You can read about the process in several books and online blogs including this basic tutorial: sharepointblogs.com/andynoon/archive/2006/06/20/8494.aspx.
Important We chose not to include a tutorial on creating .NET 1.1 Web Parts in the book because the technology will soon be deprecated and the instructions are really long and prone to error. The real value of a Web Part is to give a nonprogrammer the ability to add and configure controls on a SharePoint site. We provide you with a quick, easy, and effective way of achieving the same results without the pain.
-
Son of SmartParts helps you integrate ASP.NET 2.0 Web Part and User controls within a SharePoint Web Part. ASP.NET 2.0 Web Parts are not available in the current version of Windows SharePoint Services - full ASP.NET 2.0 Web Part support will be available in Windows SharePoint 2007. You can download the Son of SmartParts at http://workspaces.gotdotnet.com/smartpart. You can learn in detail how to create an ASP.NET 2.0 Web Part in Peter Vogel's Professional Web Parts and Custom Controls with ASP.NET 2.0 (from Wrox).
-
The last option (and the one we explore in depth) is to integrate ASP.NET 2.0 content into a team portal using the Page Viewer Web Part. One of the biggest customer requests out there is getting work item information displayed on the team portal. The application we build shows the work item list in a GridView and allows the user to click links for work item details. A screenshot of the application can be seen in Figure 10-3:
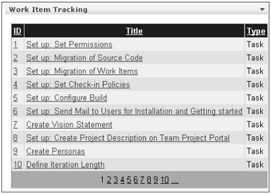
Figure 10-3
| Important | Writing custom Web-based work item applications requires special permissions to be set, especially if you are planning to use the work item object model. Some of the tasks you have to complete include setting up the physical architecture, enabling integration authentication, configuring the WIT cache folder, enabling ASP.NET impersonation (and other security settings), and running the Web application under a dedicated application pool. Peter Sheill (blogs.msdn.com/psheill) blogged about and posted a document written by Naren Datha with guidelines and requirements for Web-based work item applications. You can download the document at http://blogs.msdn.com/psheill/attachment/543120.ashx. |
Creating a Custom ASP.NET Work Item Application
First, we need to set up a custom ASP.NET 2.0 application that will interact with our SharePoint portal. The good news is that you don't need a single line of code behind to get the application working - everything will be programmed declaratively. The first thing you need to do is create a C# Web site and set up a standard Web form page called WITDisplay. You'll need to set up a unique virtual site (or Web site) separate from the built-in Team Foundation Server applications.
<%@ Page Language="C#" AutoEventWireup="true" CodeFile="WITDisplay.aspx.cs" Inherits="Default" %> <!DOCTYPE html PUBLIC "-//W3C//DTD XHTML 1.0 Transitional//EN" "http://www.w3.org/TR/xhtm11/DTD/xhtm11-transitional.dtd"> <html xmlns="http://www.w3.org/1999/xhtml" > <head runat="server"> <title>WITDisplay</title> </head> <body> <form runat="server"> <div>
Next, you set up the GridView. The first thing you'll notice is that we've allowed paging and sorting with the help of callbacks. The unique key we have provided is ID, and the data source is SqlDataSource1 (which we will define later in code). Included are a few cell, border, and font parameters to establish the look and feel.
<asp:GridView AllowPaging="True" AllowSorting="True" AutoGenerateColumns="False" DataKeyNames="ID" EnableSortingAndPagingCallbacks="True" DataSource runat="server" BackColor="White" BorderColor="#999999" BorderStyle="None" BorderWidth="1px" CellPadding="3" Font-Bold="False" Font-Names="Arial" Font-Size="Small" GridLines="Vertical">
Now set up your columns. The first column you'll use is the ID column (containing the work item ID). Since you want to make field clickable, use the asp:HyperLinkField (instead of an asp:BoundField).
<Columns> <asp:HyperLinkField HeaderText="ID" DataTextField="ID" DataTextFormatString="{0}" DataNavigateUrlFields="ID" The DataNavigateUrlFormatString establishes the hyperlink. In particular, you will access a native aspx page that displays a work item details page based on the work item's ID (artifactMoniker). The results are shown in Figure 10-4.
DataNavigateUrlFormatString ="http://TFSRTM:8080/WorkItemTracking/Workitem.aspx?artifactMoniker={0}"
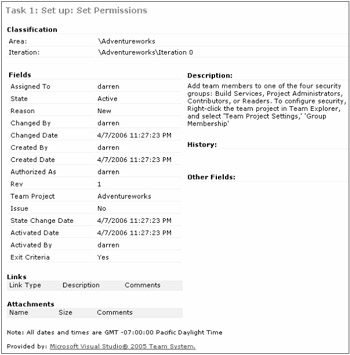
Figure 10-4
You then target a page called WorkItemDetail (because no such page has been defined beforehand, clicking a link will spawn a new details page). If a page with the WorkItemDetail ID is open in your task bar, the results will keep appearing in the same page.
Target="WorkItemDetail" ItemStyle-Font-Size="10pt" SortExpression="ID"> <ItemStyle Font-Names="Arial" Font-Size="Small" /> <HeaderStyle Font-Bold="True" Font-Names="Arial" Font-Size="Small" /> </asp:HyperLinkField>
You will then define another column for the Title. The hyperlink will behave the same as the ID field. (It will spawn a new window with the work item details.) The only difference is the SortExpression is by title, and the DataTextField is obviously Title.
<asp:HyperLinkField HeaderText="Title" DataTextField="Title" DataTextFormatString="{0}" DataNavigateUrlFields="ID" DataNavigateUrlFormatString = "http://TFSRTM:8080/WorkItemTracking/Workitem.aspx?artifactMoniker={0}" Target="WorkItemDetail" ItemStyle-Font-Size="10pt" SortExpression="Title"> <ItemStyle Font-Names="Arial" Font-Size="Small" /> <HeaderStyle Font-Bold="True" Font-Names="Arial" Font-Size="Small" /> </asp:HyperLinkField> This code adds a column for work item tasks. The SortExpression="WIType" command allows the user to sort the grid by type. Note that WIType is not a native datatype within the work item database; it is an alias for Work Item Type.
<asp:BoundField DataField="WIType" HeaderText="Type" SortExpression="WIType"> <ItemStyle Font-Names="Arial" Font-Size="Small" /> <HeaderStyle Font-Bold="True" Font-Names="Arial" Font-Size="Small" /> </asp:BoundField> </Columns>
The following code defines the Rainy Day color scheme for the entire GridView:
<FooterStyle BackColor="#CCCCCC" ForeColor="Black" /> <RowStyle BackColor="#EEEEEE" Font-Names="Arial" Font-Size="Small" ForeColor="Black" /> <SelectedRowStyle BackColor="#008A8C" Font-Bold="True" ForeColor="White" /> <PagerStyle BackColor="#999999" ForeColor="Black" HorizontalAlign="Center" /> <HeaderStyle BackColor="#000084" Font-Bold="True" Font-Names="Arial" Font-Size="Small" ForeColor="White" /> <AlternatingRowStyle BackColor="#DCDCDC" /> </asp:GridView>
Finally, you define the connection string and SQL command for the GridView. The SelectCommand query currently pulls the ID, title, and type for all the work items within the server. However, you can customize the query to pull any kind of information you want. In fact, an interesting customization you can do is integrating a DropDownList on the interface to allow your users to select from any query they want.
<asp:SqlDataSource ConnectionString="<%$ ConnectionStrings:TfsWarehouse %>" runat="server" SelectCommand="SELECT [ID], [Title], WIType = [Work Item Type] FROM [TfsWorkItemTracking].[dbo].[WorkItemsLatest]"> </asp:SqlDataSource> </div> </form> </body> </html>
You notice that the connection string refers to TfsWarehouse. We've set up the connection string in question within the web.config file. It specifically points to the Latest Work Item fact table. It provides up-to-date information about your work items. In the connection string, you use integrated security and target the TfsWorkItemTracking database. You can explore the fact tables by opening SQL Server Management Studio, connecting to the database (as opposed to analysis services), and exploring all the tables that start with Tfs. Why limit the data to work items? You can customize this application to pull any kind of project data including builds, version control, or test results.
<?xml version="1.0"?> <configuration> <appSettings/> <connectionStrings> <add name="TfsWarehouse" connectionString="Server=TFSRTM;Integrated Security=True;Database=TfsWorkItemTracking;Persist Security Info=True" providerName="System.Data.SqlClient" /> </connectionStrings> <system.web> <compilation debug="false"> <assemblies> <add assembly="Microsoft.SharePoint, Version=11.0.0.0, Culture=neutral, PublicKeyToken=71E9BCE111E9429C"/></assemblies> </compilation> <authentication mode="Windows"/> </system.web> </configuration>
| Important | At this point, you may be wondering why we pulled the data directly from the database instead of resorting to the work item object model. The main reason is performance - the GridView has been optimized to pull and page data directly from a database. If we used the object model, we would have to use an intermediate data construct (such as a DataTable) to store the results. The results are a lot slower depending on the amount of data you want to pull. |
Integrating the Work Item Application into a Web Part
Now it's time to integrate the work item application into the team portal. The first thing you need to do is add a Page Viewer Web Part into one of your SharePoint zones. Start by clicking on Modify Shared Pages in the top-right corner of your portal. Then select Add Web Parts⇨Browse.
The Add Web Parts interface appears on the right (as shown in Figure 10-5). Click the Team Web Site Gallery (as shown), and then click once on the Page Viewer Web Part option to select and highlight it.
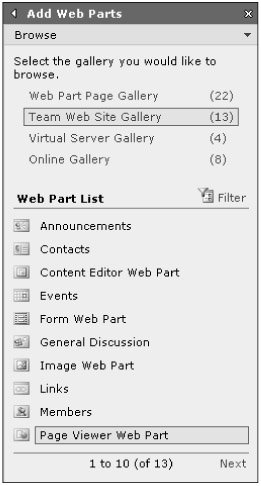
Figure 10-5
Once the option has been highlighted, drag it into one of the SharePoint zones in the middle of the page (as shown in Figure 10-6).
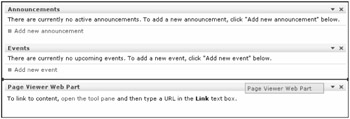
Figure 10-6
The Page Viewer has now been added to the site. Click the down arrow to the right of the Web Part and select Modify Shared Web Part. The Page Viewer Web Part properties (shown in Figure 10-7) appear on the right of the screen. Change the link to point to your ASP.NET 2.0 application, change the title to say Work Item Tracking, and change the height to 350 pixels. Once you are done, click OK.
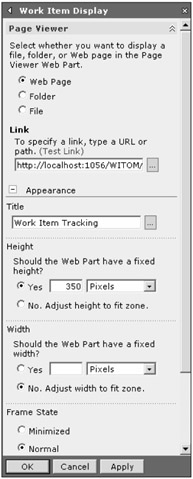
Figure 10-7
Your custom Work Item Tracking Web Part will appear on the team portal (as shown in Figure 10-8).
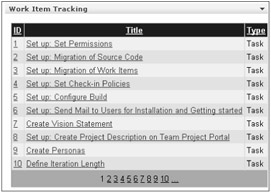
Figure 10-8
EAN: 2147483647
Pages: 168