Team Foundation Build Overview
In conjunction with Team Foundation Server and Team Explorer, Team Foundation Build server allows you to create an end-to-end build process. You can retrieve code from Team Foundation Source Control, compile it, run tests against the compiled code, release the builds onto a file server, update work items accordingly, and publish build reports of the information. Moreover, you can do all of this using a five-step wizard.
Team Foundation Build (or Team Build as it is sometimes referred to) uses a build engine called MSBuild. MSBuild is the new XML-based build engine of the .NET Framework 2.0, and is distributed as part of the framework. You can make use of MSBuild using Visual Studio or the command line, it's your choice. MSBuild uses XML files to help configure the build process. Team Foundation Build is a build automation tool. It follows a series of tasks to complete a build, utilizing MSBuild where appropriate to help with the process.
Let's look at the architecture that makes up Team Foundation Build, and then drill down into how we configure and run these builds, and how we can view the results.
Architecture
Team Foundation Build is designed to be used in conjunction with Team Foundation Server and its associated components. It's easiest to think of the Team Foundation Build architecture as broken into four distinct parts, as shown in Figure 3-1:
-
Team Explorer/Team Editions - You use Team Explorer, running on your client machine, to create, run, and view the results of your builds. Using Team Explorer, you can create and run builds. Then, using the Team Build Browser, you can view the results of a build, either while it is running or once it has finished. Team Explorer, in conjunction with the Team Build Browser, gives you full control of your build process from your client machine.
-
Team Foundation Server - Team Foundation Server provides access to the Team Foundation Build Web services, which help coordinate each step of the build process. It also provides access to the version control system, for both retrieving build scripts and code to compile, and to the work item tracking system, enabling the generation of work items from the build events. The Team Foundation Server also provides the data store for Team Foundation Build, which stores all the information related to the build, such as build configurations and build results.
-
Standalone build server - The build server is the physical machine where the build takes place. In most instances, you have a separate build machine on which you run the actual build. This tier has a build service running on it, which executes each step in the build based on instructions and information sent to it from the Team Foundation Server. If you will be running tests against the build, you will need to have either Team System for Testers or Team System Team Suite installed.
-
Drop site - This server is where the build files are placed once the build has finished running. This could be the same server as the build server, or just another server on your network. The build server needs access to this server to drop files onto this server.
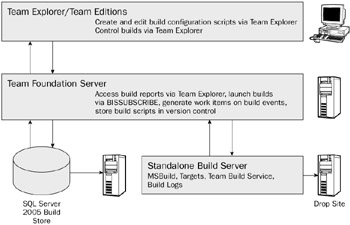
Figure 3-1
Using Team Explorer on your client machine, you create a build type, which defines the steps that will be taken in the build process. You can version control this build type using Team Foundation Server. When you are ready, you kick off the build process from Team Explorer. Team Foundation Server then begins communicating with the build services on the standalone build server, working together to retrieve files from the version control system, copy those files to the build server, run the build and any associated tests, and gather information on the build process. Using Team Explorer and the Team Build Browser, you can track the status of the build while it is running.
Once the build process is complete, the built files are placed on the drop site. Team Foundation Server finishes gathering information on the build process, including its success and failure, and stores that information for reporting purposes. Finally, again using Team Explorer and the Team Build Browser, you can view the build reports to determine the success or failure of your build process.
For information about multiple build configurations of Team Foundation Build, refer to Chapter 15. Now that you have a general understanding of the architecture, let's look into what is required to configure a build.
Build Types
Projects can be built in a variety of different ways, depending on your organizational rules and methods. Some organizations like to have nightly builds, where they take all the code that has been checked in that day and try to build it. Some organizations do this weekly. Some organizations implement continuous integration, where they try to build the application as many times as possible during the day and night.
A normal build usually involves several steps, such as retrieving the latest code from the source-control system, compiling the code, running tests and analysis, and generating reports. Most people use some sort of build scripts to automate this process. Team Foundation Build is no different. In Team Foundation Build, these scripts are called a build type.
A Team Foundation build type allows the user to define all the steps necessary for a particular build to execute, as well as any specific parameters needed for the build. Using Team Explorer and the New Team Build Type Creation Wizard, you can easily create a build type. The build type is just an XML file. Once it has been created, it is stored in your project in the Team Foundation Source Control system. From there, you can easily check it out and modify the file to work with your specific build environment, should you so choose. You can also configure multiple build types, which allows you to specify different configurations for your nightly builds as opposed to your continuous integration builds. After all, each build type is nothing more than a different build script that contains different steps and different configurations, depending on what you are trying to achieve with the build.
In the rest of this section, we walk through creating a build type using the wizard, and examine the files created. Later in this chapter, we briefly discuss how to modify an existing build type.
Before you can create a build type, you need the Team Foundation "Administer a build" privilege. Please see "Setting Up Team Foundation Build Server" later in this chapter for more information. Also, before you can create a build type, you need to have created a team project and connected that team project to the Team Foundation Version Control system. You must also have an actual code project associated with the team project and checked into the version control system.
Assuming all those pieces are in place, let's move on to creating an actual build type with the wizard:
-
In Team Explorer, navigate to the Team Builds folder located under your Team Project. Right-click the Team Builds folder, and select New Team Build Type. This starts the New Team Build Type Creation Wizard.
-
In the first step of the wizard, you enter in a name for your build type, and an optional description. Clicking Next takes you to the next step of the wizard, where you select the solutions you wish to build, as shown in Figure 3-2.
-
First you need to select which workspace you want to pull files from to create the build. You can choose to view solutions that are located in the current team project only. Or, you can select a particular workspace, which might have solutions from multiple team projects. Being able to create a build from a previously created workspace can help with getting to correct disk mappings, such as to external assembly references. Once you have selected a workspace, you need to select the solution or solutions you want to include in the build. Using the up- and down- arrows to the right of the window, you can reorder the solutions, to ensure they build in the correct order. Once you are done, click Next.
This opens the build configuration page. You can use one build type to create multiple builds of your solution. For example, you could create a Debug build and a Release build for the x86 platform, at the same time. Using the Configuration drop-down list, you can select either Debug or Release. Using the Platform drop-down list, you can select from any of the following platforms: x86, x64, Win32, Itanium, or Any CPU. Selecting a new row in the table allows you to add another configuration to the build type. You can add as many configurations as you would like.
-
Click Next to move to the Select Build Location step of the wizard. On this page, you enter the name of the build machine and the directory on the build machine (example: c:\build) where the build is to take place. You also enter the drop location for the build type. This is the location where the final compiled files are placed, so you can review and use them as appropriate. It is important that this location be a file share that everyone has write access to, and that the build service account, for example TFSSERVICE, has the appropriate rights to modify data located there. Please see the section "Setting Up a Common Build Drop Site" later in this chapter for detailed information.
-
The next step of the wizard allows you to configure which tests, if any, you would like to run against the compiled code. You can run static code analysis, or unit tests that you have configured. Select the options you want to run, and click Next. Click Finish on the summary page to create the build type.
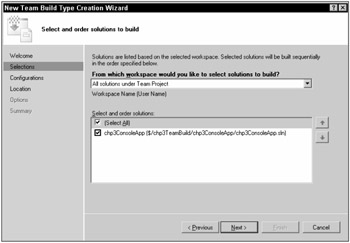
Figure 3-2
Once the build type is created, you can see it under the Team Builds folder in Team Explorer. When the build type is created, it is automatically checked in to the version control system at $/{Team ProjectName}/TeamBuildTypes/{Name Of The Build Type}/TFSBuild.proj. There are some other files created and put there as well, but for the time being, we are just concerned with the TFSBuild.proj file. This build type file contains the MSBuild script that drives the build process for this particular configuration.
Unfortunately, there is no graphical interface for making changes to a build type. Once you have created a build type using the wizard, the only way to effect changes is to modify the TFSBuild.proj file by hand. At this point, a quick look at the sections of the TFSBuild.proj file would be helpful. TFSBuild.proj is just an MSBuild XML file. It is broken up into sections that correspond back to the wizard you used to create it.
First up is the description section, offset by <Description> tags. This is the description associated with the build type:
<Description>Your Description Here</Description>
Next, the build machine is specified, using the <BuildMachine> tag:
<BuildMachine>machine1</BuildMachine>
If you build server changes, you would need to change the server name here, to ensure the appropriate build server is used.
You specify the Team Project you want to build using the <TeamProject> tag:
<TeamProject>MyTeamProjectName</TeamProject>
The build directory and drop location are listed using <BuildDirectoryPath> and <DropLocation>, respectively:
<BuildDirectoryPath>c:\buildir</BuildDirectoryPath>
and
<DropLocation>\\dropmachine\\droploc</DropLocation>
The <RunTest> tag enables or disables testing:
<RunTest>false</RunTest>
The <RunCodeAnalysis> tag enables or disables static code analysis:
<RunCodeAnalysis>Default</RunCodeAnalysis>
If you need to add more solutions to this build type after its initial creation, you need to add another <SolutionToBuild> tag to the appropriate item group in the file:
<SolutionToBuild Include="$(SolutionRoot)\SolutionPath\Solution.sln />
To add different configuration types, you add a new <ConfigurationToBuild> section:
<ConfigurationToBuild Include="Debug|Any CPU"> <FlavorToBuild>Debug</FlavorToBuild> <PlatformToBuild>Any CPU</PlatformToBuild> </ConfigurationToBuild>
This configuration section creates a Debug release of the application that runs on any CPU.
There is more information contained in the TFSBuild.proj file, but this gives you enough to have a general understanding of its contents. Consult the online help (http://msdn2.microsoft.com) for more information. The TFSBuild.proj file itself is also commented very well, making it easy to understand what is going on.
Build Execution
Once a build type has been created, you can execute a build. This can be done using Team Explorer or from the command-line tools. When a build is executed, it moves through each step of the build type and performs the necessary actions, including retrieving code from the repository, running tests, and creating build metrics for reporting purposes.
| Important | You must have the Team Foundation Server start or resume a build security rights to run a build. |
To execute a build using Team Explorer, open Team Explorer, and navigate to the Team Project you want to build. From the Build menu, select Build <Team Project>. In Team Explorer, you can also right-click the Team Builds folder and select Build <Team Project>. This opens the Build dialog box, shown in Figure 3-3. From the Build type drop-down list, select the build type you want to use for this build. Under Build location, you can change the build machine to be used by selecting a new machine from the drop-down list, or you can leave the default, which is the build machine configured with the build type. You can also change the default directory that the build will use, or leave the one configured with the build type.
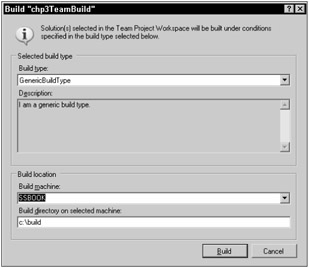
Figure 3-3
| Important | Make sure your build directory has enough space to hold the build. Running out of space will lead to failed builds. |
Now all you have to do is click the Build button in the dialog box to start the build process.
To start the build process using the command-line tools, you will use TFSBuild.exe application to schedule a build using the Windows scheduler. The Team Foundation Server Scheduler does not provide the ability to schedule builds, so you have to set this up yourself, as you will see later in this chapter. This application is located at C:\Program Files\Microsoft Visual Studio 8\Common7\IDE. There are four commands used in conjunction with this tool: delete, help, start, and stop. Here is the general syntax for starting a build using the command line tools:
TFSBuild.exe start <teamfoundationserver> <teamproject> <buildtype> [/machine:buildmachine] [/d:builddirectory].
So, to build the same project we built previously with the wizard, you would do the following:
TFSBuild.exe start SSBOOK chp3TeamBuild GenericBuildType
Where SSBOOK is the name of my Team Foundation Server, chp3TeamBuild is the name of my team project, and GenericBuildType is the build type I have created.
Please consult the online help (http://msdn2.microsoft.com) for more information on the other commands associated with TFSBuild.exe.
While the build is running, you can use the Team Build Browser or the Team Build report to monitor the build status. To open the Team Build Browser, first open Team Explorer. In the Team Builds node of the specific Team Project, click All Build Types to open the Team Build Browser. This shows a summary of all completed builds and builds that are currently in progress. The information in the Team Build Browser is automatically refreshed during the build process.
To view more detailed information concerning the build process, open the Team Build report for the particular build type that is running. From the Team Build Browser, double-click the build you are interested in to open the report. This shows you, among other things, the detailed status of each step in the build process. The build information in the report is automatically refreshed during the build process.
Let's look at some Team Foundation Build internals. Figure 3-4 shows the build process in sequence. The tasks in the hexagons are built into the Microsoft.TeamFoundation.Build.targets file. The target elements within the file help coordinate the project building process. The task elements define what should trigger within the build. You learn how to modify targets and tasks later in the chapter.
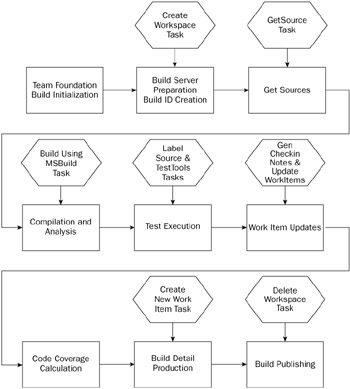
Figure 3-4
| Important | You must have Team Foundation Server view project level information permissions to view build reports and statuses. |
Build Report
Once the build process is complete, a report is generated containing detailed information about the build and its results. This report contains detailed information, including a list of all the build steps, information on which work items were resolved, new work items which were created, test execution information, and the overall build status, including any errors and warnings generated. The report also contains active links to changesets, work items, and test results to enable you to really drill down and understand what occurred during the build.
All the build report information is stored on the data tier of Team Foundation Server, and can be accessed using Team Explorer. Navigate to the Team Project you are interested in, open the Team Builds folder, and double-click the build you are interested in. This will open the Team Build Browser, as shown in Figure 3-5.
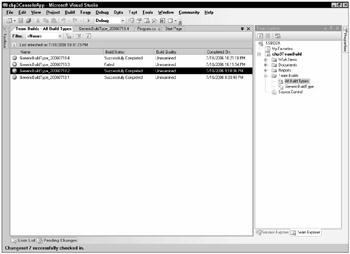
Figure 3-5
Double-click a specific build to view a detailed build report, as shown in Figure 3-6 and Figure 3-7.
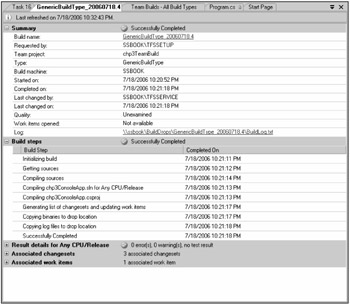
Figure 3-6
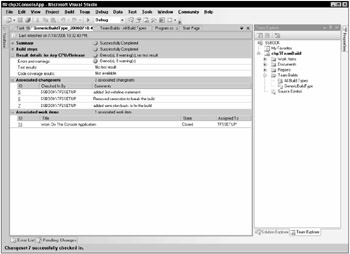
Figure 3-7
A Build Report can contain up to five different sections:
-
Summary
-
Build steps
-
Result details
-
Associate changesets
-
Associated work items
The Summary section contains the basic information about the build, including the build name, who ran the build, the build type used, start and end dates, and the current state of the build, as well as a few other pieces of information.
The Build Steps section shows all the steps used by a particular build, as well as whether the build was successful. Each step contains a timestamp, showing the date and time each step was initiated. Some of the possible build steps include:
-
Initializing Build
-
Getting Sources
-
Compiling Sources
-
Running Tests
-
Getting changesets and updating work items
-
Copying binaries and log files to drop location
-
Completion status (Successfully completed, Failed, Stopped)
The Results detail section contains information concerning any errors and/or warnings generated, test results, and code coverage results. With errors and warnings, it displays compilation and static analysis errors. You can click a link to view specific information concerning the error or warning. The test results show all the information for all the tests run during the build, including a link to the test, total number of tests run, and test results, such as passed or failed. There will be a Results Detail section for each build configuration you set up in the build type.
The Associated changeset section contains information concerning which changesets are contained in the build. This information includes Changeset ID, who checked in the changeset, and any comments associated with the changeset. You can click the Changeset ID to view detailed information concerning the changeset.
Finally, the Associated Work Items section contains information about any work items associated with this build. This information includes the Work Item ID, name, check-in action associated with the work item, and who modified this work item. You can click the Work Item ID to view detailed information concerning a specific work item. This is important information, especially for those who will be testing the build, as it tells them what they need to be looking for when they do their testing.
As you can see, the build process and subsequent build reports are deeply integrated into the rest of Team Foundation Server.
EAN: 2147483647
Pages: 168