Using Virtualization
Virtualization software is software that emulates computer hardware. Virtualization software allows you to run multiple operating systems on the same computer, at the same time. Each of these operating systems acts as a separate physical computer, complete with its own hard drive, memory, network connections, and so on.
There are two main uses for virtualization software in a Team Foundation Server context:
-
Server consolidation
-
Software testing
By installing multiple virtual machines (VM) on one powerful computer, you can take advantage of unused resources. Most servers use 20 percent or less of their resources, such as processor and RAM. Installing multiple VMs on a server allows you to take full advantage of the hardware, allowing you to push the utilization of server resources as far as possible. This also leads to less physical servers to have to maintain. Expensive computer hardware is used to its fullest potential, and less money is being spent on new hardware.
VMs also assist in software testing. Many times, you want to test an upgrade to a mission-critical application in a test environment as close to that of production as possible. However, acquiring the hardware to create this environment can be very expensive. Using VMs, you can create a test network very similar to your production network, but at less cost than purchasing duplicate hardware. VMs are also useful for testing patches before pushing them out to your corporate machines. As well, VMs make evaluating new software, particularly beta software, a relatively painless experience.
In this section, we talk about Microsoft's virtualization solutions, and give you the basics of how to install Team Foundation on a VM, for either evaluation or production purposes.
Overview of Microsoft Virtual Server and Virtual PC
Microsoft currently has two virtualization systems on the market: Virtual PC and Virtual Server. The two products have many of the same features in common, including file architecture, networking, and disk options.
Using a similar file architecture allows for the transfer of VMs between instances of Virtual PC and Virtual Server. Virtual PC and Virtual Server both use configuration files (.vmc) to store the basic information concerning the virtual machine. The virtual hard disk files are stored with a .vhd extension.
Virtual PC and Virtual Server both allow network communication between virtual machines and physical machines. There are various network options available.
Hard disk options include the use of undo and differencing disks. Undo discs allow you, for a given session with your VM, to save everything that has changed on the VM, or discard it, leaving your VM in its initial state before it was started. A differencing disk is a virtual hard disk associated with another virtual hard disk. Think of this as a parent-child relationship. You can create a virtual hard disk that contains Windows XP. Then you can create a new VM, with a differencing disk, that points to the Windows XP hard disk. Your new VM will now boot using the operating system on the original hard disk, but all changes that you make (such as installing new applications), will be applied to the differencing disk. You can have multiple VMs that all use the same base virtual hard disk, with this one caveat: You cannot apply any changes to the base virtual hard disk. If you do, all related differencing disks become invalid and all data on those disks is effectively lost.
Finally, you will find you achieve a performance increase if you run your VM on an external hard drive, separate from your main operating system.
We will be using differencing disks in an example later in this section. For this section, we will be using Virtual PC. However, these same instructions can be applied to Virtual Server with relatively few changes. Also, when I refer to "host operating system," I'm referring to the operating system running on the physical hardware. When I refer to "guest operating system," I'm referring to the operating system running inside the VM.
If you have installed Virtual PC, you can find the help file at C:\Program Files\Microsoft Virtual PC\Documentation\English\vpc.chm. This file is an excellent resource for understanding Virtual PC and all of its options.
Microsoft Virtual Server and Virtual PC are now 100-percent free, and can be downloaded from microsoft.com.
Hardware/Software Requirements
The following are the minimum hardware/software requirements for Virtual PC:
-
400 MHz Pentium-compatible process (1 GHz recommended)
-
20MB disk space
-
Host operating system: Windows XP Professional, Windows 2000 Professional, or Windows XP Tablet PC Edition
Virtual PC supports the following guest operating systems: MS-DOS 6.22, Windows 95, Windows 98, Windows ME, Windows 2000, Windows NT 4.0, Windows XP, and OS/2. With Virtual PC Service Pack 1 installed, Windows Server 2003 is also supported. Refer to the Virtual PC help file for the latest information concerning required memory and hard disk space.
There are two versions of Virtual Server: Standard Edition and Enterprise Edition. Each supports multiple processors, processor types, and operating systems. Refer to the Virtual PC help file for the latest information.
The guest operating systems for Virtual Server include all listed above for Virtual PC. In addition, it also supports Windows NT Server 4.0 Enterprise Edition SP6a.
Determining How Many Virtual Machines to Run
While there is no hard and fast rule for how many virtual machines you should run on a particular piece of hardware, there are some common sense guidelines to follow.
Each virtual machine is going to need memory, probably more than the minimum amount listed in the help file. At the same time, the host operating system is also going to need memory to continue to function. You need to make sure you have allocated enough memory to the host operating system, so it can function effectively.
Each virtual machine is also going to use processor power. Virtual PC supports single processors only, so all VMs running with Virtual PC will use the same processor. There are some options for determining how much processor time a particular machine gets. Using Virtual Server, if you are running on a multiprocessor machine, you can assign a separate processor to each VM, if you have them.
Based on how much memory you have to spare for your VMs and how much processing power you have, you will probably have to run some tests to determine the ideal number of VMs to run on your hardware.
Creating a Base Virtual Machine
This section guides you through the process of using Virtual PC to create a Windows Server 2003 virtual machine with the latest patches installed. You can then use this VM as a base hard disk for installing your Team Foundation Server components. You will use differencing disks, which allows you to install the operating system only once.
-
Open the Microsoft Virtual PC Console. This is accessed using Start⇨All Programs⇨Microsoft Virtual PC.
-
Click New to start the New Virtual Machine Wizard. Once the wizard starts, click Next. Figure 2-8 shows the Options page of the wizard.
-
You have three options: create a virtual machine, use default settings to create a virtual machine, or add an existing virtual machine. Here, you are going to use the default, which is to create a virtual machine. Click Next.
-
This step of the wizard asks you for the name and directory for your .vmc file, which is the configuration file for your virtual machine. Enter the name and select a directory; then click Next.
-
This takes you to the next step of the wizard where you can select the guest operating system you want to install on the VM. For this example, select Windows Server 2003. Clicking Next allows you to configure the amount of RAM for the machine, as shown in Figure 2-9.
-
For now, accept the defaults. This can always be changed later in the settings of the virtual machine. Click Next. This step of the wizard allows you to create or select a virtual hard disk to use with this virtual machine.
-
Select a new virtual disk and click Next. Enter the name and directory of the virtual hard disk.
It defaults to the same directory as your .VMC file, and with the same name as your .vmc file, but with a .vhd extension. For now, just accept the defaults. You have the option of changing some of the hard drive configuration options later.
-
Clicking Next takes you to the last step of the wizard. Click Finish to create the virtual machine. Once the machine is created, it appears in the Virtual PC Console, as shown in Figure 2-10.
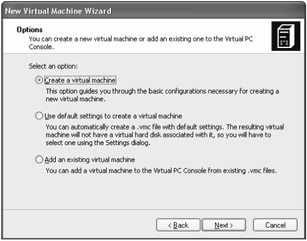
Figure 2-8
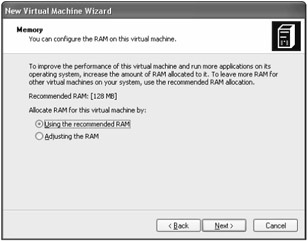
Figure 2-9
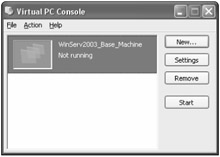
Figure 2-10
The wizard has created the virtual hard disk for you. It defaults to a dynamically expanding virtual hard disk, with a maximum size of 16GB.
Now you need to install the operating system. Insert a Windows Server 2003 Standard Edition disk into the CD drive of the physical computer. Before you start the VM, we recommend increasing the amount of memory used by it. Clicking Settings opens the settings for the VM, allowing you to change things such as memory and network configurations. Open the Settings window and change the memory to be 1024 MB. Next, click Start on the Virtual PC Console, to start the virtual machine you just created.
When the machine starts, it should recognize the CD drive and try to boot from the disk. If it does not recognize the drive, then select CD⇨Use Physical Drive D: to make the VM use the drive. Install Windows Server 2003 as normal, following the installation directions.
After installing Windows Server 2003, click Action⇨Install or Update Virtual Machine Additions. This installs the Virtual Machine Additions, which add some extra functionality to your VMs. Reboot the VM after installing the additions. Once the machine has rebooted, you can select Edit⇨Settings, to open the Settings Window for this VM. In the Networking section, select Shared Networking (NAT), to allow this VM to use the network card and Internet access of the host machine. Then, using Internet Explorer and Windows Update, download all the latest patches and apply them to the guest operating system to ensure the system is secured.
Once the guest operating system has been patched, shut down the virtual machine. You do this just like a regular machine, by selecting the Start button, and then Shutdown. Once the machine is shut down, navigate to the folder where you stored the .VHD and .VMC files. Right-click both the files and set them to be read-only. This ensures you cannot make changes to these files. Remember, you are going to use these files as the base image for your differencing disks, so this step ensures you don't corrupt your base image.
At this point, you have a base image of Windows Server 2003, which you can use for future servers.
Installing Team Foundation Server Components on a Virtual Machine
You now have a base image to use to create our other server virtual machines. In this section, you create a VM based off a differencing disk virtual hard drive. We look at how to install the components of Team Foundation Server on that drive and wrap up with a brief discussion on how to configure your new VM for network connectivity.
Creating the Virtual Machine
The first thing you need to do is create a differencing disk virtual hard drive.
-
From the Virtual PC Console, select File⇨Virtual Disk Wizard. This opens the Virtual Disk Wizard. Click Next to open the Disk Options page.
-
Select Create A New Hard Disk, and click Next. This opens the Virtual Disk Type page. You can create a new Virtual Hard Disk or a new Virtual Floppy Disk. Select the Hard Disk options and click Next.
-
This opens the Virtual Hard Disk Location page. You can select the name and location of the virtual hard disk you are creating. Enter this information and click Next. This opens the Virtual Hard Disk Options page, shown in Figure 2-11.
You have four options: Dynamically expanding, fixed, differencing, and linked to a hard disk. Click the Differencing option, and click Next. This opens the Difference Virtual Hard Disk page. This is where you select the parent virtual hard disk. Go ahead and select the Windows Server 2003 hard disk you created in the previous section. Click Next to go to the final page of the wizard. Click Finish to create the differencing hard disk. Once the disk is created, a window opens to let you know it was created successfully.
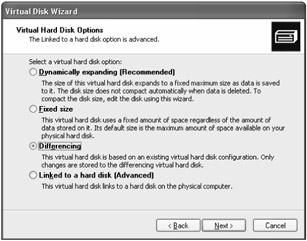
Figure 2-11
Now that you have created the virtual hard disk, you need to create the new virtual machine. You are going to follow almost the same steps as in the previous section, "Creating a Base Virtual Machine," with a few of changes:
-
Use a different name on the Name and Location page.
-
Instead of creating a new virtual hard disk, select to use An Existing Virtual Hard Disk.
-
When you select to use an existing virtual hard disk, there will be an extra step where you select which hard disk to use. Select the differencing disk we just finished creating in this section.
-
Continue the remaining steps.
You will now see the new virtual machine listed in the Virtual PC Console. Select the virtual machine and click Start to start the machine. The machine starts up just like it is supposed to, as shown in Figure 2-12.
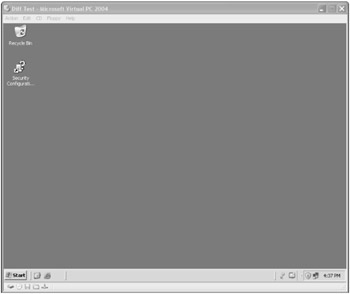
Figure 2-12
| Important | At this point, you have your virtual machine up and running. It is just a computer like any other. You can insert your installation media into your physical CD-ROM drive on your computer, and your virtual machine will recognize and use it. Follow the steps listed previously in this chapter to install Team Foundation Server. |
Configure Network for Virtual Machines
Network options with Virtual PC include:
-
Not Connected - Used if the machine is not going to be connected to a network. This can speed up the virtual machine, because it is not checking for a network controller.
-
Local - Allows virtual machines to talk to each other only. This is great for a test environment. The VMs will not access any of the network resources from the host machine. This is a private network between virtual machines.
-
Shared Networking - The VM is connected to a private network created by VPC. This includes a virtual DHCP server and NAT server. The VMs can then access most TCP/IP resources that the host operating system can access.
-
Network Adapter On Physical Computer - VM connects directly to the network connection on the host operating system. The VM acts as a separate physical machine on the same network.
-
Microsoft Loopback Adapter - Can be used to create a more complex network environment on a single physical computer, without installing multiple physical network cards.
You can specify up to four emulated network adapters for a VM. If you are running several VMs on one machine for testing purposes, more than likely you will use Local networking. Otherwise, you will have to choose the networking option that makes the most sense for your environment and what you are trying to accomplish.
EAN: 2147483647
Pages: 168