8.2 Address Lists
|
| < Day Day Up > |
|
When you address an e-mail message, you often do not know the address for the intended recipient of the message. In these cases, you can look up the recipient’s address in your personal address book, in your Outlook contacts folder, or in a shared Address List that the system administrators have made available to all users. The most common example of a shared Address List is the Exchange Global Address List (GAL). Users use Address Lists such as the GAL to look up recipient addresses when they address messages, but they also may use Address Lists to retrieve other information, such as street addresses, telephone numbers, pager numbers, fax numbers, conference rooms, and web page addresses.
Exchange allows you to create custom Address Lists in addition to the default GAL. These custom Address Lists are typically subsets of the information found in the GAL, and they allow users to quickly find relevant information without having to search through the entire GAL.
As an administrator, when you create an Exchange custom Address List you are actually defining a set of filter rules, or selection criteria, that are applied to the Active Directory. Active Directory objects (usually user objects) that match the selection criteria are added to the custom Address List. The newly created custom Address List is not static. The filter rules are periodically reapplied to the Active Directory, and the Address List is automatically updated to include any new or modified objects that match the selection criteria.
Much of the value of custom Address Lists comes from the user’s abilityto more quickly find the relevant information. If you create too many custom Address Lists, your users may not be able to quickly find the Address List that meets their needs. Similarly, if you do not give your Address Lists meaningful and consistent names, your users may not find the Address Lists useful. You need to have a strategy for creating custom Address Lists and organizing them to facilitate quick access. For example, you could create an Address List for each of your company’s locations, for each of your company’s departments, or for any other subset of your complete user list that meets the needs of your users. Your Address List names should reflect the type of entries that users can find in the list. For example, a good name for a list of users in your company’s accounting department might be “Accounting Department.”
If you have a large number of custom Address Lists, you should organize the lists so that your users can easily find the one they need. For example, a hierarchy of nested lists that mirrors your corporate organization structure might be effective. A nested Address List is one that is located under another Address List. You can use empty Address Lists to help create the appropriate hierarchy for your users. An empty list is created without specifying any selection criteria and thus contains no objects. Figure 8.19 shows one way to organize your Address Lists into a useful hierarchy.
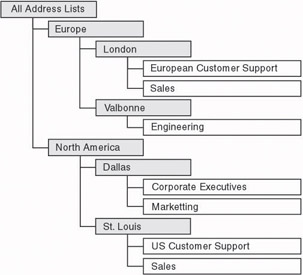
Figure 8.19: Sample Address List hierarchy
As an administrator, you must perform several tasks to manage Address Lists, including the following:
-
Defining the selection criteria that will be used to determine Address List membership
-
Specifying the Exchange servers and Windows domain controllers that will run the RUSs to periodically update the Address List
-
Defining the schedule for the periodic updates
-
Controlling user access to the Address Lists
If you are upgrading from Exchange 5.5, you must create an Address List for any Exchange 5.5 address book view that you want to continue to use. In Exchange 5.5, address book views provided similar benefits to users.
However, the management of Exchange 2003 Address Lists is completely different, and the internal data structures of Exchange 2003 and Exchange 5.5 also vary greatly. In brief, Exchange 5.5 address book views cannot be used with Exchange 2003; it is necessary to use Address Lists instead.
8.2.1 Default Address Lists
When you install Exchange, the setup procedure automatically defines several Address Lists and makes these lists available to your users. You manage these default Address Lists using the same procedures as used for managing your custom Address Lists. The default Address Lists are:
-
Global Address List. The Exchange 2003 GAL contains the same type of objects as the Exchange 5.5 GAL (i.e., it contains all e-mail users, including mailbox-enabled users, mail-enabled users, groups, contacts, public folders, and resources). The other default Address Lists are subsets of the GAL.
-
All Users. This list contains all mailbox-enabled or mail-enabled users.
-
All Contacts. This list contains all mail-enabled contacts.
-
All Groups. This list contains all mail-enabled groups.
-
Public Folders. This list contains all Exchange public folders.
8.2.2 Creating a custom Address List
The process of creating a custom Address List is really a process of defining a set of filter rules, or selection criteria, that are applied to the Active Directory. Active Directory objects (usually user objects) that match the selection criteria are added to the custom Address List.
The selection criteria you use to create an Address List are a combination of recipient categories (e.g., users with Exchange mailboxes, users with external e-mail addresses, groups, contacts, and public folders) and field-level attributes, such as the user’s city, company, country, department, and so on. For more complex selection criteria, you can use LDAP queries to identify the appropriate subset of users.
Once you define the selection criteria and the RUSs, Address Lists require minimal management. As new Active Directory users are created, deleted, or modified, changes are made automatically to the appropriate Address Lists.
You can use the following procedure to define the selection criteria for a custom Address List.
-
Start ESM from the Windows Start menu by selecting All Programs →Microsoft Exchange →System Manager.
-
Expand the Recipients section.
-
If you are creating an Address List at the top level of your hierarchy, right-click on All Address Lists and select New →Address List. If you are creating an Address List at a lower level in your hierarchy, right-click on the parent Address List for the list you are creating and select New →Address List.
-
In the Address List name field, enter a name for the new Address List (Figure 8.20). This is the Address List name that users will see when they choose an address from their Outlook Address Book. Therefore, the name you enter should provide users with an indication of the type of objects included in the Address List. For example, an appropriate name for a list containing all of the users in the Dallas office might be “Dallas Users.”
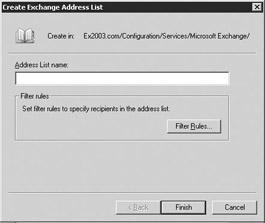
Figure 8.20: New Address List – Name dialog box -
If you have a large number of custom Address Lists, you should organize the lists into a hierarchy of nested Address Lists. You can use empty Address Lists to help create the appropriate hierarchy for your users. If the list you are creating is an empty Address List, simply select Finish to create a list that does not have any selection criteria.
If you are not creating an empty list, select the Filter Rules button to display the Find Exchange Recipients dialog box.
-
In the Find Exchange Recipients dialog box, use the Find drop-down list to select the search category for the new Address List (Figure 8.21). You can select from several categories, including: Users, Contacts, and Groups; Computers; Printers; Shared Folders; Organizational Units; Custom Search; Exchange Recipients, Remote Installation Servers, Common Queries, and Remote Installation Clients. Several of these categories are not generally useful as e-mail recipients and therefore do not warrant an Address List. Only the following search categories are generally considered for e-mail Address Lists:
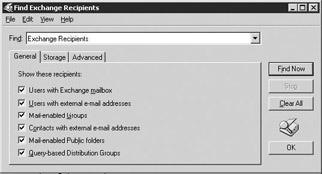
Figure 8.21: New Address List – Find Exchange Recipients General tab-
Exchange Recipients. This category contains users, groups, contacts, mailbox-enabled public folders, and system objects.
-
Users, Contacts, and Groups. This category contains only users, groups, and contacts.
-
Custom Search. This category allows you to enter an LDAP query to select Active Directory objects.
-
Select one of these from the Find drop-down list to begin defining the search filter rules that will be used to select the entries for the Address List. The search filter rules you define are used to search the Active Directory. If your requirements change, you can modify the search filter rules to meet your new requirements. The procedures for entering the search filter rules vary depending on the type of search category you select. The following sections describe the procedures for the three commonly used categories.
Defining filter rules for the Exchange Recipients category
-
In the Find Exchange Recipients dialog box, use the Find dropdown list to select the Exchange Recipients search category (see Figure 8.21).
-
General tab On the General tab, select the recipient categories that best match the Address List membership you are defining. Your choices are users with Exchange mailboxes, users with external e-mail addresses, mail-enabled groups, contacts with external e-mail addresses, mail-enabled public folders, and query-based distribution groups. For example, if you are creating an Address List that is to contain all of the distribution lists for your company, select the Mail-enabled Groups check box.
-
Storage tab Select the Storage tab to specify which mailboxes should be considered for Address List membership by the search filter process (Figure 8.22).
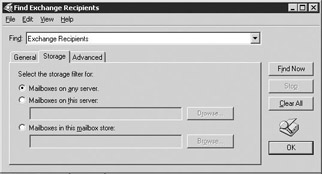
Figure 8.22: New Address List – Find Exchange Recipients Storage tab -
By default, the search examines all mailboxes on all servers. However, you can limit the search to mailboxes on a specific server or to mailboxes in a specific mailbox store. To limit the search, select either Mailboxes on this server or Mailboxes in this mailbox store, then select the server or mailbox store that should be used.
-
Advanced tab Select the Advanced tab to specify the characteristics of Address List members on the basis of field-level attributes (Figure 8.23).
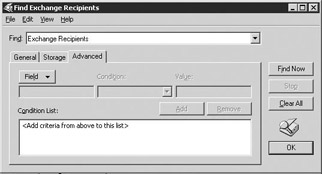
Figure 8.23: New Address List – Find Exchange Recipients Advanced tab -
Use the following steps to specify a field-level attribute that should be used as part of the selection criteria:
-
Select the Field button and select the appropriate recipient category. The recipient categories are user, contact, group, public folder, and query-based distribution group. The recipient category determines the field-level attributes that you can select in the next step.
-
Using the drop-down list, select the field-level attribute that the search filter should examine. For example, the user recipient category includes field-level attributes, such as the user’s alias, city, company, country, department, display name, and so on.
-
Using the Condition drop-down list, select the condition you want to test. Available conditions include Starts with, Ends with, Is (exactly), Is not, Present, and Not present.
-
In the Value field, enter the value that you want to compare the field-level attribute against. For example, if you want to select all users located in Dallas, you would make the following choices for the field, condition, and value:
Field =City
Condition = Is (exactly)
Value = “Dallas”
-
Select Add to add this field-level attribute test to the selection criteria.
-
You can repeat these steps to add additional search criteria.
-
Defining filter rules for the Users, Contacts, and Groups category
-
Users, Contacts, and Groups tab In the Find Exchange Recipients dialog box, use the Find drop-down list to select the Users, Contacts, and Groups search category (Figure 8.24).
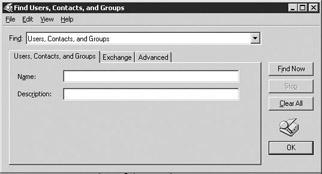
Figure 8.24: New Address List – Users, Contacts, and Groups tab -
Enter a name into the Name field and enter description information into the Description field.
-
Select the Exchange tab (Figure 8.25).

Figure 8.25: New Address List – Exchange tab -
Exchange tab To restrict the Address List membership to Exchange recipients, select the Show only Exchange recipients check box. You can then further restrict the membership by selecting one or more of the Exchange recipient subcategories. These subcategories are users with Exchange mailboxes, users with external e-mail addresses, groups, and contacts.
-
Advanced tab Select the Advanced tab to specify the characteristics of Address List members on the basis of field-level attributes (Figure 8.26).
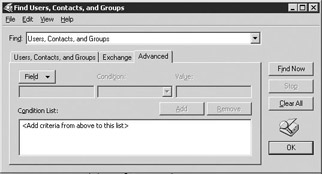
Figure 8.26: New Address List – Advanced tab -
Use the following steps to specify a field-level attribute that should be used as part of the selection criteria.
-
Select the Field button and select the appropriate recipient category. The recipient category determines the field-level attributes that you can select in the next step.
-
Using the drop-down list, select the field-level attribute that the search filter should examine (e.g., user alias, city, company, country, department, display name).
-
Using the Condition drop-down list, select the condition you want to test. Available conditions include Starts with, Ends with, Is (exactly), Is not, Present, and Not present.
-
In the Value field, enter the value against which you want to compare the field-level attribute.
-
Select Add to add this field-level attribute test to the selection criteria.
-
You can repeat these steps to add additional search criteria.
-
Defining filter rules for the Custom Search category
-
Custom Search tab In the Find Exchange Recipients dialog box, use the Find drop-down list to select the Custom Search category. You can use the Custom Search category to enter LDAP queries to specify more complex selection criteria (Figure 8.27).
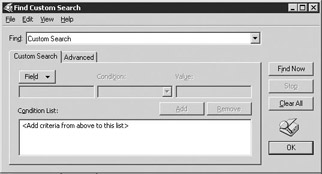
Figure 8.27: New Address List – Custom Search tab -
Use the following steps to specify a field-level attribute that should be used as part of the selection criteria.
-
Select the Field button and select the appropriate recipient category. The recipient category determines the field-level attributes that you can select in the next step.
-
Using the drop-down list, select the field-level attribute that the search filter should examine (e.g., user alias, city, company, country, department, display name).
-
Using the Condition drop-down list, select the condition you want to test. Available conditions include Starts with, Ends with, Is (exactly), Is not, Present, and Not present.
-
In the Value field, enter the value against which you want to compare the field-level attribute.
-
Select Add to add this field-level attribute test to the selection criteria.
-
You can repeat these steps to add additional search criteria.
-
-
Advanced tab Select the Advanced tab to enter LDAP queries to specify more complex selection criteria (Figure 8.28).
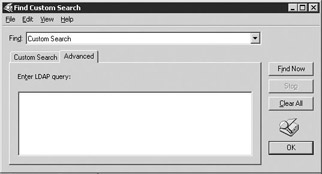
Figure 8.28: New Address List – Advanced tab -
Enter your LDAP query into the Enter LDAP query field. The syntax for LDAP queries is defined in RFC 2254 and is very powerful and flexible. Only Active Directory objects that meet the LDAP query requirements will be included in the Address List. You can quickly deduce the syntax for LDAP queries by examining the existing LDAP queries on the General tab of any existing Address List Properties dialog box. For example, the LDAP query for an Address List containing all Exchange users in the Dallas Engineering department would be:
(&(&(&(&(mailnickname =*) ( |(&(objectCategory = person)(objectClass = user) ( |(homeMDB =*)(msExchHomeServerName =*)))))) (objectCategory = user)(department =Engineering)(l = Dallas)))
Previewing the Address List
-
Regardless of which search category (i.e., Exchange recipients; users, contacts, and groups; or custom search) you use to enter your filter rules, you can immediately preview the resulting Address List by selecting the Find Now button on the Find Exchange Recipients dialog box (Figure 8.29). You should always preview the Address List, especially when you are creating a new Address List or using complex LDAP queries. Find Now also is useful for estimating how long the query will run to determine whether the query will be processor intensive. A query that runs for seconds instead of minutes is desirable.
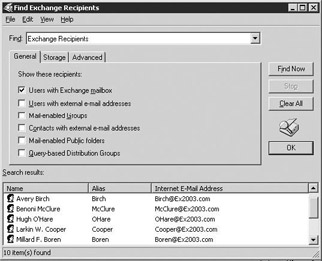
Figure 8.29: New Address List – Find Exchange Recipients dialog box -
By default, the Address List displays only the user’s name, alias, and Internet e-mail address. However, you can elect to display different fields or additional fields for each entry in the Address List. To modify the fields that will be displayed, select Choose Columns from the View menu. The Choose Columns dialog box will be displayed (Figure 8.30).
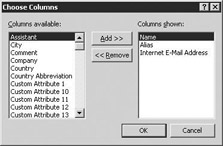
Figure 8.30: New Address List – Choose Columns dialog box -
To display an additional field, select the field from the Columns available list, then select the Add button. To remove a field, select the field from the Columns shown list and then select the Remove button. You can repeat this process until the desired set of fields has been selected.
-
Select OK when you are finished adding fields to the display. This will return you to the Find Exchange Recipients dialog box.
-
Select OK on the Find Exchange Recipients dialog box to complete the process of creating the selection criteria for a new custom Address List. The selection criteria will be saved as an LDAP query on the General tab of the Address List Properties dialog box. The new Address List will be populated the next time the RUS is run (see Section 8.5 for a detailed discussion).
By default, all Exchange users will have access to the newly created Address List. You can use the procedure outlined in the following section if you want to restrict access to the Address List.
8.2.3 Modifying an Address List
When you create an Address List, you define the filter rules, or selection criteria, that will be used to select the items to be included in the Address List. Many filter rules can be combined to form complex selection criteria for the resulting Address List. All of the separate filter rules are combined to form an LDAP query that is used to select items from the Active Directory.
What happens if you need to change your selection requirements? For example, what if you want your Address List to include not only the Dallas users but also the St. Louis users? If your requirements change, you can always modify the search filter rules to meet your new requirements. You can change Address List membership by selecting a different search category or by modifying the search filters.
The following procedure can be used to modify the search filters that are used to create an Address List.
-
Start ESM from the Windows Start menu by selecting All Programs →Microsoft Exchange →System Manager.
-
Expand the Recipients and the All Address Lists sections.
-
In the details pane, right-click on the Address List you want to modify and select Properties.
-
General tab The Filter rules field on the General tab contains the LDAP query that is used to select items for the Address List (Figure 8.31). Exchange always converts the selection criteria you specified during the Address List creation process to an LDAP query. Even the default address lists are defined by LDAP queries, as shown in Table 8.1.
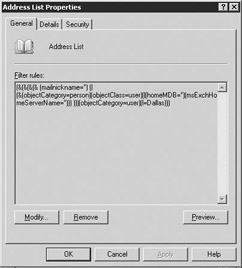
Figure 8.31: Address List – General tabTable 8.1: Lightweight Directory Access Protocol Queries for Default Address Lists Address List
Lightweight Directory Access Protocol Query
Global Address List
(&(mailnickname=*) (|(&(objectCategory=person)(objectClass=user) (!(homeMDB=*))(!(msExchHomeServerName=*))) (&(objectCategory=person)(objectClass=user) (|(homeMDB=*)(msExchHomeServerName=*))) (&(objectCategory=person)(objectClass=contact)) (objectCategory=group)(objectCategory=publicFolder) (objectCategory=msExchDynamicDistributionList)))
All users
(&(mailnickname=*) (|(&(objectCategory=person)(objectClass=user) (!(homeMDB=*))(!(msExchHomeServerName=*))) (&(objectCategory=person)(objectClass=user) (|(homeMDB=*)(msExchHomeServerName=*)))))
All contacts
(&(mailnickname=*) (|(&(objectCategory=person)(objectClass=contact))))
All groups
(&(mailnickname=*) (|(objectCategory=group)))
Public folders
(&(mailnickname=*) (|(objectCategory=publicFolder)))
Luckily, you do not need to directly modify the LDAP query to make changes to the selection criteria. Instead, select the Modify button to display the Find Exchange Recipients dialog box (Figure 8.32).
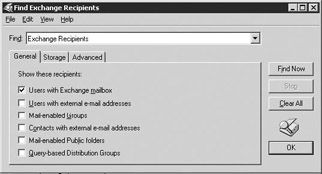
Figure 8.32: Address List – Find Exchange Recipients General tab -
The dialog box displayed will match the search category you selected when you created the Address List. Follow the procedures outlined in Section 8.2.2 to modify the Address List search criteria.
-
Security tab By default, all Exchange users in your organization are granted access to all Address Lists. However, some Address Lists may warrant access that is more restrictive. Select the Security tab to set permissions for accessing an Address List (Figure 8.33).
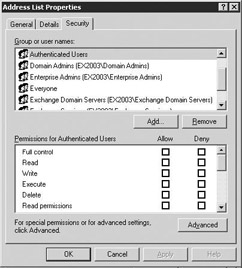
Figure 8.33: Address List – Security tab -
To prevent a user or group from accessing the Address List, select the user or group from the Name list and then in the Permissions list, clear the Allow check box next to Read permissions. Although it may seem logical, do not use the Deny check box to prevent a user from accessing the Address List. You should only use the Deny check box with careful consideration because it can have an unintended—and difficult to diagnose—effect on inheritance of permissions. For example, assume you have an Address List that is only to be accessed by your corporate vice presidents. You create a group, VP, that contains the appropriate users, and you grant this group access to the Address List. To prevent other users from accessing the Address List, you select the Deny check box for each of the other users. Later, someone is promoted, so you add the user to the VP group. However, the existing Deny check box on the newly appointed VP will prevent the user from inheriting the read permission from the VP group.
-
To allow a user or group to access the Address List, select the user or group from the Name list and then in the Permissions list, select the Allow check box next to Read permissions.
-
Select Apply and then select OK on the Address List Properties dialog box to update the selection criteria and the permissions. The Address List will be updated using the modified selection criteria the next time the RUS is run (see Section 8.5 for a detailed discussion).
8.2.4 Deleting an Address List
You can use the following procedure to delete any custom Address List or any default Address List—with the exception of the GAL. The default GAL cannot be deleted.
-
Start ESM from the Windows Start menu by selecting All Programs →Microsoft Exchange →System Manager.
-
Expand the Recipients and the All Address Lists sections.
-
In the details pane, right-click on the Address List you want to delete and select Delete. Be careful before you delete an Address List, because there is no operation to reverse the deletion of a list. If you delete an Address List by mistake, you must recreate the list using the procedure outlined in Section 8.2.2.
8.2.5 Renaming an Address List
You can use the following procedure to rename an Address List.
-
Start ESM from the Windows Start menu by selecting All Programs →Microsoft Exchange →System Manager.
-
Expand the Recipients and the All Address Lists sections.
-
In the details pane, right-click on the Address List you want to rename and select Rename.
-
Enter the new name for the Address List. Remember that this is the Address List name that users will see when they choose an address from their Outlook Address Book. Therefore, the name you enter should provide users with an indication of the type of items included in the Address List.
8.2.6 Changing the Address List hierarchy
If you have a large number of Address Lists, you should organize the lists so that your users can easily find the one they need. For example, a hierarchy of nested lists that mirrors your corporate organization structure may be effective. A nested Address List is one that is located under another Address List.
You can use the following procedure to rearrange the hierarchy of your Address Lists.
-
Start ESM from the Windows Start menu by selecting All Programs →Microsoft Exchange →System Manager.
-
Expand the Recipients section.
-
Expand the All Address Lists section and any sections listed under the All Address Lists section.
-
In the hierarchy pane, select the Address List you want to move and drag it to its new location in the hierarchy.
|
| < Day Day Up > |
|
EAN: 2147483647
Pages: 128