8.1 Managing recipient policies
|
| < Day Day Up > |
|
When you add a new recipient, the e-mail addresses for the recipient are generated according to a set of rules known as recipient policies. If you ever need to change the recipient policy, the new e-mail addresses are regenerated for all recipients, which saves you the task of individually modifying all of your user accounts.
When you install Exchange, Exchange defines a default recipient policy that will automatically generate consistent Simple Mail Transfer Protocol (SMTP) and X.400 addresses for recipients. If you choose never to implement any custom recipient policies, the e-mail addresses defined in the default policy will be applied to all recipients.
Creating a custom recipient policy requires that you define (1) the set of recipients to which the policy will be applied and (2) the e-mail addresses that will be assigned to this set of recipients.
Exchange provides a relatively easy user interface that you can use to define the set of recipients to which the policy will be applied. For example, you can create a recipient policy that only applies to users in a given department or at a specific location. Once you define the selection criteria, Exchange creates a Lightweight Directory Access Protocol (LDAP) query that will be used to search the Active Directory to select the users, contacts, or groups that match your criteria.
Depending on the subset of recipients, you may want to generate a different (or additional) SMTP or X.400 address, or you may want to generate an address for Lotus cc:Mail, GroupWise, Microsoft Mail, or Lotus Notes. For example, companies that have multiple divisions often use division-specific SMTP addresses.
As you might suspect, it can often take considerable processing power and time to search the Active Directory looking for objects that match your search criteria. For this reason, new or modified recipient policies do not take effect immediately. Instead, a separate process known as the Recipient Update Service (RUS) applies the policies. The RUS runs periodically according to a schedule that you define. The newly created recipient policy will take effect the next time the RUS runs.
The RUS not only applies newly created policies, it also regenerates e-mail addresses for all recipient policies. These periodic updates ensure that the appropriate recipient policies continue to be applied to recipients when you add new users or change user attributes that affect recipient policy membership.
What happens if two recipient policies conflict? For example, what if the same recipient is a member of two different recipient policies? Exchange solves this problem by assigning priorities for the recipient policies. The default policy is assigned the lowest priority. It is always processed last and will be applied to any recipients not included in any of the higher priority recipient policies. Your custom recipient policies are assigned incrementally higher-priorities on the basis of the order in which you create the policies. You can change these priorities to meet your requirements.
8.1.1 Creating a recipient policy
Creating a custom recipient policy requires that you define the set of recipients to which the policy will be applied and the e-mail addresses that will be assigned to this set of recipients. The newly created recipient policy will take effect the next time the RUS runs. Once you create a recipient policy, you can later change the membership selection criteria, the address types, or the priority of the recipient policy.
You can use the following procedure to create a recipient policy.
-
Start the Exchange System Manager (ESM) console from the Windows Start menu by selecting All Programs →Microsoft Exchange →System Manager.
-
Expand the Recipients section.
-
Right-click on Recipient Policies and select New →Recipient Policy.
-
In the New Policy dialog box (Figure 8.1), select both the E-Mail Addresses and Mailbox Manager Settings check boxes. Select OK to continue.
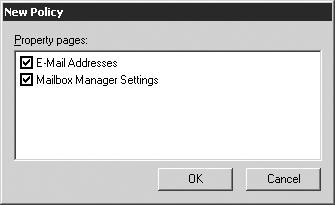
Figure 8.1: New Recipient Policy – New Policy dialog box -
General tab In the Name field, enter a name for the new recipient policy (Figure 8.2). The name you enter should provide an indication of the purpose of the recipient policy. If you have several recipient policies, appropriate naming will make it easier to understand the purpose for each policy. For example, an appropriate name for a recipient policy to assign a secondary address for users in one of your divisions might be “Secondary address for Engineering division.”
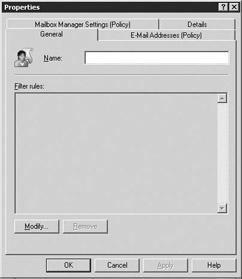
Figure 8.2: New Recipient Policy – General tab -
Select the Modify button to display the Find Exchange Recipients dialog box.
-
When you create a recipient policy, you must identify the Active Directory objects (e.g., users, public folders, contacts) that will be affected by the policy. The search filter rules are used to identify the affected Active Directory objects. For example, if you are creating a recipient policy to assign a secondary address to users in one of your divisions, your filter rules must identify the users in the affected division, and only those users. In the Find Exchange Recipients dialog box, use the Find drop-down list to select the search category for the new recipient policy. You can select from several categories, including: Users, Contacts, and Groups; Computers; Printers; Shared Folders; Organizational Units; Custom Search; Exchange Recipients, Remote Installation Servers, Common Queries, and Remote Installation Clients. Only the following search categories are generally useful for recipient policies:
-
Exchange Recipients. This category contains users, groups, contacts, mailbox-enabled public folders, and system objects.
-
Users, Contacts, and Groups. This category contains only users, groups, and contacts.
-
Custom Search. This category allows you to enter an LDAP query to select Active Directory objects.
-
Select one of these categories from the Find drop-down list to begin defining the search filter rules that will identify the objects affected by the recipient policy. The search filter rules you define are used to search the Active Directory. If your requirements change later, you can modify the search filter rules to meet your new requirements. The procedures for entering the search filter rules vary depending on the type of search category you select. The following sections describe the procedures for the most commonly used categories.
Defining filter rules for the Exchange Recipients category
-
In the Find Exchange Recipients dialog box, use the Find drop-down list to select the Exchange Recipients search category (Figure 8.3).
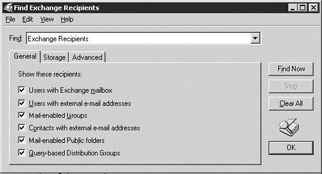
Figure 8.3: New Recipient Policy – Find Exchange Recipients General tab -
General tab On the General tab, select the recipient categories that best match the recipient policy membership you are defining. For example, if you are creating a recipient policy that applies to all of the distribution lists for your company, select the Mail-enabled Groups check box.
-
Storage tab Select the Storage tab to specify which mailboxes should be considered for recipient list membership by the search filter process (Figure 8.4).
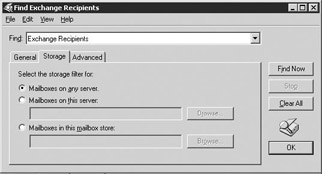
Figure 8.4: New Recipient Policy – Storage tab -
By default, the search examines all mailboxes on all servers. However, you can limit the search to mailboxes on a specific server or to mailboxes in a specific mailbox store. To limit the search, select either Mailboxes on this server or Mailboxes in this mailbox store and, select the server or mailbox store that should be used.
-
Advanced tab Select the Advanced tab to specify the characteristics of recipient policy members on the basis of field-level attributes (Figure 8.5).
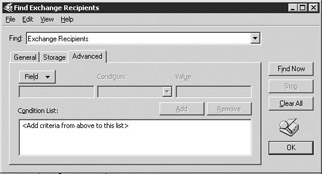
Figure 8.5: New Recipient Policy – Advanced tab -
Use the following steps to specify a field-level attribute that should be used as part of the selection criteria.
-
Select the Field button and select the appropriate recipient category. The recipient categories are user, contact, group, public folder, and query-based distribution group. The recipient category determines the field-level attributes that you can select in the next step.
-
Using the drop-down list, select the field-level attribute that the search filter should examine. For example, the user recipient category includes field-level attributes, such as the user’s alias, city, company, country, department, display name, and so on.
-
Using the Condition drop-down list, select the condition you want to test. Available conditions include Starts with, Ends with, Is (exactly), Is not, Present, Not present, and others.
-
In the Value field, enter the value against which you want to compare the field-level attribute. For example, if you want to select all users located in Dallas, you would make the following choices for the field, condition, and value:
Field =City
Condition = Is (exactly)
Value =“Dallas”
-
-
Select Add to add this field-level attribute test to the selection criteria.
-
You can repeat these steps to add additional search criteria.
Defining filter rules for the Users, Contacts, and Groups category
-
In the Find Exchange Recipients dialog box, use the Find drop-down list to select the Users, Contacts, and Groups search category (Figure 8.6).
Figure 8.6: New Recipient Policy – Users, Contacts, and Groups tab -
Enter a name into the Name field, and enter description information into the Description field.
-
Exchange tab Select the Exchange tab (Figure 8.7).
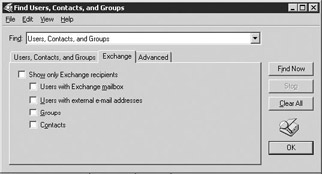
Figure 8.7: New Recipient Policy – Exchange tab -
To restrict the recipient policy membership to Exchange recipients, select the Show only Exchange recipients check box. You can then further restrict the membership by selecting one or more of the Exchange recipient subcategories. These subcategories are users with Exchange mailboxes, users with external e-mail addresses, groups, and contacts.
-
Advanced tab Select the Advanced tab to specify the characteristics of recipient policy members on the basis of field-level attributes (Figure 8.8).
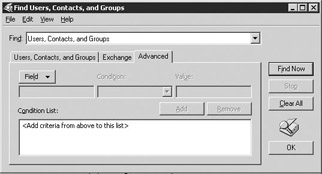
Figure 8.8: New Recipient Policy – Advanced tab -
Use the following steps to specify a field-level attribute that should be used as part of the selection criteria:
-
Select the Field button and select the appropriate recipient category. The recipient category determines the field-level attributes that you can select in the next step.
-
Using the drop-down list, select the field-level attribute that the search filter should examine (e.g., user alias, city, company, country, department, display name, and so on).
-
Using the Condition drop-down list, select the condition you want to test. Available conditions include Starts with, Ends with, Is (exactly), Is not, Present, and Not present.
-
In the Value field, enter the value against which you want to compare the field-level attribute.
-
Select Add to add this field-level attribute test to the selection criteria.
-
You can repeat these steps to add additional search criteria.
-
Defining filter rules for the Custom Search category
-
In the Find Exchange Recipients dialog box, use the Find drop-down list to select the Custom Search category. You can use the Custom Search category to enter LDAP queries to specify more complex selection criteria (Figure 8.9).
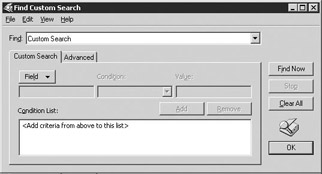
Figure 8.9: New Recipient Policy – Custom Search tab -
Use the following steps to specify a field-level attribute that should be used as part of the selection criteria.
-
Select the Field button and select the appropriate recipient category. The recipient category determines the field-level attributes that you can select in the next step.
-
Using the drop-down list, select the field-level attribute that the search filter should examine (e.g., user alias, city, company, country, department, and display name).
-
Using the Condition drop-down list, select the condition you want to test. Available conditions include Starts with, Ends with, Is (exactly), Is not, Present, and Not present.
-
In the Value field, enter the value that you want to compare the fieldlevel attribute against.
-
Select Add to add this field-level attribute test to the selection criteria.
-
You can repeat these steps to add additional search criteria.
-
-
Select the Advanced tab to enter LDAP queries to specify more complex selection criteria (Figure 8.10).
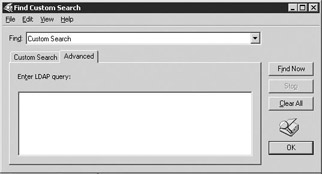
Figure 8.10: New Recipient Policy – Advanced tab -
Enter your LDAP query into the Enter LDAP query field. The syntax for LDAP queries is defined in RFC 2254 and is very powerful and flexible. Only Active Directory objects that meet the LDAP query requirements will be included in the recipient policy. You can quickly deduce the syntax for LDAP queries by examining the existing LDAP queries on the General tab of any existing recipient policy or Address List Properties dialog box. For example, the LDAP query for a recipient policy containing all Exchange users in St. Louis would be:
(&(&(&(&(mailnickname =*) (|(&(objectCategory = person)(objectClass = user) (|(homeMDB =*)(msExchHomeServerName =*)))))) (objectCategory = user) (l = St. Louis)))
Previewing the Address List
-
Regardless of which search category (i.e., Exchange recipients; users, contacts, and groups; or custom search) you use to enter your filter rules, you can immediately preview the resulting recipient policy membership by selecting the Find Now button on the Find Exchange Recipients dialog box. You should always preview the recipient policy membership, especially when you are creating a new recipient policy or when using complex LDAP queries. Find Now also is useful for estimating how long the query will run to determine whether the query will be processor intensive. A query that runs for seconds instead of minutes is desirable.
-
By default, the recipient policy displays only the user’s name, alias, and Internet e-mail address (Figure 8.11). However, you can elect to display different fields or additional fields for each entry. To modify the fields that will be displayed, select Choose Columns from the View menu. The Choose Columns dialog box will be displayed.
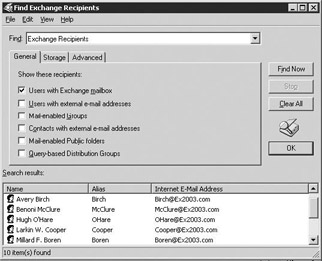
Figure 8.11: New Recipient Policy – Find Exchange Recipients dialog box -
To display an additional field, select the field from the Columns available list and then select the Add button (Figure 8.12). To remove a field, select the field from the Columns shown list, then select the Remove button. You can repeat this process until the desired set of fields has been selected.
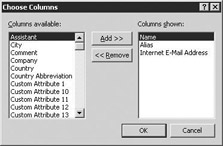
Figure 8.12: New Recipient Policy – Choose Columns dialog box -
Select OK when you are finished adding fields to the display. This will return you to the Find Exchange Recipients dialog box.
-
Select OK on the Find Exchange Recipients dialog box to complete the process of creating the selection criteria for the new recipient policy. The selection criteria will be saved as an LDAP query on the General tab of the recipient policy Properties dialog box. The new recipient policy will be applied the next time the RUS is run.
-
E-mail Addresses (Policy) tab Select the E-mail Addresses (Policy) tab (Figure 8.13).

Figure 8.13: New Recipient Policy – E-Mail Addresses (Policy) tab -
Select the check box to the left of the addresses that should be applied to the Active Directory objects identified by the filter rules.
-
Clear the check box to the left of any addresses that should not be generated. For example, if you no longer need a secondary SMTP address, you can disable generation of the secondary SMTP address for users by clearing the smtp check box. Disabling generation of an address does not remove the address from the recipient policy, but it does keep the recipient policy from applying the address to any new recipients.
-
You also can remove an unnecessary address type by selecting the e-mail address and then selecting the Remove button. However, if you believe you may want to add the address to the recipient policy in the future, it is better to disable the address by clearing the associated check box. All recipients must have at least one SMTP and X.400 address, so you cannot disable or remove all of the SMTP or X.400 address types.
-
You can add new e-mail addresses to a recipient policy. To add a new e-mail address, select the New button to display a list of the e-mail address types you can add. The available choices are X.400 address, Microsoft Mail address, SMTP address, cc:Mail address, Lotus Notes address, Novell GroupWise address, and custom address. If you have installed other third-party products, such as fax connectors, additional e-mail address types may be listed.
In the New E-mail Address dialog box, select the type of address you want to add, then select OK. You can have multiple e-mail addresses of the same type. For example, you can assign multiple SMTP addresses. (You must designate one of the addresses as the primary address.)
Multiple addresses are especially useful for companies that have multiple divisions, where the users in one or more of the divisions receive e-mail using a nonstandard address. For these users, you can create a recipient policy to enter the corporate standard e-mail addresses as their primary addresses and then enter division-specific ones as secondary addresses.
The system will display an Address Properties dialog box that is specific-for the type of address you are creating. In the Address Properties dialogbox, enter the information required by the address type you selected. Select OK to return to the E-Mail Addresses (Policy) tab.
-
By default, Exchange uses the Windows domain name as part of the recipient’s SMTP e-mail address. For example, recipients in the dallas.company.com domain would have addresses of the form user@dallas.company.com. However, it is possible to make adjustments. To edit an existing address, select the address and then select Edit. In the Address Properties dialog box, modify the address information and then select OK to return to the E-Mail Addresses (Policy) tab.
-
You can have multiple e-mail addresses of the same type. For example, you can assign two SMTP addresses to some users, and external Internet users could address e-mail to these users using either of their SMTP addresses. However, when a user sends an e-mail message, the primary address is the one that will appear in the From field.
If you have multiple addresses for an address type, the primary address appears in boldface type. To change the primary address, select the new primary address and select Set as Primary. The new primary address appears in boldface type.
-
When you have selected all addresses that should be applied, select Apply. You will be asked whether you want to immediately update addresses for the existing users that meet the filter rules. Select Yes to apply the recipient policy changes. Select No if you want to wait to apply the changes. If you select No, the changes will be applied the next time the RUSs are run.
-
Mailbox Manager Settings (Policy) tab Select the Mailbox Manager Settings (Policy) tab (Figure 8.14) to configure the Mailbox Manager policy that will be applied to the set of recipients defined by this recipient policy. You can use the Mailbox Manager Settings policy to select the Exchange folders that will be processed and to specify the action to take when the Mailbox Manager finds items that exceed policy limit.
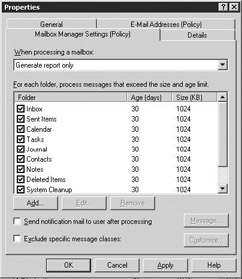
Figure 8.14: New Recipient Policy – Mailbox Manager Settings (Policy) tab -
Use the When processing a mailbox drop-down list to select the action that the Mailbox Manager should take when it finds items that exceed policy limits. The Mailbox Manager supports the following actions:
-
Generate report only. Mailbox Manager generates a report listing mailboxes that contain items exceeding policy limits. No items are moved or deleted.
-
Move to Deleted Items folder. Mailbox Manager moves items that exceed policy limits to the user’s Deleted Items folder.
-
Move to System Cleanup folders. Mailbox Manager creates a partial replica of the mailbox folder hierarchy in a System Cleanup folder and moves items that exceed policy limits to their respective folders.
-
Delete Immediately. Mailbox Manager deletes items immediately without moving them to the user’s Deleted Items folder or to the System Cleanup folder.
-
-
In the For each folder, process messages that exceed the size and age limit list, select the folders that the Mailbox Manager should process.
Mailbox Manager will search the selected folders for items that exceed the age or size policy limits. For each folder, you can set the age and size limits by selecting the folder and then selecting Edit.
You can create age and size limits on the following folders: Inbox, Sent Items, Calendar, Tasks, Journal, Contacts, Notes, Deleted Items, System Cleanup, and All Other Mail Folders. If you select a folder with a default item type other than mail or post items, all folders whose default item type matches the type you selected will be processed. For example, if you select the Contacts folder (which contains contact items by default), and the mailbox owner has created an additional Contacts folder, Mailbox Manager also will process the user-created folder.
You should consider the following factors when configuring Mailbox-Manager settings for calendar items:
-
Mailbox Manager does not process recurring calendar items.
-
If you configure an age limit of 0 days, no future appointments will be processed.
-
If you clear the Age Limit (Days) check box, the Age (days) column will be set to Any, and Mailbox Manager will process all ( nonrecurring) calendar items, including future items.
-
If you configure the age limit to a specific number of days, Mailbox Manager will process all calendar items older than the specified age and will process all current and future calendar items when they reach the age limit.
-
-
Select the Send notification mail to user after processing check box to have the Mailbox Manager send an e-mail message notifying the user when his or her mailbox has been processed. You can customize the e-mail message by selecting the check box and then selecting Message.
-
Select the Exclude specific message classes check box and then select Customize to keep Mailbox Manager from processing certain message classes.
-
Details tab Use the Administrative note field on the Details tab to enter additional information about the recipient policy.
-
Select Apply and then select OK to create the new recipient policy.
8.1.2 Adding Mailbox Manager Settings to the default recipient policy
The default recipient policy does not include the Mailbox Manager Settings (Policy) page. However, the following procedure can be used to add Mailbox Manager policies to the default recipient policy or to change the property pages for any recipient policy.
-
Start ESM from the Windows Start menu by selecting All Programs →Microsoft Exchange →System Manager.
-
Expand the Recipients and the Recipient Policies sections.
-
In the details pane, right-click on the recipient policy you want to modify, and select Change property pages to display the New Policy dialog box (Figure 8.15).
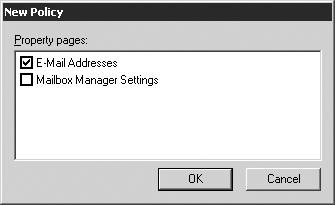
Figure 8.15: New Policy dialog box -
In the New Policy dialog box, select the desired property page check box. Select OK to add the property page.
8.1.3 Modifying a recipient policy
You can easily change the membership selection criteria or the generated address types for recipient policies using the following procedure.
-
Start ESM from the Windows Start menu by selecting All Programs →Microsoft Exchange →System Manager.
-
Expand the Recipients and the Recipient Policies sections.
-
In the details pane, right-click on the recipient policy you want to modify and select Properties.
-
General tab The Filter rules field on the General tab contains the LDAP query that is used to select items for the recipient policy (Figure 8.16). Exchange always converts the selection criteria you specified during the recipient policy creation process to an LDAP query.
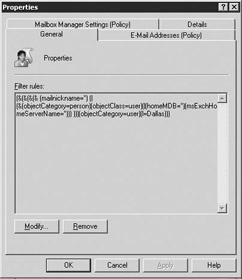
Figure 8.16: Recipient Policy – General tabLuckily, you do not need to directly modify the LDAP query to make changes to the selection criteria. Instead, select the Modify button to display the Find Exchange Recipients dialog box.
-
The Find Exchange Recipients dialog box displayed will match the search category you selected when you created the recipient policy. Follow the procedures outlined in Section 8.1.1 to modify the recipient policy search criteria.
-
E-Mail Addresses (Policy) tab Select the E-Mail Addresses (Policy) tab (Figure 8.17).
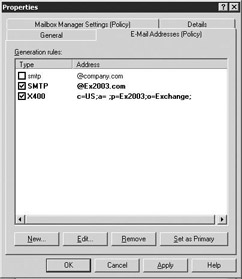
Figure 8.17: Recipient Policy – E-Mail Addresses (Policy) tab -
Select the check box to the left of the addresses that should be applied to the Active Directory objects identified by the filter rules.
-
Clear the check box to the left of any addresses that should not be generated. Disabling generation of an address does not remove the address from the recipient policy, but it does keep the recipient policy from applying the address to any new recipients.
-
You also can remove an unnecessary address type by selecting the e-mail address and then selecting the Remove button. However, if you believe you may want to add the address to the recipient policy in the future, it is better to disable the address by clearing the associated check box. Disabling generation of an address does not remove the address from the recipient policy, but it does keep the recipient policy from applying the address to any new recipients.
-
You can add new e-mail addresses to a recipient policy. To add a new e-mail address, select the New button to display a list of the e-mail address types you can add. In the New E-mail Address dialog box, select the type of address you want to add and then select OK. In the Address Properties dialog box, enter the information required by the address type you selected. Select OK to return to the E-Mail Addresses (Policy) tab.
-
To edit an existing address, select the address and then select Edit. In the Address Properties dialog box, modify the address information, then select OK to return to the E-Mail Addresses (Policy) tab.
-
If you have multiple addresses for an address type, the primary address appears in boldface type. To change the primary address, select the new primary address and select Set as Primary. The new primary address appears in boldface type.
-
When you have selected all addresses that should be applied, select Apply. You will be asked whether you want to immediately update addresses for the existing users that meet the filter rules. Select Yes to apply the recipient policy changes. Select No if you want to wait to apply the changes. If you select No, the changes will be applied the next time the RUSs are run.
-
Mailbox Manager Settings (Policy) tab Select the Mailbox Manager Settings (Policy) tab (Figure 8.18) to configure the Mailbox Manager policy that will be applied to the set of recipients defined by this recipient policy. You can use the Mailbox Manager Settings policy to select the Exchange folders that will be processed and to specify the action to take when the Mailbox Manager finds items that exceed policy limit.

Figure 8.18: Recipient Policy – Mailbox Manager Settings (Policy) tab -
Use the When processing a mailbox drop-down list to select the action that the Mailbox Manager should take when it finds items that exceed policy limits. The Mailbox Manager supports the following actions:
-
Generate report only
-
Move to Deleted Items folder
-
Move to System Cleanup folders
-
Delete immediately
-
-
In the For each folder, process messages that exceed the size and age limit list, select the folders that the Mailbox Manager should process. Mailbox Manager will search the selected folders for items that exceed the age or size policy limits. For each folder, you can set the age and size limits by selecting the folder and then selecting Edit.
You can create age and size limits on the following folders: Inbox, Sent Items, Calendar, Tasks, Journal, Contacts, Notes, Deleted Items, System Cleanup, and All Other Mail Folders. If you select a folder with a default item type other than mail or post items, all folders whose default item type matches the type you selected will be processed. For example, if you select the Contacts folder (which contains contact items by default) and the mailbox owner has created an additional Contacts folder, Mailbox Manager also will process the user-created folder.
You should consider the following factors when configuring Mailbox Manager settings for calendar items:
-
Mailbox Manager does not process recurring calendar items.
-
If you configure an age limit of 0 days, no future appointments will be processed.
-
If you clear the Age Limit (Days) check box, the Age (days) column will be set to Any, and Mailbox Manager will process all ( nonrecurring) calendar items, including future items.
-
If you configure the age limit to a specific number of days, Mailbox Manager will process all calendar items older than the specified age and will process all current and future calendar items when they reach the age limit.
-
-
Select the Send notification mail to user after processing check box to have the Mailbox Manager send an e-mail message notifying the user when his or her mailbox has been processed. You can customize the e-mail message by selecting the check box and then selecting Message.
-
Select the Exclude specific message classes check box and then select Customize to keep Mailbox Manager from processing certain message classes.
-
Details tab Use the Administrative note field on the Details tab to enter additional information about the recipient policy.
-
Select Apply and then select OK to update the recipient policy.
8.1.4 Changing recipient policy priority
The default policy is assigned the lowest priority. It is always processed last and will be applied to recipients not included in any of the higher-priority recipient policies. Other recipient policies are assigned incrementally higher priorities on the basis of the order that the policies are created. The following procedure can be used to change the priority of recipient policies.
-
Start ESM from the Windows Start menu by selecting All Programs →Microsoft Exchange →System Manager.
-
Expand the Recipients and the Recipient Policies sections.
-
In the details pane, right-click on the recipient policy you want to modify and select All Tasks →Move Up to increase the priority of the recipient policy or select All Tasks →Move Down to decrease the priority.
8.1.5 Exceptions to recipient policies
A user’s e-mail addresses are automatically generated according to the recipient policies. This keeps you from having to manually enter e-mail addresses for each of your users. However, you may have a small number of users who are exceptions to the address generation rules defined by the recipient policies. For these exceptions, you will need to manually enter their e-mail addresses. To prevent the recipient policies from updating their addresses, you must also clear the Automatically update e-mail addresses based on recipient policy check box for the user, contact, or group. This check box is located on the E-Mail Addresses tab of the user Properties.
|
| < Day Day Up > |
|
EAN: 2147483647
Pages: 128