5.1 Configuring Outlook Web Access
|
| < Day Day Up > |
|
OWA offers most of the functionality that is available from the Outlook MAPI client. Its primary advantage over the MAPI client is that OWA can be easily used over the Internet to provide access from remote locations. Microsoft has improved this version of OWA. Exchange uses the Extensible Markup Language (XML) support in Internet Explorer to increase the performance and OWA user interface. The user interface is more like Outlook, with drag-and-drop capability, pop-up menus, toolbars, hierarchy control, and Rich Text editing when used with Internet Explorer.
OWA is installed and configured automatically when Exchange is installed. The installation process adds an Exchange virtual root and a public virtual root to the Internet Information Server (IIS) directory tree. These virtual roots point to their corresponding directories in Exchange.
User access to the Exchange folders is achieved by entering one of the following addresses in a web browser.
http://server/exchange/alias/ To access the user's personal mail folders from within the corporate network
http://server.domain.com/exchange/alias/ To access the user's personal mail folders from the Internet
http://server/public/folder/ To access a public folder from within the corporate network
http://server.domain.com/public/folder/ To access a public folder from the Internet
where:
server is the name of the Exchange server.
domain.com is the fully qualified domain name of the domain in which the Exchange server resides.
exchange is the default private web folder.
alias is the user's alias.
folder is the name of the public folder.
| Note | Because OWA users will need to enter the Exchange server name and other information each time they access the OWA server, it is best to keep these names short and meaningful. |
If you plan to have many OWA users, you should implement multiple servers in a front end/back end configuration. With front end and back end servers, HyperText Transfer Protocol (HTTP) requests from an OWA client are processed as follows:
-
The front end server receives the HTTP request from a user's web browser.
-
The front end server authenticates the user and does an Active Directory lookup to determine which back end server should receive the request.
-
The front end server passes the request to the appropriate back end server running OWA and Exchange. The back end server also authenticates the user before processing the request.
By relaying all HTTP requests through a front end server, you can designate a single namespace (i.e., the name of the front end server) for all OWA users to use to reach their mailboxes. Users need not know the name of the actual Exchange server that contains their mailbox. This allows you to freely move users from one Exchange server to another or to add additional Exchange mailbox servers as your user population grows. These mailbox moves are invisible to the users and do not require changing the Uniform Resource Locator (URL) used to access Exchange.
Using a front end/back end configuration requires an HTTP virtual server. The following procedure can be used to configure OWA for this type of environment:
-
Start the Exchange System Manager (ESM) console from the Windows Start menu by selecting All Programs →Microsoft Exchange →System Manager.
-
In the Administrative Groups section, select the server where you want to create the HTTP virtual server. Double-click on the Protocols item under this server.
-
Right-click on HTTP and select New →HTTP Virtual Server.
-
General tab In the Name field, enter a name for the new virtual server. The name entered is for administrative purposes only. An HTTP virtual server is actually identified by the unique combination of host name, TCP port, Secure Sockets Layer port, and Internet Protocol (IP) address that you assign. Users will access the virtual server using the host name you provide.
-
Use the IP address drop-down list to select an IP address for the virtual server (Figure 5.1), or select the Advanced button to display the Advanced dialog box. In the Advanced dialog box, you can configure multiple identities for the virtual server.

Figure 5.1: HyperText Transfer Protocol (HTTP) Virtual Server General tab -
You can select the Limit number of connections check box to limit the number of simultaneous connections to the number you enter.
-
Enter a value in the Time-out (secs) field or accept the default time-out.
-
The Exchange Path section is used to set the path for either mailboxes or a public folder. To modify the path for mailboxes, select the Mailboxes for SMTP domain: button and then select Modify to display the Select SMTP Domain dialog box. To modify the path for a public folder, select the Public folder: button and then select Modify to display the Public Folder Selection dialog box.
-
Access tab Select the Access tab (Figure 5.2).
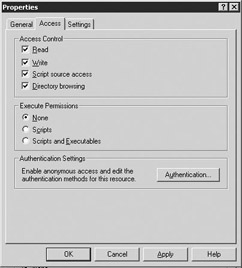
Figure 5.2: HyperText Transfer Protocol (HTTP) Virtual Server Access tab -
You can use the check boxes in the Access Control section to identify the type of access that will be allowed.
-
You can use the buttons in the Execute Permissions section to identify the type of programs that can be executed while connected to this HTTP Virtual Server.
-
Select the Authentication button to display the Authentication Methods dialog box (Figure 5.3). This dialog box can be used to set user authentication on the virtual server. This authentication will determine whether to grant a user permission to connect to the system. There are four types of authentication:
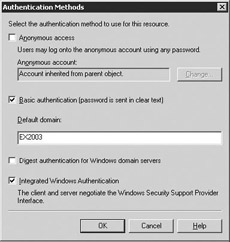
Figure 5.3: HyperText Transfer Protocol (HTTP) Virtual Server Authentication Methods dialog box-
Anonymous access will allow any user to access the HTTP Virtual Server without providing a user name or password. If you select this option, you must enter an account name in the Anonymous account field.
-
Basic authentication will require that users provide a valid user name and password. You must enter a domain name in the Default domain field.
-
Select the Digest authentication for Windows domain servers check box to require that users provide a valid Active Directory user logon, which is then sent as a hash value over the network. You should use this check box on back end servers to ensure that user authentication information and data are not passed as clear text over the Internet.
-
Integrated Windows Authentication will require that users provide a valid Active Directory user name and password. If the user is already logged into his or her primary Active Directory account, Exchange will provide seamless access to the user's mailbox without requiring the user to reenter the user name and password.
-
-
Settings tab Select the Settings tab (Figure 5.4).
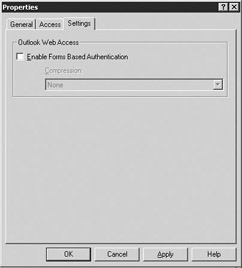
Figure 5.4: HyperText Transfer Protocol (HTTP) Virtual Server Settings tab -
You can use this tab to configure the OWA authentication and compression settings. If you select the Enable Forms Based Authentication check box, users will log on to OWA using the new OWA logon page, which will store the user credentials in a cookie on the user's system. Forms-based authentication includes the following three levels of compression:
-
None will not compress any pages.
-
Low will compress all static pages.
-
High will compress static and dynamic pages.
-
|
| < Day Day Up > |
|
EAN: 2147483647
Pages: 128