7.1 Managing mailbox-enabled users
 | ||||||||
| Chapter 7 - Managing Recipients | |
| Monitoring and Managing Microsoft Exchange 2000 Server | |
| by Mike Daugherty | |
| Digital Press 2001 | |
| |
7.3 Managing mail-enabled groups
A mail-enabled group is similar to distribution lists from previous versions of Exchange. The mail-enabled group contains a list of other recipients. When you send mail to the group, the mail is sent to each recipient included in the group . You can use Active Directory Users and Computers to manage mail-enabled groups.
7.3.1 Creating a mail-enabled group
You can use the following procedure to create a mail-enabled group:
-
Start the Active Directory Users and Computers from the Windows 2000 Start menu by selecting Programs Administrative Tools Active Directory Users and Computers.
-
Right-click on Users, and select New Group (Figure 7.22).
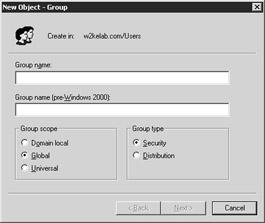
Figure 7.22: The New Object Group dialog box -
In the Group name field, enter the groups Windows 2000 name.
-
Windows 2000 automatically sets the Group name (pre-Windows 2000) field to the same value as the Group name field. You can override this value if necessary.
-
For Group scope , select one of the following options.
-
Domain local . For Windows 2000 native-mode environments, domain local groups can contain user accounts, global groups, universal groups from any domain, and other domain local groups from the same domain. A domain local group in a native-mode environment can be converted to a universal group if it does not contain other domain local groups. For mixed-mode environments, domain local groups can only contain user accounts and global groups.
-
Global . For Windows 2000 native-mode environments, global groups can contain user accounts and other global groups from the same domain. A global group in a native-mode environment can be converted to a universal group if it is not a member of any other global group. For mixed-mode environments, global groups can only contain user accounts.
-
Universal . For Windows 2000 native-mode environments universal groups can contain user accounts, global groups, and universal groups from any domain.
-
-
Windows 2000 has two types of groups. You can send mail to either a security group or a distribution group. However, in addition to being used as an e-mail distribution list, a security group is also used by Windows 2000 to allow or deny access to resources. If you add a new member to a security group, that user will not only be added to the e-mail distribution list, but will also be granted all permissions available to the group. For Group type , select either Security or Distribution .
-
Select Next to continue.
-
Select the Create an Exchange e-mail address check box to automatically create an e-mail address that will be included in the Exchange address lists (Figure 7.23).
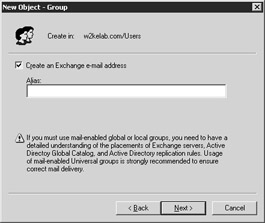
Figure 7.23: New Object Group alias dialog box -
By default, Exchange sets the mail-enabled group Alias value to the group name you entered on the previous window. You can override this value if necessary.
-
Select Next to display a dialog box summarizing the information you entered.
-
Verify that the information is correct, and then select Finish to create the group. Select Back if you need to correct any information.
7.3.2 Delegating management responsibility for a mail-enabled group
When you create a new mail-enabled group, it is created as an empty mail-enabled group that can be managed only by the administrator. However, if the administrator retains sole management responsibility for all shared distribution lists, adding and removing names from the mail-enabled groups will quickly become a full-time job. It is also difficult to maintain security if the administrator is solely responsible for maintaining these groups. For example, if a user asks to be added to a group that receives confidential salary information, how will the administrator know if the user should be added? It is preferable to delegate management responsibility to others. The group that requested the shared distribution list will typically have a group leader or administrative assistant willing to accept this responsibility. You can use the following procedure to delegate management responsibilities for the mail-enabled group:
-
Start the Active Directory Users and Computers from the Windows 2000 Start menu by selecting Programs Administrative Tools Active Directory Users and Computers.
-
In Active Directory Users and Computers, select Advanced Features from the View menu. This will allow you to view the properties listed on the Exchange Advanced tab.
-
Expand the Users section.
-
In the details pane, right-click the group, and select Properties.
-
Select the Managed By tab (Figure 7.24).
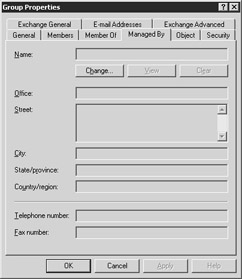
Figure 7.24: The Group Properties Managed By tab -
Select the Change button to display the Select User or Contact dialog box.
-
Select the user who will manage the mail-enabled group and select OK to return to the Managed By tab.
-
Select OK on the Managed By tab to make the change. The designated user can manage the group by double-clicking on the Outlook Address Book entry for the distribution list or by using Active Directory Users and Computers if the user has the appropriate permissions to access this program.
7.3.3 Adding or removing mail-enabled group members
You can use the following procedure to add or remove mail-enabled group members:
-
Start the Active Directory Users and Computers from the Windows 2000 Start menu by selecting Programs Administrative Tools Active Directory Users and Computers.
-
In Active Directory Users and Computers, select Advanced Features from the View menu. This will allow you to view the properties listed on the Exchange Advanced tab.
-
Expand the Users section.
-
In the details pane, right-click the group, and select Properties.
-
Select the Members tab (Figure 7.25).
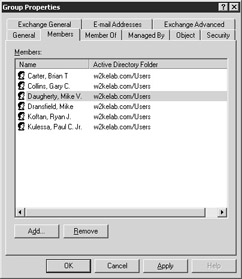
Figure 7.25: The Group Properties Members tab -
Select the Add button to display the Select Users, Contacts, Computers, or Groups dialog box. Select the recipients you want to add and then select OK to return to the Members tab.
-
Select the Remove button to remove a recipient from the list.
7.3.4 Adding or removing mail-enabled group members using Outlook
If you have delegated management responsibility to a user who does not have permissions to run Active Directory Users and Computers, the designated user can manage the group using Outlook:
-
Log on as the owner of the shared distribution list, and start Outlook.
-
From the Outlook Tools menu, select Address Book to display the list of users and distribution lists.
-
Double-click on the group to display the group Properties dialog box.
-
Select Modify Members to display the Distribution List Membership dialog box.
-
Select Add or Remove to add or remove recipients. Select OK to save the modified group.
7.3.5 Modifying a mail-enabled group
You can use the following procedure to modify an existing mail-enabled group:
-
Start the Active Directory Users and Computers from the Windows 2000 Start menu by selecting Programs Administrative Tools Active Directory Users and Computers.
-
In Active Directory Users and Computers, select Advanced Features from the View menu. This will allow you to view the properties listed on the Exchange Advanced tab.
-
Expand the Users section.
-
In the details pane, right-click the group you want to modify, and select Properties.
-
Select the E-mail Addresses tab. The E-mail Addresses tab is used to maintain alternate electronic mail addresses for this group. You can have multiple e-mail addresses of the same type. For example, you can assign two SMTP addresses to the group. If you have multiple addresses for an address type, the primary address appears bold (Figure 7.26).
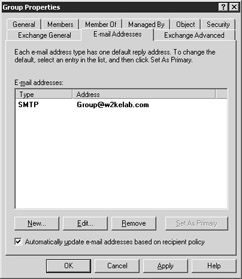
Figure 7.26: The Group Properties E-mail Addresses tab -
You can add new e-mail addresses to the mail-enabled group. To add a new e-mail address, select the New button to display a list of the e-mail address types you can add. The available choices are: X.400 address, Microsoft Mail address, SMTP address, cc:Mail address, Lotus Notes address, Novell GroupWise address, and custom address. Select the type of address you want to add, and then select OK. In the Address Properties dialog box, enter the information required by the address type you selected. Select OK to return to the E-Mail Addresses tab.
-
To change an e-mail address for a mail-enabled group, double-click the address you want to modify to display the Address Properties dialog box. This dialog box is specific for the type of address you are adding. In the Address Properties dialog box, change the e-mail address information, and then select OK to return to the E-Mail Addresses tab.
-
When the group no longer needs a particular address, you can remove the unnecessary address by selecting the e-mail address and then selecting the Remove button. You can remove any address, except for the primary SMTP address, since all recipients must have at least one SMTP address. To remove the primary SMTP address, you must first designate another SMTP address as the primary one.
-
If you have multiple addresses for an address type, the primary address appears bolded. To change the primary address, select the new primary address and select Set as Primary. The new primary address appears bolded.
-
E-mail addresses are automatically generated according to the recipient policies. This keeps you from having to manually enter e-mail addresses for each of your users. However, you may have a small number of groups that are exceptions to the address-generation rules defined by the recipient policies. For these exceptions, you will need to manually enter their e-mail addresses and clear the Automatically update e-mail addresses based on recipient policy check box to prevent the recipient policies from updating the users addresses.
-
Select the Exchange General tab to display information about the group alias, e-mail address, or delivery restrictions (Figure 7.27).
-
To change the groups alias, enter a new value into the Alias field.
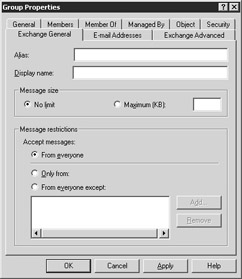
Figure 7.27: The Group Properties Exchange General tab -
To change the groups display name, enter a new value into the Display name field.
-
You can use the Message size option to specify the maximum acceptable message size that this group can receive. Select Maximum (KB) and enter a value into the associated field to specify a limit for this group. Select No limit if you do not want to limit the size of messages.
-
You can use the Message restrictions options to control the users from whom this recipient can accept e-mail messages.
Select From everyone if you do not want to place restrictions on who can send e-mail to this group. By default, mail-enabled groups can accept messages from anyone .
Alternatively, you can set restrictions so that e-mail will be accepted only from a specific set of users. To list specific users who can send e-mail to this group, select Only from . Then select the Add button to display the Select Recipient dialog box. In the Select Recipient dialog box, select those users who will be allowed to send e-mail to this recipient. When you have identified these users, select OK to return to the Exchange General tab.
You can also elect to allow messages to be accepted from everyone except a specific set of users. To list specific users who will not be allowed to send e-mail to this group, select From everyone except . Then select the Add button to display the Select Recipient dialog box. In the Select Recipient dialog box, select the users who will not be allowed to send e-mail to this recipient. When you have identified these users, select OK to return to the Exchange General tab.
-
Select the Exchange Advanced tab (Figure 7.28).
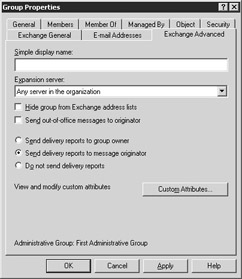
Figure 7.28: The Group Properties Exchange Advanced tab -
Exchange sends the simple display name to other e-mail systems that cannot understand any non-ANSI characters you may have used in the users normal display name. To set a simple display name, enter the name into the Simple display name field. The name should include only ANSI characters.
-
Use the Expansion Server drop-down list to select the server that will be used to expand the group into a list of group members. The default selection is Any server in the organization , but you can select a specific server if you like.
-
By default, all recipients are listed in Exchange address lists. Select the Hide from Exchange address lists check box to prevent this mail-enabled group from appearing in address lists.
-
Exchange users can automatically send out-of-office messages in response to messages that are sent to them while they are away from the office. If a message is sent to the group while one of the group members has an out-of-office message in effect, you can use the Send out-of-office messages to originator check box to control whether the out-of-office message is sent to the message originator.
-
If a problem is encountered while delivering a message to the group, you can control who is notified about the problem. You can select one of the following options for problem notification.
-
Select Send delivery reports to group owner to send the delivery reports to a group owner. The group owner is listed on the Managed By tab.
-
Select Send delivery reports to message originator to send the delivery report to the message originator. This lets the message originator know that the message was not delivered.
-
Select Do not send delivery reports to prevent delivery reports from being sent.
-
-
To enter company-specific information, select the Custom Attributes button to display the Exchange Custom Attributes dialog box. In the Exchange Custom Attributes dialog box, select the attribute ( extensionAttribute1 through extensionAttribute15 ) you want to change, and then select Edit. Enter a value for the custom attribute, and select OK to return to the Exchange Custom Attributes dialog box. Select OK to return to the Exchange Advanced tab of the Properties dialog box.
| |
EAN: 2147483647
Pages: 113