6.6 Setting per-domain SMTP parameters
 | ||||||||
| Chapter 6 - Managing E-Mail Connectivity | |
| Monitoring and Managing Microsoft Exchange 2000 Server | |
| by Mike Daugherty | |
| Digital Press 2001 | |
| |
6.8 Modifying SMTP virtual server parameters
Each SMTP virtual server you create has parameters you can set. You can modify SMTP virtual server parameters using the following procedure:
-
Start the System Manager from the Windows 2000 Start menu by selecting Programs Microsoft Exchange System Manager.
Note By default, administrative groups and routing groups are not displayed. If you have not already enabled these, right-click on the Exchange organization and select Properties to display the organization properties. Select the Display administrative groups check box to allow the administrative groups to be displayed and select the Display routing groups check box to display the routing groups. You must restart the Exchange System Manager after enabling display of administrative groups and routing groups.
-
Expand the Administrative Groups section.
-
Expand the administrative group (e.g., First Administrative Group ) that contains the SMTP virtual server.
-
Expand the Servers section.
-
Expand the server that contains the SMTP virtual server.
-
Expand the Protocols section.
-
Expand the SMTP section.
-
Right-click on the SMTP virtual server you want to change, and select Properties. See Figure 6.9.

Figure 6.9: The General tab -
You can use the IP address drop-down list to change the virtual servers IP address. By default, the SMTP virtual server accepts connections on TCP port 25. You can use the Advanced button to change the TCP port associated with each IP address or to configure multiple identities for this virtual server. If you have multiple virtual servers on the same system, each virtual server must have a different IP address or a different TCP port.
-
By default, each virtual server accepts an unlimited number of inbound SMTP connections. It creates as many outbound connections as required, limited only by system resources. If your server is performing tasks in addition to supporting the SMTP virtual server, you may want to limit the number of connections. To do this, select the Limit number of connections to check box and enter a value into the associated field.
-
You can log messages passing through the SMTP virtual server by selecting the Enable logging check box. Select the log file format from the Active log format drop-down list. The options are:
-
Microsoft IIS Log File Format
-
National Center for Supercomputing Applications (NCSA) Common Log File Format
-
ODBC Logging
-
World Wide Web Consortium (W3C) Extended Log File Format
Select the Properties button to specify parameters for the log files. The parameters vary depending upon the log file format, but most formats allow you to select options such as the log file directory and how log files are created and saved. The log file name varies with the log file format but generally includes the year, month, day, and/or hour to help you identify when the log file was created. Most file formats provide the following options for when a new log file is created:
-
Hourly . Log files are created hourly.
-
Daily . Log files are created daily starting with the first entry that occurs after midnight.
-
Weekly . Log files are created weekly starting with the first entry that occurs after midnight Saturday.
-
Monthly . Log files are created monthly starting with the first entry that occurs after midnight of the last day of the month.
-
Unlimited file size . Entries are appended to the same log file. Because this log file is always opened, you must stop the server before you can examine the log file entries.
-
When file size reaches . A new log file is created when the current log file reaches the size you specify.
-
-
Select the Access tab to configure which other systems will be allowed to access the SMTP virtual server and the methods they can use to gain this access (Figure 6.10). You can secure access to the SMTP virtual server in several ways. These include requiring authentication before establishing a message transfer session, allowing access only from specific systems, and using certificates and secure channels.
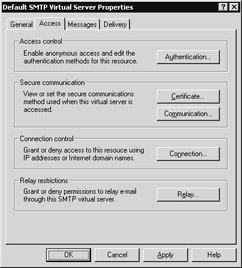
Figure 6.10: The Access tab -
Select the Authentication button to change the authentication for this SMTP virtual server. The available options are:
-
Anonymous access . No user name or password is required.
-
Basic authentication . The account name and password will be sent over the network in clear text. If you select this option, you can also select to use Transport Layer Security (TLS) encryption. TLS is a privacy protocol that uses a smart card or certificate.
-
Integrated Windows authentication . This option requires a Windows account name. Authentication will be negotiated by the Windows operating system.
-
-
Select the Certificate button to create server certificates used in secure Web communications between your server and a client. Once a key certificate is installed, you can require that access take place on a secure channel by selecting the Communications button and then selecting the Require secure channel check box. If your system supports 128-bit encryption, you can use this support by selecting the Require 128-bit encryption check box.
-
Select the Connection button to identify the systems that are allowed to access this SMTP virtual server. By default, any system can access the virtual server. There are two ways to identify the computers:
-
Select Only the list below , and then list the specific systems that will be allowed to access the virtual server.
-
Select All except the list below , and then list the specific systems that will be denied access.
-
You can specify the systems by IP address, subnet address, or by domain name.
-
-
Relaying e-mail through an unsuspecting SMTP server is a common practice of those people who distribute unsolicited commercial e-mail. Relaying this unwanted e-mail hides the actual source of the e-mail. By default, the SMTP virtual server is configured to allow messages to be relayed. Select the Relay button to grant or deny permissions to relay e-mail through this SMTP virtual server. There are two ways to identify the systems that may relay e-mail through this virtual server: Select Only the list below , and then list the specific systems that will be allowed.
-
Select All except the list below , and then list the specific systems that will be denied.
-
You can specify the systems by IP address, subnet address, or by domain name.
-
-
Select the Messages tab to configure limits and restrictions for message size, session size, number of messages per connection, and number of recipients per message (Figure 6.11). You can use these restrictions to control how much of your server resources are consumed processing SMTP e-mail. You can also use this tab to specify the location of the Badmail directory, and to specify where to send nondelivery reports and where to forward e-mail with unresolved recipients.

Figure 6.11: The Message tab -
Select the Limit message size to (KB) check box to limit message size to the value you supply in the associated field. The default message size is 4,096 KB. The default 2 MB limit is more than adequate for most situations. However, if your users regularly need to e-mail large attachments, you may want to raise this limit.
-
Select the Limit session size to (KB) check box to limit session size to the value you supply in the associated field. The default session size is 10,240 KB.
-
Select the Limit number of messages per connection to check box to limit the number of messages to the value you enter in the associated field. If your SMTP virtual server regularly handles a large number of messages to the same server, you can use this option to increase the speed of message delivery by opening multiple connections to the destination server. The number you type in the field represents the number of messages a virtual server can send in one session. The default number of messages is 20.
-
Select the Limit number of recipients per message to check box to limit the number of recipients to the value you enter in the associated field. If the number of recipients for a message exceeds this value, the message will not be delivered to the excess recipients. Exchange will send a non-delivery report to the sender. The default maximum number of recipients per message is 64,000.
-
In the Send copy of Non-Delivery Report to field, enter a mailbox where you would like for nondelivery reports to be sent for review.
-
In the Forward all mail with unresolved recipients to host field, enter a mailbox where you would like for these mail messages to be sent for review.
-
Select the Delivery tab (Figure 6.12). The parameters on this tab allow you to configure how frequently the SMTP virtual server attempts to deliver messages.
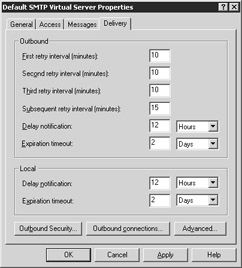
Figure 6.12: The Delivery tab -
The SMTP virtual server attempts to deliver outbound messages as soon as they arrive in the queue. However, there are times when network problems may prevent immediate delivery to the destination server (or to the next -hop server). When a failure occurs, the virtual server requeues the message for later retries. Use the outbound message retry interval to specify when the SMTP virtual server will attempt to retry sending messages.
-
By default, if an outbound message cannot be sent, it is requeued and another attempt will be made in 10 minutes (the First retry interval (minutes) value).
-
If this first retry is also unsuccessful , the message is requeued and another attempt will be made in 10 minutes (the Second retry interval (minutes) value).
-
If this retry is also unsuccessful, a third retry will be made after 10 minutes (the Third retry interval (minutes) value), and additional retries will be made every 15 minutes (the Subsequent retry interval (minutes) value).
-
After twelve hours (the Delay notification value), a message will be sent notifying the sender of the message that the message has not yet been delivered, but is still queued for delivery.
-
The SMTP virtual server will continue attempts to send the message for two days (the Expiration timeout value), after which the message will be considered undeliverable and a non-delivery report (NDR) will be sent to the sender of the message.
-
-
Select the Outbound Security button to change the authentication method that this SMTP virtual server will use to connect to other servers. The available options are:
-
Anonymous access . No user name or password is required.
-
Basic authentication . The account name and password will be sent over the network in clear text.
-
Integrated Windows authentication . This option requires a Windows account name. Authentication will be negotiated by the Windows operating system.
You can also select to use Transport Layer Security (TLS) encryption. TLS is a privacy protocol that uses a smart card or certificate.
-
-
Select the Outbound Connections button to set configuration parameters for limiting outbound connections, limiting outbound connections per domain, and changing the TCP port that will be used.
-
Select the Advanced Delivery button to configure various delivery parameters, including those for maximum hop count, masquerade domain, fully qualified domain name, and smart host. One of the key parameters to configure is the Perform reverse DNS lookup on incoming messages check box. Unscrupulous users can easily manipulate SMTP, and this parameter closes a common security hole that Internet users use to hide the true source of the incoming message. If you select this check box, the virtual server will use the senders DNS address to do a reverse lookup of the DNS domain name. If the reverse lookup returns a DNS domain name that does not match the domain name specified in the SMTP Mail from field, the virtual server will reject the message. DNS reverse lookups impact message transfer performance and keep message from being relayed through multiple hops. However, the advantages usually outweigh these problems.
| |
EAN: 2147483647
Pages: 113