| Network services, by their very nature, accept incoming network traffic and act upon it. Therefore, any network service presents a potential security risk, and a network service as complex and feature-rich as IIS presents a bigger risk, simply because administrators may not understand the security implications of IIS' capabilities. In the next several sections, I'll give you some tips for keeping IIS ”and your servers in general ”as secure as possible. These tips apply primarily to servers that are accessible to attackers or the general public; the majority of the servers on your network should be shielded by a firewall, preventing the public and potential attackers from accessing the servers in any way.  | You may not feel the need to secure intranet web servers as thoroughly as publicly exposed Internet web servers. After all, you trust your users, right? Don't! Disgruntled or even incompetent employees can cause plenty of damage, and never discount the possibility of your internal network being compromised. Secure all your web servers as thoroughly as possible, no matter how safe they may seem. | |
12.3.1 Installing IIS IIS is not installed as part of a default Windows Server 2003 installation. That's because only a small percentage of Windows Server 2003 computers need to run IIS; leaving IIS out by default, you're assured that the security risk presented by IIS is present only on computers where you've explicitly installed the software. When IIS is installed, it is not installed with any optional components or services by default, and can serve only static HTML content to clients . This is a drastic change from Windows 2000, which by default installed its version of IIS and made it active. Unfortunately, this default installation caused all Windows 2000 computers to be vulnerable to a wide variety of IIS-based attacks. Often only administrators who were aware of security vulnerability mitigation and companies that had policies on exactly what software should be running on each computer would remove IIS where it was not required. This is the principal reason that IIS is not installed by default in Windows Server 2003.  | If you upgraded to Windows Server 2003 from an older version of Windows, you most likely already have IIS installed with a hodgepodge of IIS services enabled. In that case, you need to clean up the existing installation. You should skip to "Configuring the Services You Need" and remove the services that aren't necessary. While Microsoft provides a tool, IISLockdown, to help with this, the tool is not as effective as your doing it yourself. I don't recommend you use IISLockdown on Windows Server 2003 for this reason. | |
When you're ready to install IIS on a server, just follow these steps: -
From the Control Panel, open Add or Remove Programs. -
Click on Add/Remove Windows Components. -
Locate Application Server in the components list and select it. Note that IIS is installed as part of a group of application services rather than as a standalone component as in previous versions of Windows. Because you already know that you want only IIS, this is the only item you select here. -
Click Details. You'll see the list of Application Server components, including IIS, as shown in Figure 12-5. -
Select the IIS component. Note that the Enable Network COM+ Access component is automatically selected for you; this component is required to run IIS. -
Click OK, and then Next. Windows Server 2003 will install the components you selected. Figure 12-5. Installing IIS 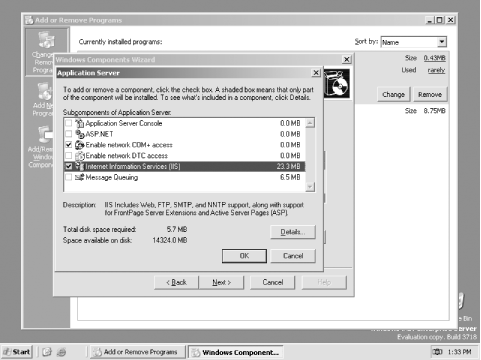
 | Don't leave IIS in its default configuration unless you know that's what your organization needs. In fact, you shouldn't even install IIS if you don't know this. In the next few sections, I'll cover the steps to configure IIS. Remember, even though IIS 6.0's default configuration is much more secure, you should always review that configuration to make sure it meets both your business and security requirements. | |
12.3.2 Configuring the Services You Need As I've already described, IIS includes a number of different services, including HTTP, NNTP, SMTP, and more. By default, IIS is installed with a single web site, using the HTTP protocol. This is a change from the previous version of IIS, in which FTP and other services were also enabled by default. Figure 12-6 shows the IIS Manager console with the Default Web Site enabled. Figure 12-6. The IIS Manager console 
Notice, too, that IIS does not configure an administrative web site by default, as previous versions did. IIS' default configuration is designed to provide the minimum functionality necessary for a web server, while preserving as secure a system configuration as possible. If you want to set up an FTP site or some other IIS service, you'll need to go back into the Control Panel and the Add/Remove Windows Components section. Then follow these steps: -
Select Application Server and click Details. -
Select IIS and click Details. -
As shown in Figure 12-7, select the IIS services that you want to enable. When you installed IIS, only the default services ”a set of common files, the IIS Manager console, and the World Wide Web Service ”were installed. You can also add other services, such as FTP, BITS, or NNTP, if you wish. Make sure you add only services that you know you need and are part of your written IIS installation procedure (written procedures are described in ).  | Don't install any services unless you are going to use them and you have planned defenses around adding them. Planning systemwide defenses is discussed later in this chapter. | |
Figure 12-7. Optional IIS components 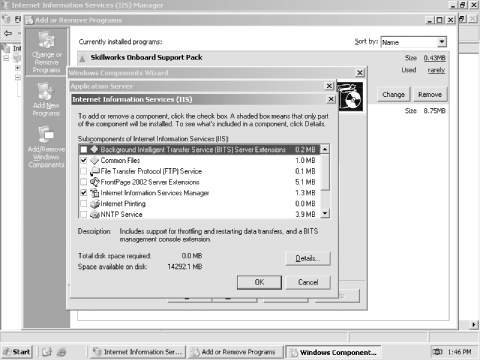
Even the World Wide Web Service itself has additional components, which you can access by selecting the service and clicking Details. These additional components include ASP, a remote administration web site, WebDAV capabilities, and more. Figure 12-8 shows the components list. Figure 12-8. Optional World Wide Web Service components 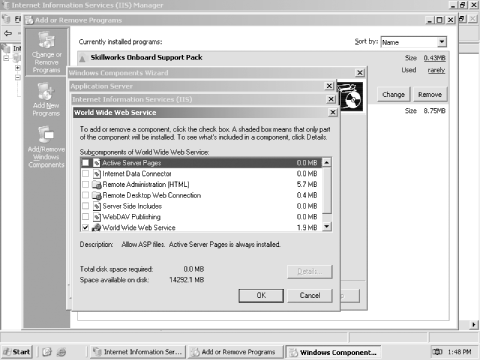
Again, install these components only if you've determined that they're needed in your environment and only if you've researched and understand the security risks. For example: -
ASP is an often- attacked component. While it provides great capabilities to a web developer, developers must also take steps to make sure their code can't be compromised by attackers. Those precautions aren't ones that you as an administrator can easily evaluate; simply ensure that your developers are aware of the risks ASP presents and have taken steps to protect their code from attack. -
Server Side Includes allows IIS to nest web files within one another. This could also allow an attacker to place files on your web server and include them in legitimate files that you've placed there, effectively hijacking your web pages. Carefully thought-out NTFS file permissions can prevent this from happening. -
WebDAV is a publishing service that allows remote users to add and modify files on a web site. Take great care that the WebDAV service permits connections only from authorized users and that attackers will not be able to use the service to upload unauthorized web pages.  | Each component shown in Figure 12-8 has its own benefits and security risks. Many of these risks and benefits can be better understood by an experienced web developer, and you should always consult with a developer to help deploy these components in a safe, secure fashion. | |
12.3.3 Using Secure Sockets Layer You are probably already familiar with Secure Sockets Layer (SSL). It shows up as that little lock icon (or in the case of Netscape, the unbroken key) and indicates that the server is authentic . It also normally indicates that a secure channel exists between the client and the server and that the data exchanged between them is protected from eavesdroppers. Because this is such a powerful mitigation against different attacks, I'll show you how to set it up with IIS. Setting up SSL is very simple. You must first obtain a web server certificate and associated private key that chains to a root trusted by the client computers. Chapter 9 went into great depth on this particular topic, so I won't repeat those instructions here. You must load the certificate and private key on the web server by using a wizard. It's this simple: -
You should already have an appropriate web server certificate and private key, either from a trusted third party or from your own internal PKI. -
-
Right-click the desired web site and select Properties. -
Click the Directory Security tab, and then click the Server Certificate button. -
Follow the prompts in the wizard. Once that's done, IIS automatically finds the certificate and begins using it for SSL traffic on this web site. Is that it? Well, almost. Most administrators say that they want to require only SSL for sites or entire IIS farms. This isn't normally a good user experience. Allowing only SSL traffic causes normal connections to the server to fail with an ugly IIS error. The better experience is to have a web page that checks the connection state and, if a non-SSL connection is detected , redirects to the HTTPS:// equivalent of the page. This small amount of code should be implemented on all web pages to ensure consistency across the site. Unencrypted HTTP traffic normally uses port 80. SSL must use a different port. This is normally port 443 but can be any port (they both can). This is important to note when you configure the firewall between your IIS server and the clients and also when configuring port blocking, which is covered later in this chapter. You must allow the SSL port to pass through the firewall. To configure the ports, see "Using Port Numbers " and Figure 12-10, later in this chapter. 12.3.4 Using IP Address Restrictions One great way to secure internal web servers is to use IP address restrictions. These restrictions tell IIS to accept connections from only specific domain names , computers, or groups of computers, based upon IP address. For an internal server, for example, you might configure IIS to accept connections from only internal IP addresses, ensuring that outsiders ”even ones that somehow compromise your firewall ”won't be able to easily access IIS. These restrictions are configured on a per-site basis, as follows : -
Right-click the site in the IIS Manager console, and select Properties. -
On the Directory Security tab, click the button to edit IP address restrictions. -
As shown in Figure 12-9, you can have IIS allow or deny access to all IP addresses by default, and then include a list of exceptions to the default rule. In the example shown, IIS will reject all connections not coming from the internal IP address range shown. Since this address range is a designated private IP range, you can be assured that no Internet-based computers are using it. Figure 12-9. IP restrictions 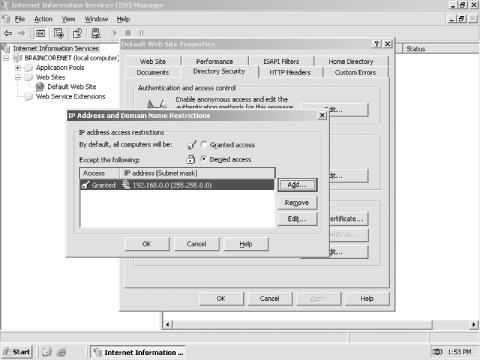
 | If an intruder compromises your firewall, he may seem to be using the firewall's internal IP addresses. If IIS should be accessible to only internal users, then you might exclude the firewall's internal IP addresses from the list of allowed addresses. Doing so will help keep all external users out of IIS, no matter how they get into your network. | |
12.3.5 Using Port Numbers Web sites typically use TCP port 80 for connections, since that's the default port used by the HTTP protocol. If you have web sites that shouldn't be accessible to the general public, you can "hide" the sites by using a nonstandard port number. Simply provide the correct port number to authorized users, and instruct them to use a different URL to access the web site. For example, suppose you configure a web site on a server named www.woodgrovebank.com and assign the web site to use port 85. Users could access the site only by using the URL http://www.woodgrovebank.com:85. To configure a web site to use an alternate port number, follow these steps: -
Right-click the site in the IIS Manager console, and select Properties. -
On the Web Site tab, provide the desired port number, as shown in Figure 12-10. Figure 12-10. Changing a web site's network port 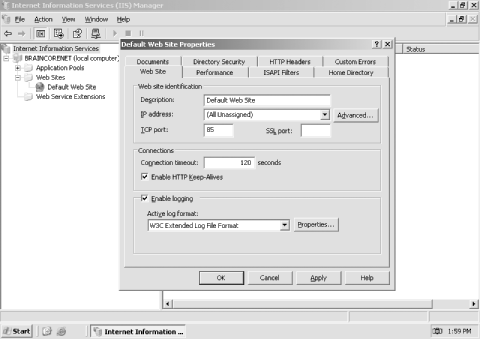
 | Be careful not to use port numbers that another service is using. For example, the FTP Service uses port 21 by default, so you can't configure a web site to use the same port number. Doing so will result in both the web and FTP sites working erratically. For a list of standard protocols and associated ports see the following file: %SystemRoot%\system32\drivers\etc\services . | |
Don't rely on nonstandard port numbers to protect a web site, though. While useful as a means of deterring casual snoopers, sophisticated attackers can use port scanners to find your "hidden" sites. A port scanner attempts to connect to all possible ports, or a range of ports, looking for ports on which the attacked computer responds. When the scanner finds such a port, it logs it, allowing the attacker to focus on that port for more specific attacks. 12.3.6 Using File Permissions You should always use NTFS file permissions to secure web pages that you care about. This is especially true for web pages that shouldn't be generally accessible, as it provides another layer of protection against attackers. When a user requests a web page, IIS checks the NTFS permissions on the page and will deliver the page to the user only if the user is on the file's access control list. If necessary, IIS will ask the user to provide credentials proving she should have access to the file. 12.3.7 Configuring Authentication IIS supports four different means of authenticating users, which you can adjust as follows: -
In the IIS Manager console, right-click a web site and select Properties. -
Click the Directory Security tab and edit the authentication and access control methods . Figure 12-11 shows the dialog box. Figure 12-11. IIS authentication 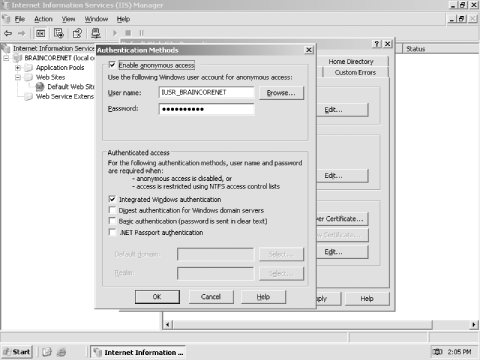
IIS' authentication methods are: -
- Integrated Windows authentication
-
Allows users to log on with a server or domain username and password. Users logged onto a domain will have their domain credentials automatically presented to IIS, if necessary. Note that this method works only when users are using Internet Explorer as their web browser. -
- Digest authentication
-
Similar to Basic authentication but is compatible with a wider range of web browsers and somewhat more secure. Credentials are protected during transmission, which helps prevent against eavesdroppers learning a user's password. -
- Basic authentication
-
Simply sends the user's credentials in clear text. Never select this option unless the web site is already secured by an SSL connection. Clear-text credentials can be easily captured while in transit and used for unauthorized access at a later time. -
- .NET Passport authentication
-
Uses Microsoft's .NET Passport system to authenticate users. This method requires a bit of extra setup and may require fees to use the Passport service; see the IIS documentation for details.  | By default, IIS enables anonymous access to web pages. Users will be authenticated only if an authentication method is selected and either anonymous access is disabled or users attempt to access a file that is secured with NTFS file permissions. | |
Of special note for setting file permissions are two user accounts. They are: -
- IUSR_computername
-
When an anonymous connection is made to IIS and no authentication is possible or configured, the connection must still have some user context for access control to work properly. IIS assigns all anonymous connections the same access that the IUSR_computername account (the IUSR account) has. That is, all connections to the IIS server have the same access to resources as the IUSR_computername account. -
- IWAM_computername
-
This account is used by IIS as another security context. Specifically, when IIS must launch another process, it launches that process in the IWAM_computername account (the IWAM account) context. When you plan your file and directory access for IIS files, you must consider whether the IUSR and IWAM accounts need access. In many cases involving anonymous-accessible web sites, the IUSR account must have at least Read access to the files that make up the web site. 12.3.8 Allow Only Needed Functionality By default, IIS disables most of its advanced functionality. These features are typically enabled through Web Service Extensions, and managed through the IIS Manager console, as shown in Figure 12-12. Figure 12-12. Web Service Extensions 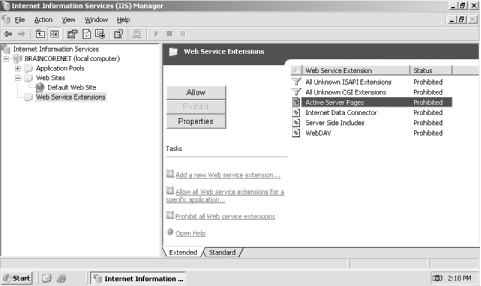
As shown, IIS by default disables all unknown ISAPI and CGI extensions, ASP, the Internet Data Connector, Server Side Includes, and WebDAV. You can click the appropriate button to allow or prohibit any service extension, or click the provided links to add new extensions.  | Never allow unknown ISAPI or CGI extensions. Doing so could allow an attacker to place an unauthorized extension on your system and execute it, doing who knows what kind of damage to your network. By allowing only specific extensions, you can control what vulnerabilities your system is open to. | |
12.3.9 Review Web Server Logs Your web server log files can provide valuable clues when an attacker is attempting to compromise the server. Unfortunately, these log files can be long and difficult to read, especially on complex, busy web sites. I recommend using a third-party log scanning tool, such as WebTrends (www. webtrends .com), which can provide site statistics as well as scan for potential security problems. Without some type of log analysis tool that can review the logs in a reasonable amount of time, the logs are not effective in identifying and helping mitigate attacks. The amount and complexity of information saved in the logs is simply too much for an administrator to sit down and sort through manually. The logs do still have some value for proving an attack occurred or learning about attack patterns, but for any type of IDS, you need an automated system.  | Many firewall products can serve in this same capacity to analyze patterns in real time and notify you when something bad is happening. Of course, your IIS server should always be behind a firewall. | |
All IIS web sites create log files by default. These are saved in %SystemRoot%\System32\LogFiles , under a subfolder for each specific web site. However, you can change where your log files are saved. To do so: -
Right-click the web site and select Properties. -
On the Web Site tab, click Properties. -
As shown in Figure 12-13, modify the log properties to save to the desired location. You can also control how often IIS will start a new log file: Hourly, Daily, Weekly, and so forth. Figure 12-13. IIS log options 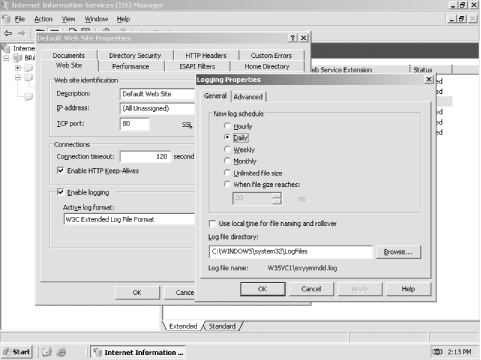
Log files can also provide valuable forensic evidence in the event an attack is detected. Forensic analysis is often carried out over weeks or months, so the real-time analysis tool isn't critical to that process. You should archive and save your log files for however long your organization's written security policies require. For more information on implementing log preservation, see the Event Log topic in the Windows Server 2003 Technical Reference (formerly the Resource Kit) at http://www.microsoft.com/resources/documentation/WindowsServ/2003/all/techref/enus/W2K3TR_sepol_event_set.asp. 12.3.10 Using Port Filtering Windows Server 2003 includes TCP/IP port filtering capabilities. You can use port filtering on a web server to ensure that only web server traffic is received by the server. This helps close the holes opened by any other services or applications that might be running on the server by preventing any traffic from reaching them.  | As you saw in Chapter 8, IPSec can also be used as a port restriction mechanism. Although it may seem redundant and increase management overhead, using both methods helps ensure the most consistent and effective port restrictions possible. Multiple layers of security like this provide for defense in depth, which was discussed in Chapter 2. | |
To configure port filtering: -
Modify the TCP/IP properties of any installed network adapter. -
-
On the Options tab, click Properties. -
As shown in Figure 12-14, configure port filtering as desired. In this example, port filtering is configured to accept TCP traffic only on ports 80 and 443, most commonly used for HTTP and HTTPS traffic. Figure 12-14. Port filtering 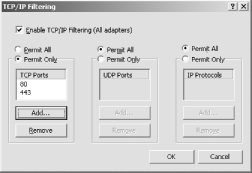
Port filtering does have some significant caveats: -
Filtering is effective for all installed adapters, not just the adapter on which you configure it. -
Filtering can prevent key operating system services from functioning. For example, if the configuration shown in Figure 12-14 were applied to a domain controller, the domain controller would be nonfunctional except as a basic web server, because the ports necessary for domain controller and Active Directory communications aren't allowed. Port filtering is best used on standalone servers that don't belong to a domain and don't do anything except provide a limited set of network services, such as a web site or FTP site. This limited set makes it easy to determine the ports necessary for the server to function. In a domain environment, you can use IPSec instead of, or as a redundant complement to, port filtering. Blocking ports can provide greatly increased security, but at a cost. You may no longer be able to use remote management tools, access file shares, and so forth if you restrict the system's network communication. You should ensure that port filtering is planned properly to allow for all approved network functionality based on the computer's role. It's important to note that port filtering and IPSec restrictions should not take the place of a firewall solution. Your IIS servers should always be separated from the Internet by a dedicated stateful inspection firewall that ensures the traffic that passes to your IIS server is appropriate. Microsoft Internet Security and Acceleration Server (ISA) is one such firewall, but many are available. The firewall you choose should inspect all contents of each packet to ensure that the data is appropriate. This helps stop attacks such as malformed URLs and content bombs from even reaching the IIS server. 12.3.11 Dedicating IIS Servers Avoid running a publicly accessible IIS site on a server that performs other functions. Some server products require IIS in order to operate, but that doesn't mean IIS also needs to host a public web site. Let the server product use IIS, but configure port filters to prevent the public from accessing the IIS server at all, if possible. In addition, you should remove all web content and services that are not required for the product to operate . The less exposure the web server presents, the less likely it is to become a victim of a virus or Internet-based attack. Specialized Administration: Good or Bad? Specialized administration isn't always a benefit. Everyone has read about or experienced web-based attacks that affect IIS. The severity and impact of these attacks varies greatly from organization to organization. However, the attacks had their greatest impact in poorly managed environments. One such environment is City Power & Light (CP&L). As usual, I've changed the name to protect the innocent. CP&L is a large corporation with a deep reliance on technology. Like most companies of this nature, it has a large IT group in which most administrators specialize in their own technology. This allows CP&L to employ gurus in various technologies such as IIS, Active Directory, and security. While specialization is a benefit to the deep technical knowledge required by CP&L, it often leads to isolation between technologies and results in environments that are well configured for one task ”and poorly configured for others. When the PKI was created at CP&L, the PKI guru was careful. He planned out the hierarchy well in advance and took every precaution he could think of. He applied Group Policy to restrict access, required biometric authentication, and used an HSM for key storage on his root CA. However, this guru was unfamiliar with the other services on the CA. He installed IIS because he was informed that web-based enrollment worked only if IIS were installed. He never configured IIS further than necessary to ensure that clients could enroll for certificates on the CA. Because the PKI guru was unfamiliar with IIS, he was simply unaware that the IIS guru should be involved so that they could work together to secure the computer. The results of this story are predictable. The CA was attacked by a worm that affects poorly configured IIS installations. This worm destroyed the CA database and ran rampant throughout the PKI, destroying every CA except the offline root. The computers had to be completely restored from an outdated backup and manually secured before they could be brought back online. The cost to CP&L was enormous and resulted in significant downtime for the PKI, which was unable to issue CRLs, issue new certificates, or renew existing certificates for several days. All because one guru didn't confer with another. |
|