Trees
| Tree rendering has only recently found its way into computer games. Golf simulators were among the first to try to convey the look of realistic trees (usually by simulating them with billboards). But many games today take place in outdoors scenarios, so trees are getting more popular. Trees can be rendered in a variety of ways, and the decision on how to do this depends on the priority of the trees in the rendering pipeline. There are many different approaches, but each one offers a different cost-benefit relationship, so you need to analyze how many clock cycles or triangles you are going to devote to your scenario. In some action games, trees can just be a backdrop against which the gameplay occurs, and thus a simple, cheap method will be employed. In other scenarios, such as role-playing games (RPGs), the tree is part of the atmosphere, and thus more energy will be devoted to portraying them realistically. I will cover the different rendering methods in detail, emphasizing the key characteristics (memory footprint, CPU usage, triangles, and so on) so you can make an informed decision for your game. BillboardsA billboard is a screen-aligned quad that is used to substitute a complex, distant object with a high-resolution picture. As the viewer moves around, the billboard also rotates, so it always faces you. Billboards are great for distant trees because they allow you to represent a visually dense forest with just a few triangles. As you have already seen, aligning a billboard with the screen is relatively straightforward. All you have to do is calculate world-space vectors, which, when projected, result in screen-aligned vectors, and then use them to render the primitive. These computations can easily be made from the modeling and projection matrices in your API of choice or directly by combining the player's position and rotation angles with some clever trigonometry. If you decide to render trees with billboards, you should be aware of some techniques that might be helpful to increase the realism of the result. Try to use as many different textures as you can, so the landscape looks varied and not a repetition of the same tree. If possible, pack all those tree textures in a large, single texture, so you can encapsulate the entire forest in a single rendering call, avoiding the ever-costly texture swap operations. A second piece of advice: If you can afford it, apply a subtle screen-aligned skewing transform to the trees to convey animation. Make sure trees are phased out from one another, so the overall result gives a sense of chaos, which will help realism. Skewing can be implemented easily on billboards. It is just a matter of leaving the base vertices unchanged while translating the top vertices along the line defined by the screen-aligned horizontal vector, as shown in Figure 20.1. Figure 20.1. Billboarded tree using a skew transform to simulate simple animation.
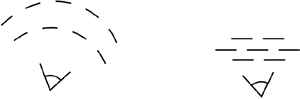
Another improvement technique is to play with colors and sizes a bit. You can either recolor textures so they look different or modify per-vertex color and modulate texture color slightly in the rendering pass. Whatever your choice, the idea is that no two trees should look exactly the same; they should vary in hue over a relatively broad spectrum. Also, play with sizes. Store one scaling transform for each tree, so you can display different size trees. Huge variations are not really required. Allowing a 10 15 percent deviation from the "standard" size is all you need to further break down the landscape patterns, and thus create a convincing scenario. Billboards are great if you need to create a forest on a very limited resource platform. Thus, all the techniques previously explained are geared toward increasing the realism of the results, because this technique is pretty limited. Now let's explore some limitations and items to watch out for when using billboarded trees. First and foremost, be very careful with viewing distances. As you probably know, billboards are not really meant to be viewed up close. They are flat, look pixelated, and if the billboard is close to the lateral edges of the screen, can look distorted. The best alternative to correct a flat, pixelated look is to blend a faraway billboard representation with an up close version made by using a more involved method. Image-based rendering trees can be used as well as real geometry objects. I will go into more detail about these approaches as I explore each technique. The distortion issue is somewhat harder to deal with. Billboards are designed to always face the camera. Thus, if they are close to the viewer, a small camera movement will imply a large angular shift, so the billboard will rotate to accommodate the new player position and can sometimes look wrong. Two solutions exist to solve this problem. The first option is to align the billboards not so they face the camera, but so they face the camera's viewing plane (see Figure 20.2). By doing this, distant billboards will still look correct (angular issues are negligible here). Closer instances will no longer rotate to face the viewer, and a more realistic look will be reached. Figure 20.2. Billboards aligned with the camera (left) versus billboards aligned with the camera's viewing plane to correct distortion.
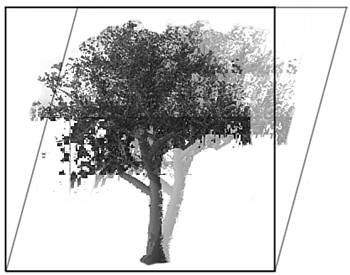
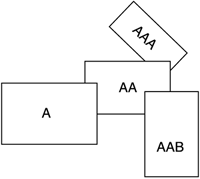
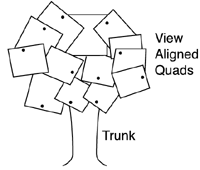
The second alternative is to allow a limited rotation over the camera's viewing plane. This is a middle-of-the-road solution that provides quite good results. Here, billboards will be computed as if they were facing the camera. Then, the angle between this representation and the viewing plane will be computed, and only a limited range of rotations will be allowed. This way trees can be oriented to the camera when they are distant, and closer trees do not suffer the rotation artifacts found in classical billboards. Image-Based MethodsTraditional graphics programmers tend to have a predilection for triangles. All problems must boil down to triangle rendering and a (sometimes pretty complex) geometrical representation. But what if we forgot about that for a second? What if, instead of decomposing everything into triangles, we chose a different primitive? Image-Based Rendering (IBR) is the common denominator of many different techniques that do not try to create accurate geometrical representations of objects, but rather convey their visual appeal by using images. In the extreme case, a billboard is an IBR method. But many other IBR methods exist, yielding much better results. Tree rendering is very suitable for IBR. Trees have huge geometric data sets, with a decent tree requiring well over 10,000 triangles. IBR, on the other hand, places the emphasis on textures, keeping triangle counts relatively low. As you will see in a moment, you can create relatively good-looking trees with about 20 triangles using some clever IBR techniques. IBR techniques can also be scaled up or down to offer varying levels of detail. We will see how they blend naturally with billboards and can be easily integrated with geometry representations as well. Parallel IBR MethodThe Parallel IBR method is designed to accurately portray trees that are part of a background. The limitation is that we must either be static or moving in a parallel plane to the trees. Thus, it is a suitable method for adventures, most fighting games, and so on. The main idea is to represent the complexity of a real tree with a hierarchical, layered billboard array. We would use one billboard for the tree trunk, and from there, a series of billboards connected by joints, much like a character in skeletal animation. Thus, we can animate the tree as if it were being blown by the wind by propagating motion through the hierarchy while keeping a very low triangle count. A good model of a tree using this method can take about 25 quads to render, so the method can be used for dense forests as well. The main difficulty of this method is obtaining the billboard data so the resulting tree looks good. The method I would recommend requires a rendering package (3ds max, Maya, and so on) and any of the tree modeling plug-ins available for them. You start by modeling the tree with as much detail as you want. Remember that this is an IBR method, so more detail does not necessarily mean more complexity or lower frame rates. Thus, make sure the tree is as realistic as possible. Then, you need to use clipping planes or Boolean operations to extract slices of tree geometry in Z direction and take snapshots of that geometry. The trunk can generally be stored in a single layer, and thus the tree foliage is where you must spend most of your time. Make sure large branches are hierarchically divided into several layers because this will allow finer animation later on. I suggest storing these layers using some meaningful naming convention because reconstructing the tree afterward can become tricky if you don't. For example, I encode the name as a series of letters, which represent the hierarchical disposition of a given layer as shown in Figure 20.3. Figure 20.3. Naming for hierarchical branches.
The next step involves storing the "anchor point" for each joint between two layers. The anchor point is where we will link pieces together. A branch will rotate with respect to this spot, so detecting it correctly is essential for the realism of the complete scene. You should store these joint coordinates in 2D, referring to the current element's coordinate system, as shown in Figure 20.4. Figure 20.4. Orthogonal image-based trees with quads shown.
So our data set is now ready. To render it, we must follow a skeletal animation approach. Each new billboard inherits movement from its parent and propagates downward to the children. As a rule of thumb, nodes closer to the root are generally larger and heavier. Thus, the range of movements of the different branches should increase slightly as we move away from the tree root and advance to the leaves. Combining all the steps in this process generates extremely photorealistic trees. Note, however, that creating the data set is a tedious process, especially if you need to do it for several tree types to create a forest. Thus, it is recommended that you code some plug-ins for your modeler of choice, which makes life easier. An intuitive GUI can greatly simplify creating this method's data sets. An extension to this mechanism uses parallel IBR for the leaves, which are usually stored in clusters, and real geometry (possibly with progressive meshes as explained in Chapter 21, "Procedural Techniques") for the trunk. This way we have trees we can move closer to, and if leaves are designed to incorporate not only the yaw but the pitch as well, we can look up from below. Orthogonal IBR methodThe parallel method explained in the previous section allows the creation of realistic trees for static or movement-limited players. They convey a great sense of parallax and volume, and can be animated. The downside is that we cannot look at the tree up close, nor rotate around it realistically. The reasons for these limitations lie in the texture resolution and in the fact that textures are screen-aligned, so rotating around them is impossible. A new technique must be used for those cases requiring more flexibility. As in the previous case, this technique is somewhat similar to medical computerized axial tomography (CAT) scans, so slices of the tree must be taken. But this time we will be able to rotate freely and, with some limitations, even stay in the shade of our trees. The key difference is that this time we won't take parallel slices but will sample the tree in both the XY and YZ plane, so we get a series of evenly spaced texture maps. Then, we will paint them, reconstructing the proportions of the tree as in conventional volume rendering. To prevent the viewer from noticing the regular pattern, alpha-blending will be used to ensure a smooth transition between billboards aligned in both axes. This way we can view the tree from any distance and rotate around it. The more billboards you use, the better results you will achieve. However, demos with about 5 8 slices in each direction (resulting in a 20 32 triangle tree) look quite good. The only problem with this technique is that the trunk must usually be dealt with separately, because most of the time it will look wrong. The other issue is that a viewer right below a tree shouldn't be allowed to look up, or the illusion of complexity will be lost completely. Pitch movement must thus be limited for this technique to achieve good results. A workaround to this situation is using not two axes but three axes: XY, YZ, and XZ. The XZ billboards will seldom be used except to solve the case where the viewer is placed below the tree. Then, the treetop would be sliced in horizontal layers, and the sense of volume and parallax will be preserved. But this solution is seldom implemented because it requires even more texture maps (IBR methods are all texture hungry). It is much simpler to restrict camera movement a bit. As for the implementation, the orthogonal method starts like the parallel method: by modeling a very high-resolution tree using any plug-in or package. The tree can again be as complex as you want because we will not be using the geometry at all. The slicing process does not take place in the modeling package but in a preprocessor or at load time in the main application. The algorithm is as follows: compute the bounding box of the tree select the right number of slices for each slice in XY plane place the camera in a fixed position along the Z axis initialize a front and back clipping plane so you restrict the Zbuffer to the area you Note that the position of the camera is not really relevant, as long as it remains still over a rendering loop. The only difference it will make is on the size of the billboards, which will be scaled to suitable texture sizes afterward anyway. Now you should have a series of RGBA images ready for rendering. As you can see, this preprocess is much simpler than the one required in the parallel method. For rendering, you must begin by rendering all images to a series of axis-aligned quads, so they reconstruct the geometry of the tree. Then, you must alpha-blend the quads depending on the angle to the viewer. Specifically, quads facing the viewer must be opaque, and as the quad moves away from the viewer, its transparency should increase. Tuning this code is essential for the illusion of volume, so a bit of trial and error is required. Once you achieve this, you should see the XY and the YZ billboards "taking turns," so as XY quads fade out, YZ quads fade in to create a continuous look of the tree volume. Sometimes the trunk will work out well with this technique, and sometimes you will need to use a regular mesh for the trunk because it will look layered. You can see the overall result depicted in Figure 20.5. Figure 20.5. Final look of the tree with anchor points and texture maps shown.[1]
Orthogonal IBR trees look very convincing. But they have a downside. The hierarchical animation method we devised for parallel trees is not feasible here. Texture maps are evenly spaced and moving them would make the tree look like it was breaking. A minor improvement can be achieved by shearing the top vertices of the quads very subtly, so it looks like the treetop as a whole is moving. Sometimes you will even be able to manually add some extra quads to the treetops, so you can move them a bit and imitate animation. However, this technique works best with static trees. Another downside to this technique in particular (and IBR in general) is that texture use simply skyrockets. A detailed, good quality tree will need a lot of good quality slices, and this means lots of memory will be used. Take, for example, a tree made of 8+8 slices; each one stored as a 32-bit 256x256 RGBA bitmap. Each bitmap will require 256KB of uncompressed memory for a grand total of 4MB for the whole tree. You might argue that these numbers are not that bad because we are not using any geometry in return. Although this is correct, 4MB per tree makes using this technique very hard in any mainstream game, where data sets must be kept to a minimum. Here is some advice to reduce the texture requirements:
|

EAN: N/A
Pages: 261