Load-Distribution Algorithms
| In order to distribute requests among real servers, you can use any of the following load-balancing algorithms:
Round RobinRound robin is the most basic prediction algorithm. As requests arrive, the content switch forwards them blindly to its list of real servers starting with the real (short for real server) that you configured first, and ending with the last real you configured. With round robin, during one cycle, the content switch sends only one connection to each real server. If a server farm has N servers, a single cycle represents N connections. Alternately, with weighted round robin (WRR), each cycle provides multiple connections to each real. You can assign to each real a weightthose reals with a higher weight receive a larger number of the available connections. Now the sum of all the weights of the real servers represents the number of connections issued by the content switch during one round-robin cycle. With WRR, you can assign different weights to subgroups of real servers within a server farm. For example, the assigning of weights is beneficial if your server farm has numerous real servers running on a few different hardware platforms, with various memory capacities and CPU speeds. Table 10-2 illustrates a server farm consisting of four groups of six real servers in total that are assigned various weights. The total number of connections per cycle in this example is 27.
To configure WRR on your CSS, use the balance weightedrr command in your content rule. To specify the weights for the real, use the weight command in service configuration mode on the CSS. To configure least connections on your CSM, use the predictor leastconns command in your server farm configuration. You can configure the weights using the weight command in real configuration mode on the CSM. You can manually weight your reals, as Table 10-2 illustrates, or you can automatically weight them using DFP. DFP requires that you install a software agent on your real servers. DFP agents are commercially available from third-party software vendors. If the installed agent recognizes that resources are low on its real server, it can send a DPF message to the content switch to modify its weight within the server farm. Your content switches act as DFP managers. The DFP manager actively probes the agents for status information, such as whether the real server is over- or underused. To configure your CSS as a DFP manager, use the following command in global configuration mode: dfp ip_address {port} {key "secret" | [des-encrypted encrypted_key | " encrypt_key"]} {timeout seconds} {retry count} {delay time} {max-agent-wt weight} The ip_address value indicates the IP address of the DFP agent. To encrypt the information exchanged between the DFP agent and manager, you can enter an MD5 key as a quoted string, using the key parameter. Alternatively, you can perform DES encryption by providing an encrypted unquoted key (that has already been encrypted by the CSS) or quoted unencrypted key (that the CSS encrypts for you), using the des-encrypted parameter. The CSS encrypts your key, if necessary, before saving it to the running configuration. The timeout value indicates the inactivity period before the manager closes the connection to the agent. The retries value specifies the number of times the manager attempts to connect to the agent. The delay value indicates the length of time that the DFP manager waits between each retry. All time units are in seconds. The default TCP port for DFP is 14001. For example, you can use the following command to configure your CSS to connect to the real 10.1.10.11: dfp 10.1.10.11 14001 key "cisco" timeout 300 retry 3 delay 15 To configure your CSM as a DFP manager, use the following commands in CSM configuration mode: dfp [password password] agent ip-address port [activity-timeout [retry-count [retry-interval]]] For example, you can use the following commands to configure your CSM to connect to the real 10.1.10.11: dfp password cisco agent 10.1.10.11 14001 300 3 15 A drawback to round robin is that it can cause an uneven distribution of concurrent connections in volatile environments where real servers fail frequently. In the event of a real failure for a period of time, the remaining servers absorb the load. Even when the failed real comes back online, its concurrent connections may not catch up to the others, unless they also fail for the same duration and frequency. To provide an even distribution of connections to your reals in volatile environments, use the least-connections distribution algorithm. Least ConnectionsWith the least-connections algorithm, as the name suggests, the content switch forwards new requests to real servers with the fewest connections. The content switch maintains the concurrent number of existing connections to each real. When a real receives a new connection, the content switch increments the count. When clients or servers tear down connections, the content switch decrements the amount. The benefit of the least-connections load distribution mechanism is that it creates an even distribution of connections across your reals. Real server weighting is also available for the least-connections predictor algorithmthose reals with higher relative weights receive a larger proportion of the available connections. The difference with least-connection weighting and the weighting mechanism in WRR is the way in which the content switch uses the weight to determine the distribution of connections. For example, say that you give the same weights to subgroups of reals within your server farm as given previously in Table 10-2. Consider a server farm consisting of N subgroups of reals, with N different weights 1, 2, ... N. During one cycle, the real subgroup with weight 1 would receive 1 / (1 + 2 + ... + N) connections, the real with weight 2 would receive 2 / (1 + 2 + ... + N) connections, and so forth. Table 10-3 illustrates how the least-connections algorithm distributes the load with the same weights as given previously with WRR in Table 10-2.
To configure least connections on your CSS, use the balance leastconn command in your content rule. The CSS does not use the service weight with least connectionsit assumes that every service has the same weight. To configure least connections on your CSM, use the predictor leastconns command in your server farm configuration. You configure the weight in real configuration mode on the CSM, using the weight command. You can also use DFP as discussed previously to automatically adjust the weights of your real servers. A drawback to least connections is that, when real servers fail or when you add a new real server to the farm, the CSS sets the real's connection count to zero. When they come online again, the content switch may overload them with connections to bring them up to the level of connections that are on the rest of the available reals in the server farm. To overcome the possibility of overloading a real when it comes back online, the CSM least-connections algorithm provides an inherent slow-start mechanism to avoid overloading real servers when they come online. If you find that your servers tend to fail repeatedly when they come online on your CSS, you should consider using weight round robinthe CSS least connection algorithm does not provide connection slow start. When you add the real server to the farm, make sure that its weight is very low, and then gradually increase its weight manually to provide a similar function to slow start. Both round robin and least connection load-balancing methods enable you to configure connection thresholds. Once you configure the connection thresholds, the content switch will take a real server out of the rotation, leaving existing connections intact. To define the maximum number of connections of a real server on the CSS, use the following command in service configuration mode: max connections max-conns Once the CSS reaches the maximum connections for the real, it will not issue connections until the connections drop below the maximum threshold. To define the maximum number of connections of a real server on the CSM, use the following commands in real server configuration mode: maxconns max-conns minconns min-conns Once the CSM reaches the maximum connections for the real, it will not issue connections until the connections drop below the minimum threshold. Configuring Server LoadYour CSS can estimate the average load of a real server by calculating its average response times that are obtained from live traffic over a period of time. The content switch uses response times from both TCP connection setup and application layer requests/responses for live flows in its calculations. The content switch forwards requests to the real servers based on their loadthe reals with a higher load receive fewer requests than those with a lower load. The CSS implements a proprietary algorithm called Arrowpoint Content Awareness (ACA) to calculate the real-time server load based on the average response time over a period of time. ACA is not useful in small server farms (for example, server farms with only two or three reals). To enable ACA, use the balance aca content rule command. You can then configure either relative or absolute server load calculations. Note As an alternative to ACA, you can also use the load value service configuration command to manually specify the load of a server. The CSS considers a real with a value of 254 configured with this command as out of service. This command bypasses the ACA load calculation and can be set using XML, SNMP, or the command line. To use the load command, you must first disable load reporting by using the no load reporting global configuration command. Calculating Relative LoadWith relative load calculations, the CSS computes the load for each real to a value between 2 and 254, where 255 is fully loaded and therefore ineligible for content requests. The CSS computes two different load numbers for each serverone for large files (greater than 15 KB) and one for small files (less than 15 KB)and then averages the two. The load step is a value that the content switch uses to determine whether a significant difference exists between the average response times of different servers. The greater the step, the less likely it is that the average response times of the reals servers will be different. You can manually set the load step yourself, using the command load step step static Alternately, you can configure the CSS to automatically calculate the load step for you by using the command load step step dynamic With the load step dynamic command, you must configure an initial load step, but the CSS modifies it after the CSS collects sufficient response times. The CSS takes a real server out-of-service when its load surpasses a load threshold that you configure with the command load threshold load To calculate the load of the real Reali, where i is the index of real within the server farm, the CSS uses the following function to normalize the load against the fastest responding real MinimumRespTime: Load(Reali) = [(RespTime(Reali) MinimumRespTime)/LoadStep] + 2 The content switch assigns the real server with the lowest response time (MinimumRespTime) with a load of 2. All other real servers' loads are based on the response time of that real. For example, Table 10-4 shows four servers with response times of 100 ms, 200 ms, 600 ms, and 700 ms. The lowest response time is that of server S1 at 100 ms. The load is calculated for the remaining services in Table 10-4 using a MinimumRespTime of 100 ms and a load step of 10 ms.
If you use a load step of 100 ms instead, you will get the loads calculated in Table 10-5. Because the difference in response times between S1 and S2 is equal to 100, their load numbers are the same, and therefore they will receive the same amount of connections from the CSS. Also, notice that, the higher you choose the load step, the closer the load numbers are for the reals.
The CSS recalculates the load numbers for each real server when the load-teardown timer expires. To configure the load-teardown timer, use the following command: load teardown-timer interval The CSS uses an age-out mechanism to test real servers whose performance has dropped substantially for an extended time, but that may be back to normal by the end of the age-out timer. When the age-out timer expires, the content switch resets the load to a value of two of all reals whose load has not changed since the beginning of the age-out timer. This way, the content switch can issue more connections to the reals in order for the tear-down reports to accumulate more flow information and more accurately calculate the load for the server. To change the age-out timer, use the following command: load ageout-timer seconds The default setting for the tear-down and age-out timers are 20 and 60 seconds, respectively. Calculating Absolute LoadAs you learned with relative load calculations, the content switch normalizes the response time values with the fastest responding real while calculating the load of the remaining real servers. However, if you use your CSS to switch content for multiple applications, relative load normalizes the load values of services of a slower application with the response time of the fastest service of the faster responding application. For example, the average response times of application A is 50 ms and application B is 700 ms. Furthermore, the response time of the fastest responding service is 20 ms for a service within application A. In this example, the CSS normalizes all services within applications A and B using the response time of 20 ms. If you want to use ACA for multiple applications on a single CSS, you should use absolute load calculations instead of relative load. Absolute load calculations take into account only the actual perceived load of the server. With absolute load calculations, the CSS divides the load number scale into 16 ranges of load numbers. The CSS assigns individual load steps to the ranges, depending on the granularity of the response times of your applications. Ranges are groups of consecutive load numbers that share a common load step between numbers. You can adjust the load step and maximum response times for the ranges by using the command load absolute-sensitivity number The CSS uses a sensitivity of 21 by default. Table 10-6 gives the load step and maximum response time values for the 16 ranges, based on a sensitivity of 21. With this sensitivity, the upper boundaries for the load step and maximum response time are 65,536 ms and 33 minutes, 51 seconds, respectively.
With absolute load calculations, the CSS groups services from your faster applications into the lower ranges. The maximum response time value in Table 10-6 separates your slower applications from faster applications. Additionally, real servers of slower-responding applications tend to have larger differences in response times. Therefore, the CSS increases the load step as the maximum response time increases, as Table 10-6 illustrates. As an example, Table 10-7 gives sample absolute load calculations for two applications with three reals each. Based on the perceived response times, the CSS assigns application A to range 1 and application B to range 5.
Increasing the sensitivity increases the upper load step size and maximum response time boundaries, and thus decreases the load numbers that the CSS assigns to your reals. For example, if you change the sensitivity to 22 using the command load absolute-sensitivity 22, the CSS would assign lower load numbers to the reals of application B in Table 10-7. Hash DistributionIn previous chapters, you learned that hashing can be used to check the integrity of SSL segments, authenticate HTTP requests, and compute hash values from keys used in hash table lookups during CEF adjacency determination. You can also use hashing for distributing load across real servers. With simple hash distribution, the content switch extracts the input to its hash function from fields within the incoming IP packet and TCP/UDP segment headers, including source/destination IP addresses and TCP/UDP ports. The content switch computes the hash as a value between 0 and a number that is usually quite a bit larger than the number of reals. The content switch then divides the hash value by the number of reals N, with the remainder being in between 0 and N 1. The remainder of the division provides the real server to forward the request to. Note To determine the remainder of a division between two numbers, the content switch uses the modulus or "mod" operator. A benefit of hashing in general is that, because the content switch hashes every packet of a flow, it does not need to store the associations of the client's connection to the selected real server in RAM. As a result, hashing is a stateless distribution method, whereas the methods described previously are all stateful because the content switch must store the mappings in RAM in order to know where to forward subsequent packets of the client's flow. Hashing the packet's source IP address is useful only in environments where there are vast numbers of clients, because the same keys provide the same hash value. A small number of clients may cause an over-selection of particular real servers. Additionally, some ISPs use mega-proxy servers to NAT hundreds or even thousands of clients to a single IP address. As a result, your content switch will forward all requests from clients behind the proxy to the same real server, potentially causing that real server to overload. You can configure your content switch to hash the following information for selecting real servers:
Layer 57 Load BalancingIn order to match a client request to a virtual server, you can configure your CSS to inspect application layer headers as matching criteria. By enabling application-layer load balancing, you can assign client requests to virtual servers given the following criteria:
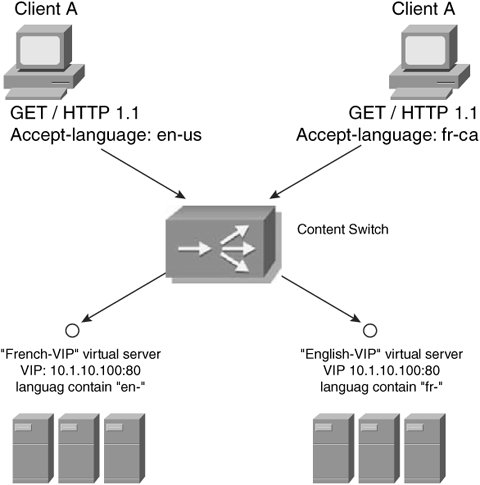
Figure 10-21 illustrates how you can configure a CSS with two virtual servers for the same content. The content switch forwards the requests to different server farms by inspecting the application request. Figure 10-21. HTTP Header Load Balancing To configure your CSS with these two different virtual servers, use the configuration in Example 10-9. Browsers use character codes for specifying the language within the "Accept-Language:" HTTP header. Additionally, different dialects of the same language use a unique code. For example, the English language has dialect codes for Australian (en-au), Belize (en-bz), and many others. The example in Figure 10-21 uses United States English (en-us) and Canadian French (fr-ca), but you can catch all the available dialects by using the contain keyword in Example 10-9. Example 10-9. HTTP Header Load Balancing on the CSS
You can also create Extension Qualifier Lists (EQL) to enable the CSS to inspect the URI for file extensions. For example, to configure a virtual server to service your static files, and another to serve your dynamic files, you can use the configuration in Example 10-10. Example 10-10. Using EQLs on the CSS
To configure your CSM with these two virtual servers, use the configuration in Example 10-11. To configure the two language policies, you must associate the HTTP header maps ("french-lang" and "english-lang") to their respective server farms by using the policy command. Then, instead of applying the server farms to the virtual server, you apply the policies. Example 10-11. HTTP Header Load Balancing on the CSM
To switch content based on file extensions on your CSM, you must create a URL map with the url-map command in policy configuration mode, as Example 10-12 illustrates. The first matching policy that is configured within the virtual server content-vip wins. You should also consider configuring a default policy that catches requests that do not match any of your other policies. Example 10-12. Extension Matching on the CSM
Note Bear in mind that HTTP header load balancing is different from HTTP URL hashing. HTTP header load balancing is a method of selecting virtual servers. URL hashing is a method of deciding which real server to send the request to, after the content switch selects a virtual server. Equal-Cost Multi-Path Router Load BalancingEqual-Cost Multi-Path (ECMP) is similar to CEF load balancing. To configure per-flow load balancing, use the command ip ecmp address This command enables the CSS to hash the source and destination addresses of incoming packets together to ensure that your flows will traverse the same outgoing router. To enable per-packet load balancing, use the command ip ecmp round-robin By default, the CSS selects the same interface for return traffic of a flow as the incoming traffic came from. To disable this behavior for ECMP, you can use the command ip ecmp no-prefer-ingress Figure 10-22 illustrates ECMP. Figure 10-22. Load Balancing Packets Across Multiple Routers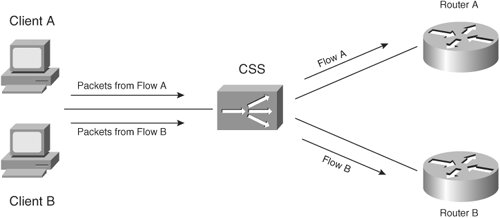 So far in this Chapter, you've learned a lot about how content switches receive and forward requests to real servers from clients. As a result, you should now be able to configure and deploy a basic server farm in your production environment. Once you enable your configuration in production, moving forward, you may want to tweak the settings and make the server farm perform more efficiently by using enhanced application health checking. You may also have application requirements to ensure that users remain connected to the same real server for the duration of their sessions. Additionally, when the capacity of your server farms increase, you may find that your content switches start to failthis is not an uncommon event in large server farm environments. To prevent your application from failing when your content switch fails, you should consider configuring content switch fault tolerance. The remainder of the Chapter will provide you with the information you need to configure a robust and highly available server farm. |
EAN: 2147483647
Pages: 178