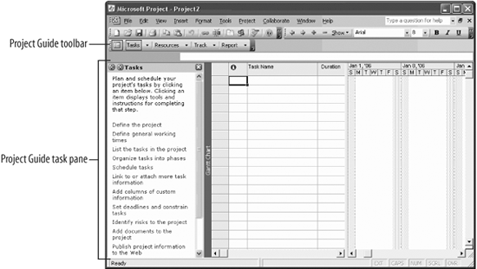
Lesson 1.13. Using the Project Guide Figure 1-14. A new project file with the Project Guide displayed. 
A new feature introduced in Project 2002, and probably the most helpful feature for beginners, is the Project Guide (as shown in Figure 1-14). The Project Guide is like an advanced wizard that guides you through each step in creating a project: entering tasks and resources, recording progress, reporting project status, and so on. The Project Guide appears whenever you create a new project file, but you can turn the Project Guide off once you are more familiar with how to build a project. There are two ways to use the Project Guide: Project Guide toolbar: This toolbar provides access to instructions and wizards in each of four basic project elements: Tasks, Resources, Track, and Report. Project Guide task pane: The task pane contains a list of tasks for each basic project element, and provides the necessary instructions and wizards to help you accomplish those tasks.
In this lesson, we will explore the Project Guide. If you can't see the Project Guide task pane, click the  Show/Hide Project Guide button on the Project Guide toolbar. Show/Hide Project Guide button on the Project Guide toolbar.
Tip: To view or hide the Project Guide toolbar, select View  The Project Guide task pane displays the steps for working with tasks. Let's try a step in the Tasks category. Click the Define general working times link in the Project Guide task pane. The first step in defining the project's working times appears. Notice that there are two arrows at the top of the guide, which you can use to progress between steps in the wizard. If you were actually creating a project, you would just follow the arrows. If you know the exact step you want help with, you can quickly access it from the Project Guide toolbar. Click the Resources button list arrow on the Project Guide toolbar. A list of all the steps available in the Resources category of the Project Guide appears. Select Specify people and equipment for the project from the list. The options for entering resources appear in the task pane. Also, notice that the view changes from Gantt Chart to Simple Resource Sheet. The Project Guide recognizes the action being performedin this case, entering resourcesand changes the view to accommodate the steps. If the task pane is taking up too much room, you can close it and work only from the Project Guide toolbar. Click the Show/Hide Project Guide button on the Project Guide toolbar.
Tip: To turn off the Project Guide, select Tools  Interface tab, and uncheck the Display Project Guide checkbox. Interface tab, and uncheck the Display Project Guide checkbox.
The task pane disappears. One of the great advantages of the Project Guide is that even if you know how to create a project, you can still use the Project Guide to view the different methods or options available to perform a step. Refer to Table 1-9 for a listing of the steps that the Project Guide covers.
Table 1-9. Project Guide StepsTasks | Define the project | Link to or attach more task information | Define general working times | Add columns of custom information | List the tasks in the project | Set deadlines and constrain tasks | Organize tasks into phases | Add documents to the project | Schedule tasks | Publish project information to the Web | Resources | Specify people and equipment for the project | Link to or attach more resource information | Define working times for resources | Add columns of custom information | Assign people and equipment to tasks | Publish project information to the Web | Track | Save a baseline plan to compare with later versions | Prepare to track the progress of your project | Incorporate progress information into the project | Check the progress of the project | Make changes to the project | Track issues associated with this project | Request text-based status reports | Publish project information to the Web | Report | Select a view or report | Change the content or order of information in a view | Change the look or content of the Gantt Chart | Print current view as a report (new feature in Project 2003) | Compare progress against baseline work | See the project's critical tasks | See how resources' time is allocated | See project costs |
QUICK REFERENCE TO VIEW THE PROJECT GUIDE TOOLBAR: |
|


