Lesson 10.1. Creating and Running a Macro Figure 10-1. You create macros 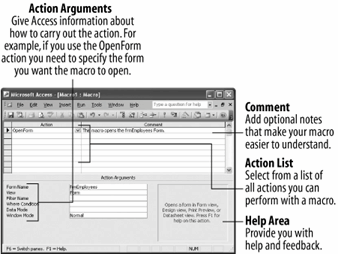
In some programs, such as Microsoft Excel or Word, you can create macros with a "macro recorder" to record your commands, keystrokes, and mouse clicks. Unfortunately, there isn't a "macro recorder" or Macro Wizard to help you create a macro in Microsoft Access. Instead, you create macros by entering the actions and arguments directly in Macro Design view, shown in Figure 10-1. Don't worryit's not as difficult as it sounds. Working in Macro Design view really isn't all that different from working in Table Design viewit's where you define and edit your macro objects. Simple macros that automate a single task, such as opening a form or report, are incredibly simple to createwe'll create such a macro in this lesson. More complicated macros with several steps or procedures may require a little bit of planning. Before you create a complicated macro, think about what you want the macro to do and the individual actions that are required to complete this operation. Practice the steps needed to carry out the operation and write them down as you goit will make writing the macro a lot easier. And so, without any further ado, let's create our first macro. Start Microsoft Access, open the Lesson 10 database, click the Macros icon in the Objects bar, and click the New button. The Macro1: Macro window appears, as shown in Figure 10-1. The Action cell is where you tell Access what you want the macro to do. Click the first blank Action cell, then click the list arrow. A list of actions appears. An action, or command, is the basic building block of a macroit's an instruction that tells Access what you want the macro to do. There are more than 50 different actions you can choose from. When you start creating your own macros you will almost certainly want to refer to Table 10-3 (found in Lesson 10.6) to help you find the right action. Scroll down and select the OpenForm action. The OpenForm action is added to the first line of the macro window. Most of the time you will have to give Access more information about how to execute each action. For example, here we will have to tell Access which form to open with the OpenForm action. You use arguments to supply Microsoft Access with information about how to carry out the action. Each type of action has its own set of arguments, which appear in the Action Arguments panel, located at the bottom of the macro window. Click the Form Name text box in the Action Arguments panel, click the list arrow, and select frmEmployees. That's the only argument we need to specify for this exercise, but notice that there are additional arguments for the OpenForm action, such as the View argument, which lets you select the view in which to open the form (Form view, Design view, or Print Preview). If you want, you can type a comment to explain the action in the Comment column. If you've ever had any programming experience, the Comment column is the same as a remark statement. Click the first blank Comment cell and type This macro opens the frmEmployees Form. Comments are completely optional, but they do make your macros easier to understand, especially if other users will edit them. Click the Save button on the toolbar, save the macro as mcrEmployees and click OK. You're finished working in the Macro window for now so... Close the Macro window. Time to test your new macro. The Macros icon in the Objects bar in the Database window should be selected. Double-click the mcrEmployees macro. Access runs the mcrEmployees macro and opens the frmEmployees form. Close the frmEmployees form.
That's all there is to a macronot nearly as hard as you thought it would be, was it? Even the Microsoft Access developers don't have all the macro actions memorized, so make sure you have Table 10-3 handy so that you know what action to use in your macros. QUICK REFERENCE TO CREATE A MACRO: IN THE DATABASE WINDOW, CLICK THE MACROS ICON IN THE OBJECTS BAR AND CLICK THE NEW BUTTON. CLICK THE FIRST BLANK ACTION CELL. CLICK THE LIST ARROW AND SELECT THE ACTION YOU WANT THE MACRO TO PERFORM. SPECIFY ANY REQUIRED ARGUMENTS FOR THE ACTION IN THE ACTION ARGUMENTS AREA. REPEAT STEPS 2-4 FOR EACH ADDITIONAL ACTION YOU WANT THE MACRO TO EXECUTE. CLICK THE SAVE BUTTON ON THE TOOLBAR, GIVE YOUR NEW MACRO A NAME, AND CLICK OK. CLOSE THE MACRO WINDOW.
TO RUN A MACRO: 
|
|