Organizing Film Projects
| As with a video project, before you begin, you need to establish a framework for your projecta clear path from beginning to end. Planning is beneficial for any project, and taking time to organize your post-production process during the pre-production of a film will help you determine your best approach. Planning a Film WorkflowTo ensure success, begin your planning early. When you edit film on a nonlinear system there are many considerations. You will need to decide which film format to use, which frame rate to use for the telecine transfer, which editing timebase you will use, what sound recorder and sound timebase to use, and how to sync the sound with the film. Aside from the technical preparation, you need to have an idea of who's who. Introduce yourself to everyone involved in the production process. Make sure to introduce yourself to the personnel at the facility who will develop your film, work prints, and release prints; the telecine operator; the negative cutter; and the audio post-production team. An early dialogue with anyone directly involved in handling your film will establish communication and help you streamline your process. Determining Film SpecificationsConsider which film format you use. Cinema Tools supports 35mm 4-perf, 35mm 3-perf, and 16mm-20 film formats. Determining Telecine SpecificationsYou must decide on video frame rates, how and what to transfer, and what aesthetic look to apply to your film. Telecine machines are expensive and have to be used in a facility that provides a trained operator. Any decisions regarding your transfer process should be made prior to your session, so you should run a couple of tests prior to committing to an entire process. When deciding how much to transfer during a telecine session, you will need to choose between transferring by complete camera roll or selectively by scene-and-take:
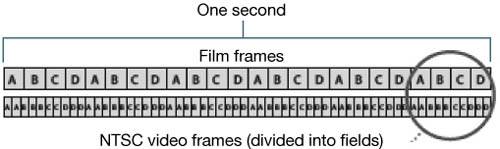
Film runs at a frame rate of 24 fps. Video runs at 29.97 fps NTSC; 25 fps PAL; or 24 fps (24p)depending on your video standard. You can choose among a number of options for the distribution of film's 24 fps among the frame rates of NTSC and PAL.
You need to bring a variety of materials to your telecine sessionstypically, the work print, sound files, paperwork, and an electronic file that contains a list of all the events you want the telecine operator to record. You will also need to consider how you want to adjust the color and contrast of each scene. During the telecine session, you will set your basic color and contrast, and after your picture edit is complete, you will fine-tune your color adjustments with a colorist. When you complete your telecine, you'll receive two critical pieces of material: your videotapes and an electronic file called a telecine log file, which contains the metadata recorded during your telecine session. You should also ask for a printout of the telecine log file. Be sure to check your information as soon as possible. Make sure you have the correct tapes, files, and number of events, and that your sound is in sync. Determining Sound SpecificationsWhen you begin a film project, the task of defining your sound specifications is similar to that of a video project. For film, sound is recorded on separate media, so the main factors you need to be concerned with are frame rate, sync, and final mix. During the film shoot, you will usually have your choice of timecode standards: 30 fps, 29.97 fps (non-drop-frame and drop-frame), 25 fps, or 24 fps. Ideally, you should choose your recording timecode standard based on your video transfer timecode standard. Matching the audio timebase to the video transfer timebase is standard practice because the sync process is easier. This standard is especially true if you are syncing during the telecine. Tip If you are editing in NTSC, use non-drop frame timebase for both video and audio. When you achieve sync through the telecine transfer, you need to maintain the original audio timecode records. Capturing your original audio timecode information will be imperative if you plan to export the audio information in an EDL for a professional audio mix. Check that your original audio timecode is recorded in the event log during your telecine session. You may also need to compensate for a particular format; NTSC and PAL transfers can alter how you transfer your audio in order to maintain correct sync.
If you do not sync during the telecine process, you will capture separate video and audio files and sync your clips directly in Final Cut Pro. (See the exercise in the "Capture Media By Complete Tape" section of Lesson 3.) Tip Using the Conform feature in Cinema Tools will let you achieve a change in audio frame rate. You can also modify the speed of an audio clip directly in Final Cut Pro. To achieve a speed change in Final Cut Pro, simply select the clips you wish to change, choose Modify > Speed, and apply the appropriate speed change. For example, for NTSC you will apply a speed change of 99.9%. This will slow down the audio by 0.1%. Organizing MediaFilm projects share the same rules of media organization as video. (See the section on organizing media in Lesson 3.) However, because the clip names in Final Cut Pro film projects are a result of your Cinema Tools database, you need to consider the appropriate film clip naming conventions:
|
EAN: N/A
Pages: 205