Installing Hardware
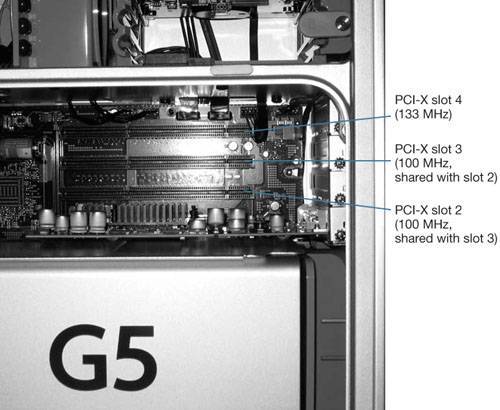
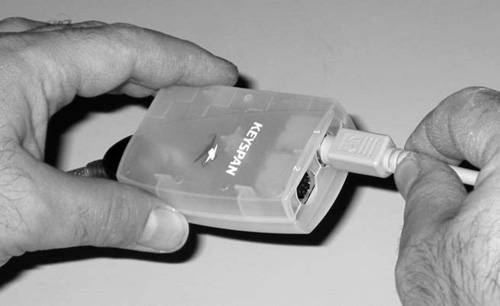
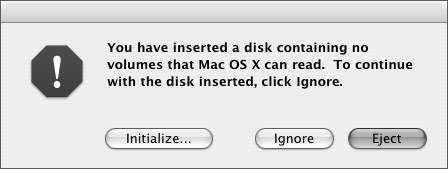
| At this point, you've selected your capture and storage devices, and are ready to hook them up to your Mac. Let's start with internal installations first, and then hook up the external gear. Internal InstallationsYou may have already deduced that you are going to need to install at least one (HBA), and usually two (HBA and capture card), PCI devices in your machine. The process is as simple as opening up the G5 (or G4) and installing the cards in one or two available PCI slots. But which slots? Ah, there's the dilemma. In a G4 or in some lower-end G5s, you really have no limitation as to the location of the cards, since these machines contain ordinary shared-bus PCI slots running at 33 MHz. Sadly, a lot of the high-speed performance of modern capture cards and HBAs are lost on these types of slots, and that is why these Macs are becoming outdated for uncompressed production. In the high-end dual-processor G5s (early production 1.8 and 2 GHz duals, and current 2 and 2.5 GHz duals), however, consider the super-fast PCI-X 133 MHz slot 4 versus the bus-sharing PCI-X 100 MHz slots 2 and 3. Dual-processor G5 PCI slot locations The golden rule for installation on these machines is to place whichever card, capture or HBA, has the highest speed into slot 4. This is because the isolated bus on slot 4 will slow down to the speed of that card, and that card only. Then place the slower card(s) into either slots 2 or 3. But don't put a card in either of these slots that is slower than the other one, as the shared bus for slots 2 and 3 will slow down to accommodate the slower of the two cards and remain at that speed. What if you're lucky enough to get two cards that run at 133 MHz? In that case, the common procedure is to place the capture card in slot 4 and the HBA in slot 2 or 3, again making sure that there are no cards going into remaining slots that would slow down the HBA's performance. In G5s with super-duper, two-slot-hogging graphics cards (ATI Radeon 9800 XT or nVidia GeForce 6800), slot 2 won't be available anyway. This causes some issues when configuring an uncompressed system using SATA drives, or for Xsan. See Lesson 15 for more information. Hooking Up Storage to the HBAClose your Mac; we're all done with the internal wrangling. With one to three cards placed in the appropriate slots, it's time to connect your storage to your HBA. FireWire ConnectionFireWire HBAs are a cinch: simply connect the FireWire-to-ATA/SATA device to your FireWire HBA with a FireWire cable (preferably FW800). Cable lengths of no more than 3 meters (10 feet) are recommended. SATA ConnectionAs mentioned previously, SATA HBAs currently offer up to eight external ports. If you had room to install two HBAs, you can now connect up to 16 drives that will be striped together. In any case, make sure to use high-quality, externally shielded SATA cables to hook up your drives to the HBA. Fibre ConnectionWith Fibre devices, you have a choice in cable substrates and connectors. If using the recommended Apple Fibre HBA, you'll need SFP connectors on that end of your cables. Most Fibre-to-ATA/SATA units have SFP connectors on the other side as well, but check to make sure, as adaptors from one type of connector to another are quite expensive. The 2.9 meter (9 feet) copper cables that come with the Apple Fibre HBA can usually connect the HBA to the storage. But in case you wish to place your somewhat noisy Fibre storage unit far from your editing system, optical cables will do the trick. You can run optical cables up to 10 kilometers. You'll need to purchase SFP transceivers for each end of each optical cable to convert the electrical signals to optical ones and back. See Lesson 15 for more details on optical Fibre cable connectivity. SCSI ConnectionThe ATTO UL4 series of cards use 68-pin LVD connectors, but there are differences between the single- and dual-channel models. The UL4S uses one high-density 68-pin (HD68) connector. However, in order to fit two connectors on the back of the card, the UL4D uses very high-density cable interconnect 68-pin (VHDCI) connectors. Most striped SCSI enclosures, and almost all SCSI-to-ATA/SATA storage devices, have HD68 connectors on them, so you'll need the appropriate cable (no more than 12.5 meters, or 37 feet long), to connect your unit to the HBA. SCSI is a bit of an antiquated protocol, and it needs to be terminated. Make sure to attach an HD68 terminator to any unused connector on the SCSI chain to finish the install. Tip Don't try to cut corners on the quality of any of the connections we just mentioned, especially with SCSI cables and terminators. Fibre and SCSI are expensive, but spending serious coin on the cables will yield a more reliable direct-attached storage system. Installing the Keyspan USB Twin Serial Adaptor (If Necessary)If you have installed a capture device that doesn't have built-in device control, take the time now to install the Keyspan adaptor into an available USB port on the back of your Mac. While you're back there, connect the DIN8 connector of your DIN8-to-DB9 control cable to port 1 on the Keyspan device. Note The numbers of the twin ports on the device are somewhat hard to discern, since they are printed in faint white on top of white transparent plastic. Make sure you have a flashlight back there. Powering Up the Storage and ComputerNow that you have an attached storage system, it's a good practice to always power up the storage before powering up the Mac, in that order. You'll probably encounter one or more warnings that look like this when the machine starts up. Don't panic. That's the OS's way of telling you that there are new devices available to be initialized as storage volumes, but they aren't initialized yet. Click the Ignore button on these windows for the time being, so that you can make sure you have the appropriate drivers and software to configure your storage system. For FireWire-to-ATA/SATA RAIDs, these volumes are usually preformatted and will simply pop up on the Desktop, ready for use. In that case, you can skip all the way down to the "Installing FCP" section of this lesson. However, if you also get the warning when the machine fires up, proceed directly to the "Creating Volumes from Single-Host RAIDs" section later in this lesson. |
EAN: N/A
Pages: 205