#55. Special Effects for Graphics If you're looking for more exotic graphics modifications than simple rotation, scale, and shear, InDesign offers a handful of features that let you create see-through effects, or in InDesign terminology, "transparency effects." For example, you can make a graphic translucent so that underlying elements are visible through it. Or you can make the edge of a graphic fade to translucent and gradually reveal underlying elements. Converting a Clipping Path to a Frame The Clipping Path command (Object menu) lets you mask portions of an imported graphic using built-in clipping paths or alpha channels or an InDesigngenerated clipping path based on the graphic's contrast. While it's not possible to stroke a clipping path, you can convert a clipping path to a frame, and then apply a stroke to the frame. To change a clipping path into a frame: 1. | Use the Clipping Path command to apply a clipping path.
| 2. | Ctrl-click (Mac OS) or Right-click (Windows) and choose Convert Clipping Path to Frame from the context menu. After you convert a clipping path to a frame, you can apply a stroke to the frame, assign a frame style and color, and so on.
|
|
Like the modifications explained in the previous two tips, you can apply transparency effects independently to a graphic and its frame. Make sure you use the correct tool to select the graphic or frame before you make your changes. Use the Selection tool to select the frame; use the Direct Selection or Position tool to select the graphic within. Generally, you'll apply these special effects to graphics frames; however, you can achieve different results by applying them to graphicsor both. Do whatever achieves the results you want. InDesign includes four transparency effects: Drop Shadow: The Drop Shadow command (Object menu) lets you add a soft- or hard-edged shadow behind graphics and graphics frames (Figure 55a). The controls in the Drop Shadow dialog box let you specify the placement and appearance of the shadow. To create a hard-edged drop shadow, enter a Blur or Spread value of 0. Figure 55a. A drop shadow adds a three-dimensional look to a page. In this example, the drop shadow is applied to a graphic that has been silhouetted using a clipping path.  Feather: The Feather command (Object menu) lets you fade the edge of a graphic or a graphics frame from opaque to transparent (Figure 55b). You can specify the distance over which feathering is applied. Underlying objects are visible through feathered areas. Figure 55b. The Feather dialog box lets you soften the edge of a graphic so that it fades to transparent. In this example, a feathered edge is applied to the graphic on the right. 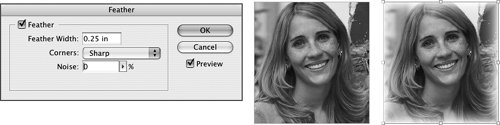 Blending: Like the blending mode feature in Photoshop, blending modes in InDesign provide options for blending the colors where objects overlap. Use the Blending Mode menu in the Transparency palette (Window >Transparency) to apply a blending mode to a graphic or graphics frame (Figure 55c). Figure 55c. The blending mode menu in the Transparency palette lets you apply any of several blending modes to a graphic. In this example, the Multiply blending mode is applied to the same graphic on the right. 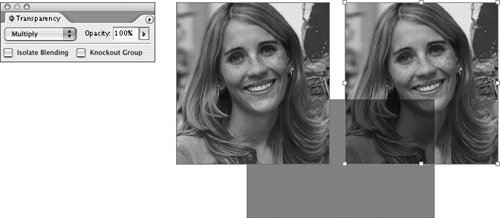
Applying Transparency to Other Objects You can apply InDesign's transparency effects to any object. For example, you can apply a drop shadow to text within a transparent text frame (a frame with no fill color), and you can apply a blending mode and opacity and feather the edges of shapes and lines you create with the drawing tools. When you apply a drop shadow to a transparent text frame, a drop shadow is created for all the text within the frame. You cannot apply a drop shadow to only a range of text. |
Opacity: You can make a graphic or graphics frame appear to be translucent by applying opacity to it. Use the Opacity controls in the Transparency palette to modify the opacity of a graphic or graphics frame (Figure 55d). As you lower the opacity value, the selection becomes increasingly lighter and more translucent. An opacity value of 100% makes an object opaque. An opacity value of 0% makes an object invisible. Figure 55d. The Opacity field in the Transparency palette lets you make an object translucent. In this example, the graphic on the right has an opacity value of 50%, which reveals the shape beneath it. 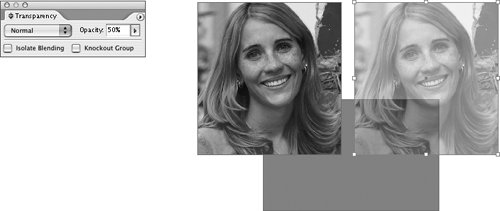
The Implications of Transparency When you print or export an InDesign layout that includes transparency effects, such as drop shadows and feathered edges, InDesign flattens areas where transparency occurs. Flattening essentially rasterizes areas affected by transparent objects and sends this information to the printer for output. Although you're not likely to encounter any problems applying transparency effects or printing or exporting documents that contain transparency effects, it's a good idea to let your print service provider know if your documents contain transparency. Your service provider can make whatever adjustments are required to output the document correctly on its printers. |
If you want to mask portions of a graphic so that they're not visible, you can use a clipping path. The Clipping Path dialog box (Object > Clipping Path) lets you choose a clipping path or alpha channel that's built into a graphic, or you can choose Detect Edges in the Clipping Path dialog box's Type menu to have InDesign generate a clipping path based on the light and dark areas in the graphic (Figure 55e). The Detect Edges option works best for images that are silhouetted against a background that's uniformly lighter or darker. Figure 55e. In this example, the Detect Edges option was used to create a clipping path for the graphic that removes the white background. The original graphic without a clipping path is on the left. 
|