Flylib.com

Books Software


Section 50. Creating Complex Shapes


#50. Creating Complex Shapes

While the Pen tool is the only tool that lets you draw complex shapes, InDesign offers a handy palette that lets you create complex shapes from two or more basic shapes. When multiple objects are selected, the Pathfinder palette (Window > Object & Layout > Pathfinder) provides five options for creating a single shape that's generated from the selected objects. The results you get from the Pathfinder options depend on the stacking order of the selected objects. If you don't get the results you want, use the Arrange commands (Object > Arrange) to adjust the stacking order.

Here's a brief explanation of the Pathfinder options:

Add: Combines the selected objects to form a single, all encompassing shape ( Figure 50a ).

Subtract: All objects in front of the backmost object are removed ( Figure 50b ).

Intersect: Creates a shape from overlapping areas and excludes areas that don't overlap ( Figure 50c ).

Exclude Overlap: The opposite of Intersect. Creates a shape from areas that do not overlap ( Figure 50d ).

Minus Back: Somewhat like Subtract. All objects in back of the frontmost object are removed ( Figure 50e ).


Figure 50a. The Add button combines multiple objects into a single object.


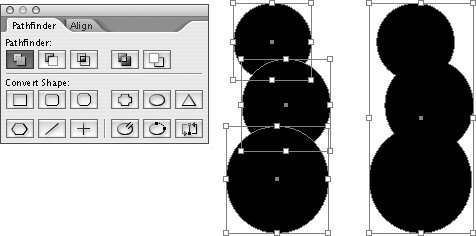
Figure 50b. In this example, the Subtract option in the Pathfinder palette generated the shape on the right by " punching out" several circles from a square black background frame (center).


Figure 50c. The Intersect button creates an object from overlapping areas.


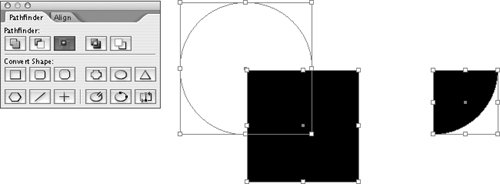
Figure 50d. The Exclude Overlap button creates an object from areas that don't overlap.


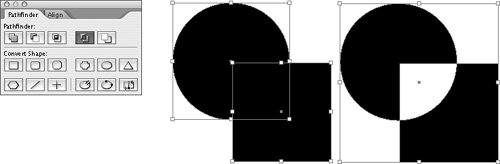
Figure 50e. The Minus Back button removes the background objects from the frontmost object.


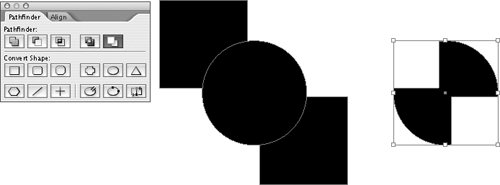
The five Pathfinder options are also available as commands in the Object menu (Object > Pathfinder).

If You Can't Draw It Easily with InDesign ...

InDesign's drawing features are capable of handling many illustration tasks , but if your drawing requirements exceed InDesign's capabilities, your best bet is to use a dedicated illustration program, like Illustrator. You can even begin work on an illustration in Illustrator, and then copy and paste it into InDesign and use InDesign's drawing features to further modify the illustration.


#51. Converting Shapes

If you need to make minor modifications to an object's shape, select it with the Direct Selection tool, and then move anchor points, direction points, and segments. For bigger modifications, use the Add Anchor Point, Delete Anchor Point, and Convert Direction Point tools, which are grouped with the Pen tool in the toolbox. To convert an object into one of 12 predefined shapes, use the Pathfinder palette (Window > Object & Layout > Pathfinder).

To change an object's shape with the Pathfinder palette, select the object, and then click one of the nine convert shape buttons in the palette ( Figure 51 ):

Figure 51. Click one of the convert shape buttons in the Pathfinder palette to change the shape of the selected object. In this example, the circle was converted to a polygon. When you convert a shape to a polygon, the current settings of the Polygon tool are used.


Rectangle

Rounded Corner Rectangle

Beveled Corner Rectangle

Inverse Rounded Corner Rectangle

Ellipse

Triangle

Polygon

Line

Vertical/Horizontal Line


Using the Scissors Tool

You can use the Scissors tool to convert a closed shape to an open shape and to cut an open shape into two pieces. To use the Scissors tool, select it in the toolbox, and then move the crosshair pointer over the edge of an object. When a circle is displayed in the middle of the crosshairsindicating that the pointer is over the edge of the objectclick the mouse button. An anchor point is displayed where you click. If you select this anchor point with the Direct Selection tool and move it, you'll find another anchor point in the same place. This anchor point is the other endpoint if you cut a closed path. It's an endpoint on a separate path if you cut an open path.


You'll find three additional buttons for changing the shape of objects at the bottom right of the Pathfinder palette:

  • Open Path button: The Open Path button creates an open shape from a closed shape, much like using the Scissors tool on a closed shape. InDesign chooses an anchor point at which the shape is opened. You may need to select the object with the Direct Selection tool to determine where the object has been split.

  • Close Path button: The Close Path button creates a closed shape from an open shape by connecting the two endpoints.

  • Reverse Path button: If you've created a shape with one or more "holes" in itfor example, a donut shape created by using the Subtract button on a pair of concentric circlesselecting the inner path and then clicking the Reverse Path button in the Pathfinder palette will eliminate the hole while keeping the path. Clicking the Reverse Path button again will show the hole.