Movement Events
We now have three ducks that are positioned in the user interface, and it’s time to enable them to interact in the frame. As MMF works in a step-by-step manner, we’ll continue to do our work in the same way:
-
Open the Event Editor.
-
Double-click New Condition to open the New Condition window.
-
Right-click the first duck and choose Position, Test Position from the pop-up menu. This will display a new window (see Figure 19.42).

Figure 19.42: The Test Position window. -
The arrow pointing left and inside the inner square (see Figure 19.43) is the one that needs to be clicked. Click OK to close the window.

Figure 19.43: You can see the arrow that needs to be selected.The new event is created (see Figure 19.44).

Figure 19.44: The new event has been created. -
Right-click the column beneath the first duck in this row and select Movement, Wrap Around Play Area. This will force the duck to continue wrapping around as it reaches the right side of the screen.
-
Repeat the steps for each duck, and your events should now resemble Figure 19.45.

Figure 19.45: You can repeat the steps for every duck. -
Close the Event Editor for now and open the Frame Editor.
-
Add a new active object to the frame by choosing Insert, Object, Active. The Animation Editor opens immediately.
-
Double-click Frame 1 to open the image, which is a diamond by default.
-
Choose the Eraser from the tools along the left side of the screen (see Figure 19.46) and erase the diamond.

Figure 19.46: The eraser can be selected. -
Choose Continuous Brush Tool (see Figure 19.47).

Figure 19.47: The Continuous Brush tool.Along the bottom of the screen, there is a palette of colors available for our tool (see Figure 19.48).

Figure 19.48: There are many colors available. -
Choose a red color so that when we draw, it will be easily visible on the screen.
The Continuous Brush tool displays a toolbar along the top of the screen as well (see Figure 19.49). This toolbar, which is positioned beneath the standard toolbar when the Continuous Brush is selected, contains a variety of options. Among them is the size of the brush (see Figure 19.50).

Figure 19.49: A toolbar is available for the tool.
Figure 19.50: One of the options is the brush size. -
Click the largest of the three visible options.
-
Position your mouse in approximately the middle of the Animation Editor, which is currently completely empty, and single-click the mouse to create a red dot in the middle of it.
-
Close the new image and save the changes.
-
Close the Animation Editor and save the changes.
The dot is now visible in the Frame Editor and is named Active4 by default.
-
Open the Event Editor.
-
Double-click New Condition.
-
Right-click the icon that looks like a chessboard and choose Start of Application.
-
Right-click the Mouse and Keyboard column next to the newly created event and choose Hide Windows Mouse Pointer.
-
Create a new condition.
-
Right-click the icon called Special, which looks like two networked PCs, and choose Always Never, Always.
-
Right-click the Active4 column positioned in the newly created event row and choose Position, Set X Coordinate. This displays the Set X Coordinate window (see Figure 19.51).
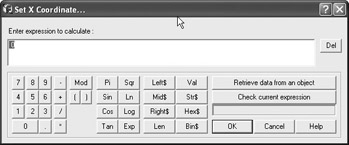
Figure 19.51: The Set X Coordinate window is displayed with the Expression Editor. -
Type XMouse into the window (see Figure 19.52) and click OK.
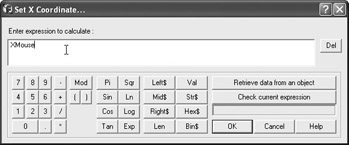
Figure 19.52: XMouse has been entered as the expression. -
Right-click the same square beneath Active4 and Position, Set Y Coordinate.
-
In the Set Y Coordinate window, type YMouse and click OK. The dot will now be positioned wherever you move the mouse and will act as a sort of scope for our next step.
-
Create a new condition. Choose Mouse and Keyboard from the New Condition window and choose The Mouse, User Clicks On an Object.
-
This will display the User Clicks On an Object window (see Figure 19.53). Click OK, leaving default objects. Click the first duck and click OK.

Figure 19.53: The User Clicks On an Object window. -
In the new event column we just created, right-click the square located beneath the first duck and choose Destroy. Although the mouse is not visible in our frame, MMF still checks for the events associated with the mouse. Now, when we click on the first duck, it will be destroyed.
-
Create a new condition. Right-click on the first duck in the New Condition window and choose Animation, Has an Animation Finished. Choose Disappearing from the Has an Animation Finished window.
-
Right-click the square located under the Create New Objects column and choose Create Object. Choose the first duck from the available options. Position your cursor in the lower-right corner in the approximate location where the upper-left coordinate of the duck is currently located (see Figure 19.54) and click OK. We’ll now have a duck re-created every time you destroy one.
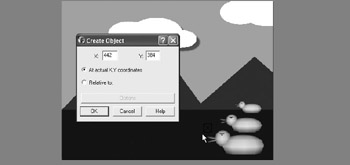
Figure 19.54: Position the cursor near the duck. -
Repeat steps 30–34 for the remaining two ducks, adjusting the positions when you create the new objects.
EAN: 2147483647
Pages: 168