REMOVAL AND INSTALLATION
IDE optical drives are connected the same way as EIDE hard drives, so see Chapter 6 for more information. Set the jumpers for primary/secondary, master/slave, or cable select, just as you do with EIDE hard drives. The BIOS should be set for auto-detect for each optical drive. Also, pin 1 is almost always next to the power connector, which is the same type of power connector used for hard drives. Screws are used on each side of the cage to secure the drive. The only differences are that optical drives have to be installed in a 5.25-inch bay with an opening in the front of the case, and that an audio cable usually has to be connected. Figure 7.1 shows a typical example of an installed optical drive.
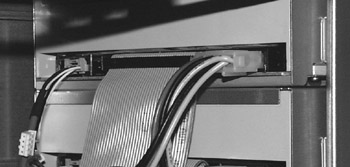
Figure 7.1: A typical CD-ROM drive installation.
To remove a drive, shut off the power, remove all cables from the computer, and open the case. If there could be any question about reconnecting the drive, make a diagram of which connectors are connected where. Make a note of the drive’s jumper position. This is especially important if you will be removing other drives as well. Next, remove the data, power, and audio cables. Then, remove the screws fastening the drive to the cage and pull out the unit. To replace a drive, follow the instructions in Chapter 6 for installing a hard drive, except for the differences described here.
Mixing Drives with Different UDMA Ratings
As is true with hard drives, you normally wouldn’t want to have drives of different UDMA ratings—for example, an Ultra ATA UDMA 100 drive on the same IDE channel as an Ultra ATA UDMA 66—unless the motherboard or IDE controller came with a program such as Intel’s Application Accelerator. See Chapter 6 for more information.
Audio Cables
For most optical drives to play analog audio from audio CDs or video discs with audio, there is an audio connector on these drives. These get connected to the audio header connectors on the motherboard or sound card. Some motherboards have two or more of these, as shown in Figure 7.2.
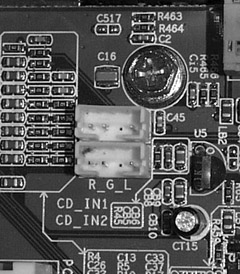
Figure 7.2: Audio header connectors on a motherboard.
If you have one drive and two connectors, use the header connector for CD-ROM in. If you have two drives and two connectors, connect the drive that will be most likely used for audio playback to the CD-ROM in and the other to the AUX in. If you have two drives and only one connector, the user will be limited to one of the drives for analog audio playback (digital audio playback can be heard without an audio cable being connected at all; it is transmitted via the data cable). If one of the drives is a DVD drive, you’ll want to connect the audio connector to it. In this case, instruct the user to play audio CDs in the DVD drive. Figure 7.3 shows an audio connector on an optical drive.
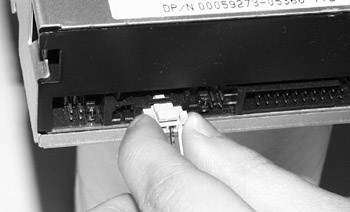
Figure 7.3: Optical drive, audio connector.
Proprietary Faceplates
Often, a computer manufacturer will design their cases for aesthetics and will include an odd-shaped front opening for optical drives. It is often hard to acquire a replacement for these drives by the time they fail. If you have a large supply of used drives or can match the original manufacturer’s drive closely enough, you might be able to get a good match by removing the faceplate carefully from the original and fitting it on the replacement. Usually, you will need to modify the case slightly or place the drive in a different drive bay if available. There have been times that we have opted to get a brand new high-quality case with a power supply, and transfer the motherboard and all internal parts to the new case as well as install a new standard optical drive. This might actually be a better and more aesthetic long-term solution as long as all the components will fit properly in the new case.
Driver, Firmware, and Software
Windows, in almost all cases, will automatically install all necessary drivers for optical drives. Once the drive is installed, the programs supplied by the manufacturer that allow for use of the drive’s features can be installed. These are usually “lite” versions of programs. The user can purchase full versions of these programs for added functionality. In addition, newer versions of Windows Media Player and other media players such as RealPlayer™ (real.com) have the multimedia functions built in. Windows Media Player is standard with Windows, and updates are frequently available either through Windows Update (see Chapter 2, “System Configuration and Computer Hygiene”), microsoft.com/downloads, or microsoft.com/windows/windowsmedia. In addition, data-burning capabilities are built into My Computer in Windows XP, as shown in Figure 7.4.
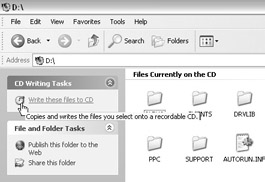
Figure 7.4: Windows XP CD burner controls.
In most cases, a drive’s firmware should be left alone. If you are researching a problem and find that a firmware update is necessary, go to the manufacturer’s Web site and follow the directions exactly.
| Note | Remember, you run the same risks when updating component firmware as when you update a motherboard BIOS. If you make a mistake, you might render the drive useless! |
Installing and Configuring External Optical Drives
USB and FireWire drives can be very simple to install. Follow the manufacturer’s instructions carefully and read them first before you connect anything. In most cases, USB drives will require that the software be installed before the drive is ever connected to the computer. Some USB drives might be able to be plugged into a PC with Windows Me, 2000, or XP directly without any driver installation at all because the drivers are built right into the firmware of the drive.
With FireWire, the drive is usually plugged into the computer after it is running and the OS will recognize the drive and install Windows native drivers. If the drivers were not installed originally with Windows, you will probably be asked to insert your Windows installation CD. After your drive is properly detected, you can install any applications needed to use the drive, such as software for CD burning, movie editing, music production, and so forth.
EAN: 2147483647
Pages: 390