Implementing, Managing, and Troubleshooting Input and Output (IO) Devices
Implementing, Managing, and Troubleshooting Input and Output (I/O) DevicesThe majority of the work involving I/O device implementation, management, and troubleshooting is found in the Device Manager utility. Every device has its own Properties dialog box, specific to its device type and sometimes specific to the manufacturer and model, depending on the installed driver. Standard tabs found in any device Properties dialog box are
When Microsoft developed Windows XP, the company substantially enhanced the NT kernel, on which Windows XP is based. Because it functions at the low level of the operating system, the kernel improvements significantly boost performance. The I/O subsystem is one of these enhancements. The I/O subsystem comprises the kernel components that interface with hardware devices. The Windows XP improvements provide a better interface to the devices and retain compatibility with the drivers created for Windows 2000. For an administrator, this means that you can upgrade a Windows 2000 computer without needing to replace existing drivers, with few exceptions. If you have a problem with a driver that was developed for use specifically with Windows XP, you can install the Windows 2000 version of the driver. However, although the Windows 2000 drivers function, they do not take advantage of the finer enhancements of the kernel improvements. You can use Device Manager to determine whether an I/O conflict exists by changing the view. To do this, right-click My Computer and select Manage. In Computer Management, right-click Device Manager in the left pane, select View, and then select Resources by Type. In the right pane, click the plus (+) sign next to Input/Output (IO). Each device is listed in the order of the I/O resources it uses, as shown in Figure 8.1. Figure 8.1. Device Manager provides an organized view of devices by the I/O resources they consume.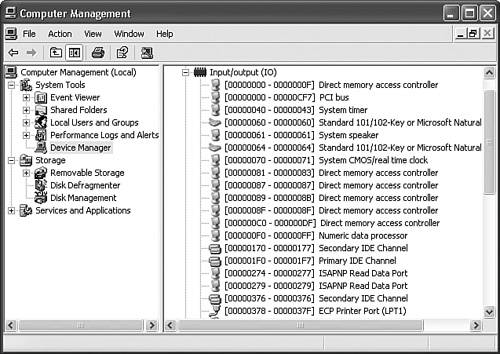 Device Manager offers other views that assist in monitoring. When you select Devices by Type, you see the devices organized by the kind of hardware each device is. If you have multiple monitors, for example, you see each of the monitors displayed below the Monitor node. This is the default view. The Devices by Connection view groups each device by the way it is connected in the computer. For example, all the disk drives and CD or DVD drives connected to the IDE controller are displayed under the IDE connection node. The Resources by Connection view shows the status of the I/O ports, as well as DMA channels, IRQs, and memory addresses, listed by the connection type. To expand the views to show nonPlug and Play devices, select Show Hidden Devices from the View menu. If you want to view whether a single device has an I/O conflict, you can double-click it in Device Manager to view its properties, as shown in Figure 8.2. Click the Resources tab to see the resources that are used by that particular device. At the bottom of this window, the Conflicting Device list box shows other devices that are consuming the same I/O resources. Figure 8.2. Each device's Properties dialog box Resources tab displays I/O conflicts for the individual device. Monitoring, Configuring, and Troubleshooting I/O DevicesObjective: Implement, manage, and troubleshoot input and output (I/O) devices.
As you know, the optimal place to monitor and manage devices in a Windows XP Professional computer is in Device Manager. This tool provides a graphical representation of the hardware devices installed in the computer. To use Device Manager, you must have the permission to load and unload drivers, to copy files to the %windir%\system32\drivers directory, and to write changes to the registry. All these permissions are granted to members of the Administrators group. In Device Manager, you can identify resource conflicts, update and roll back drivers, uninstall devices, scan for new hardware, view and change device properties, and view the files and dates of those files that make up the device drivers. Exam Alert Watch for questions requiring users to start applications with administrative rights The correct answer is to use Run As. Microsoft recommends that you do not run your computer as a member of the Administrators group. To update a driver, you can use the Run As method to start Device Manager as an Administrator. From the command line, you can type runas /user:Administrator "mmc %windir%\system32\devmgmt.msc" and then provide the password when prompted. Device drivers are often the main cause of a problem. Using the latest device drivers often offers the best hardware performance; however, doing so is not always advantageous because problems may occur in certain hardware combinations. You can download the latest device drivers from the manufacturer. Before you use Device Manager to update the driver, you should read the instructions to ensure that there is not a proprietary installation process, and that the files are uncompressed and ready to be installed. To update the driver in Device Manager, follow these steps:
If you update a driver and the computer begins to function abnormally, you can roll back the driver to the earlier version. Not all device drivers can be rolled back. For example, you cannot roll back a printer driver, nor can you roll back a driver that is the one initially installed in the operating system. To roll back a driver in Device Manager, follow these steps:
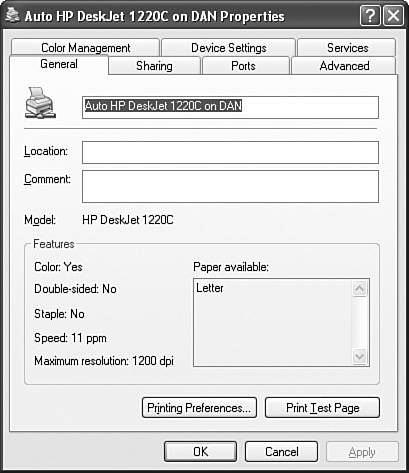
You can disable a device to free up the resources that it's consuming. You can also troubleshoot individual devices by using the Troubleshooter Wizard. Note The System Information utility, which can be opened by typing msinfo32 from the command line or in the Open text box in the Run dialog box, provides a quick view of any resource conflicts. After you are in the utility, click the plus sign (+) next to Hardware Resources and then click Conflicts/Sharing. Note that some devices do share resources, such as IRQs, and appear in this list even though they do not actually conflict. PrintersPrint devices are among the most diverse I/O devices you can use. Print devices come in every shape and size, with specialization for their output. They also tend to have several versions of drivers, and are often attached to various computers on a network. In a peer-to-peer network configuration, Windows XP Professional automatically crawls the network and looks for printers (the software that performs the printing function and transmits it to the appropriate print devices), as well as other resources. Users see these printers listed as Auto printername on computername. Drivers may be installed transparently, or you can prompt the operating system to install a driver for the printer simply by connecting to the printer itself. When a computer running Windows XP Professional is a member of a domain, it does not use the NetCrawler feature. Instead, a user can browse the domain for printers and connect to them. To connect to a printer directly, open the Printers and Faxes utility in Control Panel and click the Add a Printer task. The Add Printer Wizard starts. Click Next in the first screen. You can select the A Network Printer or a Printer Attached to Another Computer option and click Next. Select Connect to this Printer (or to browse for a printer, select this option and click Next). Type the name of the printer in the Universal Naming Convention (UNC) form of \\computername\printername. (As the wizard says, you can leave this blank to browse the network for a printer.) Click Next. If you do not have the printer driver installed on your computer, you will see the dialog box shown in Figure 8.3, which explains that a new printer driver will be installed on your computer. Click Yes. The operating system installs the printer driver, and then you are asked whether to make this printer the default printer for the computer. Select your answer, click Next, and then click Finish. Figure 8.3. When you connect to a printer on the network using Add a Printer, you are prompted to install the driver. When the Windows XP Professional computer is a member of a domain, you can use the Search utility to find printers that are published to Active Directory. To do so, click Start, Search, Printers, Computers or People. Select the A Printer on the Network option, and then enter search criteria on the three different tabs of the Find Printers dialog box. The Printers tab is often the only one needed because you can use it to search by name or location or printer model. The Features tab enables you to find a printer that has duplex or high-resolution properties. The Advanced tab provides search options for printers that support a particular printer language or advanced printing features. The Find Printers dialog box returns all the printers that meet the criteria specified, and these can be sorted or filtered further in the results pane. When you find the printer to which you want to print, double-click to connect to it, and the printer driver will be installed. Print devices vary in the types of features that they provide. Their drivers are also specific to those features. Sometimes you can use a printer driver that is fairly generic to print to several different print devices, but you cannot access that print device's individual features without using its own driver. For example, you can use the HP LaserJet II driver to print to a variety of print devices, but you cannot use it to print duplex sheets, color photos, or high-resolution documents, or use other print device features even if the print device has them. The printer driver determines the features that are available. This also applies to device driver versionsthe latest versions typically offer the most comprehensive printing features. To configure printer features, you must begin with the printer's icon in the Printers and Faxes dialog box. First, right-click the printer icon and select Properties from the shortcut menu. A dialog box, similar to the one shown in Figure 8.4, opens. On the General tab, click the Printing Preferences button. A Printing Preferences dialog box opens, which enables you to set the orientation of the page, the print quality, and collation, among other printer-specific features. The General tab also provides a Print Test Page button, which opens a dialog box that is extraordinarily helpful when troubleshooting printer problems. You can configure how to share a printer on a network on the Sharing tab in the printer's Properties dialog box. If you select the Ports tab, you can select the port to which the printer is attached and, if there are multiple identical printers attached to the computer on different ports, you can establish printer pooling. You can configure whether the print job is spooled or printed directly to the printer, as well as other complex features on the Advanced tab. The Advanced tab also provides a New Driver button, which you can use to install another driver for the same printer. The Color Management tab leads to selecting a color profile, if available, for the printer. You can select forms and tray assignments in the Device Settings tab. And you can clean the printer cartridge in the Services tab. Figure 8.4. You can configure printer features in the Print device's Properties dialog box. Exam Alert Know how to connect to printers via a Uniform Resource Locator (URL) The basic URL to access a printer is http://servername/Printers/printername/. For example, to access a printer named HP, which is shared by a server named SRV, you simply need to type http://SRV/Printers/HP. If you try to connect to a printer using the printer's URL in Internet Explorer, you may receive a message stating This page cannot be found. This happens if you incorrectly type the URL. You can see all the printers shared by a server simply by eliminating the name of a specific printer from the above URLsuch as http://SRV/Printers. ScannersScanners and cameras obtain images and input them into a computer. Therefore, scanners and cameras perform the opposite function of a printer, which outputs data and images. TWAIN device drivers are an older technology driver model for scanning images into a computer. Windows XP replaces TWAIN with the Windows Image Acquisition (WIA) interface for both scanners and cameras. Because scanners use the same underlying technology as cameras, the two are grouped in Control Panel under the Scanners and Cameras utility. These devicesdigital cameras, digital video cameras, scanners, and any other image-capturing devicesare largely Plug and Play. They install upon detection by Windows XP. After it is installed, you can download images from the device into any folder on the computer using the Scanners and Cameras Wizard. The default folder for images is the My Pictures folder, which is contained within My Documents. Most cameras and scanners are sold with accompanying software that provides additional image management, for example, a scanner often comes with fax software, copy software, or optical character recognition (OCR) software. The image that is input from a scanner or camera is simply an imageit does not function as text until it has been interpreted by an OCR program. If the scanner is used to pass the image through the computer to the printer, it is always rendered as an image of the original document. Exam Alert Device driver installation requires administrative rights When you connect a scanner or digital camera, Windows XP automatically recognizes the device a majority of the time. However, if you do not have the appropriate rights, Windows XP does not install the driver. Cameras and scanners do not always appear as icons in Windows XP if they are not connected, or if their power has been turned off. Power-saving features on many cameras force them to shut down after a certain period of time; therefore, if an icon does not appear as expected, you should check the device to see whether it is turned on. Step by Step 8.1 discusses how to install a digital camera or scanner that connects via a Universal Serial Bus (USB) port.
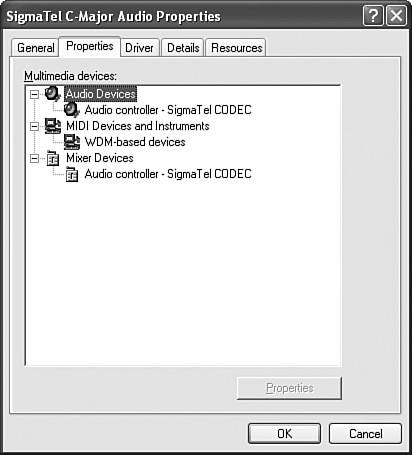
Multimedia DevicesUnlike still images, digital audio and video data is read in a timed and ordered sequence, which is why it is referred to as "streaming." Windows XP offers improved support for video and audio technologies. Digital audio devices interface with Windows XP through the Windows Driver Model (WDM) audio architecture, which in turn enables multiple streams of audio to be managed concurrently. Through the image mastering application program interface (API), the operating system supports CD mastering in either read-only or read/write format. Windows XP also supports Digital Rights Management (DRM), which effectively ensures that proprietary audio files are protected through encryption and rules for usage. Multimedia devices are configured in Device Manager. Open Device Manager to the default view of Devices by Type. Click the plus sign next to Sound, Video and Game Controllers to expand the device listing. Right-click the device type and select Properties from the shortcut menu. Click the Driver tab (if available) to update the driver, roll back the driver, or uninstall the device. Click the Properties tab to view a listing of the device drivers within this device type, as depicted in Figure 8.5. Click a device and then click the Properties button to access specific configuration options. Figure 8.5. In Device Manager, a multimedia device may consist of multiple sub-devices. MicePointing devices, such as mice, touch-screens, and pen tablets, are all configured in the Mouse utility in Control Panel. This utility offers a variety of configuration options found on five different tabs:
When you access the pointing device's properties in Device Manager, you may configure some advanced options of the pointing device, update the driver, and roll back the driver or uninstall it. If your mouse is connected to a COM port and you are experiencing problems, you can configure the COM port as part of your troubleshooting efforts. To do so, in Device Manager, navigate to the Ports (COM & LPT) node and expand it. Right-click the port that you are going to configure and select Properties. If your mouse is connected to the USB port and you are experiencing problems, you can configure the USB port in Device Manager under Universal Serial Bus Controllers. Right-click the correct USB port and select Properties. Under the Driver tab, you can update or roll back the driver. Under the Advanced tab, you can view the amount of bandwidth being consumed by the device and check not to receive notifications of USB errors for the device. The mouse pointer often demonstrates a problem before any other device on the computer. It may jump or appear distorted, or it may stop responding. If the problem is a one-time occurrence, it was likely caused by an application and not the mouse driver. However, if the problem persists, you should do the following:
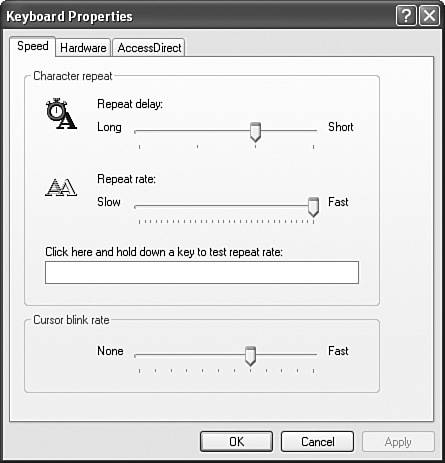
KeyboardsThe most common method of inputting data into a computer is through a keyboard. Keyboards replaced punchcards and are a tremendous improvement over them. They will likely be replaced themselves, as soon as viable speech and handwriting recognition technologies are available. As ubiquitous as they are, keyboards do not require adjustments or special software settings. The keyboards simply seem to function as soon as they are plugged in. After you install a new keyboard, it uses the standard keyboard device driver. If the manufacturer incorporates special functionality for the keyboard, you can install the manufacturer's keyboard device driver in Device Manager or through the Keyboard utility in Control Panel. If you use the Keyboard utility, click the Hardware tab, click to select the keyboard from the list shown, and then click the Properties button. The Properties dialog box opens. (You can also access this dialog box by right-clicking the keyboard in Device Manager and selecting Properties.) Click the Driver tab, and then click the Uninstall button. (If you are updating the driver or rolling back the driver, select the appropriate button.) To prompt for the installation of the new keyboard driver, open Device Manager and click the Action menu, and then select Scan for Hardware Changes. Exam Alert Familiarize yourself with the language options available in the keyboards applet Keyboards are simple to install if they are the standard type for your region. However, you may find a question or two asking you to describe how to switch to an international keyboard layout. More on this process is found in Chapter 10. Any options available from the manufacturer's keyboard device driver can be configured in the Keyboards utility in Control Panel. In this utility, you can adjust the repeat rate of a character that occurs when you hold a key down, as well as the amount of time that passes before the key starts repeating. You can also change how fast the cursor blinks. Figure 8.6 displays the keyboard utility from Control Panel. Figure 8.6. The Keyboard utility in Control Panel offers keyboard configuration options. You should update your keyboard driver if you are experiencing any of the following issues:
Smart Card ReadersOne of the security measures that many businesses are putting into practice is the use of smart cards. Smart cards look like credit cards and contain embedded integrated circuits that store a user's public and private keys for use in a public key infrastructure (PKI) system. PKI enables smart cards to authenticate the requestor even when the network (such as the Internet) is unsecure. It works as a cryptographic system that assigns a public key and a private key to each user or resource. The entire network has access to the public key for a particular user, but only that user has his private key, which is a combination of the encoded smart card and a personal identification number (PIN) that the user types in. The pair of keys are actually digital certificates provided by a certification authority (CA) server. When a user swipes the smart card through the smart card reader, the private key is used in conjunction with the public key to "unlock" the resource. Windows XP Professional supports Plug and Play smart card readers and the industry-standard Personal Computer/Smart Card (PC/SC) standard specification. Most smart card readers connect via USB ports. When they are connected, Windows XP detects the reader and looks for a driver to install. If the manufacturer provides software and instructions for installation, those instructions should be followed rather than the standard directions for detection and installation of Plug and Play device drivers.
Note Printing a resource report through Device Manager Device Manager enables you to print a report showing what resources are consumed by your system's devices. To print this report, click the Action menu and select Print. In the lower part of the Print dialog box under Report Type, select System Summary. Click Print. Monitoring, Configuring, and Troubleshooting Multimedia HardwareObjective: Implement, manage, and troubleshoot input and output (I/O) devices.
Multimedia hardware devices typically connect via USB ports, but can also connect via FireWire (IEEE 1394), serial (RS-232), and SCSI ports. These devices, although conforming to standards that Windows XP uses, usually require software from the manufacturer to utilize the specialized capabilities of the hardware. You can monitor any device installed on the computer in Device Manager, but this allows only a limited amount of access to the devicetypically only driver- and resource-related functions. The user interface to multimedia devices is available in Control Panel and My Computer. When you install a multimedia device, such as a digital camera, an icon for it appears in My Computer as well as in the Scanners and Cameras utility in Control Panel. When you click the camera icon in either of these locations, an interface for displaying and saving pictures appears. Applications that are WIA-compliant can acquire images directly into the application from the device. Desktop publishing, image editing, and document creation applications are typically WIA-compliant. Windows XP Professional uses the WDM streaming class driver to capture video. WDM integrates with streaming architecture, uses a single-class driver for hardware (not only video cameras but also DVD and MPEG devices), and supports DirectShow. To troubleshoot video capture problems where frames are being lost, you should close all other running programs and unneeded processes on the computer. You should also disable any video capture settings that provide a preview of the video being captured, and apply the capture settings that save the video to the hard disk before encoding it and saving it as a file. If your device connects to a serial port, you can adjust the baud rate on the port. Speed up the baud rate to facilitate image transfer, or slow it down to adjust to limitations of the computer's hardware. Note Some digital cameras incorporate infrared technology and can transfer images to your computer without being physically connected. This process uses the Infrared Transfer Picture (IrTran-P) protocol. IrTran-P is detected by Windows XP when you press the Send button on the digital camera. Windows XP establishes a session and receives the image and stores it in the My Pictures folder. IrTran-P conflicts with ActiveSync 3.0, which is the synchronization software for Windows CE. You can use only one of these at a time. Installing, Configuring, and Managing ModemsObjective: Implement, manage, and troubleshoot input and output (I/O) devices.
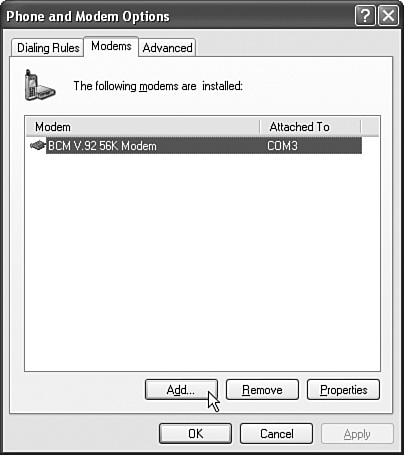
The word modem stands for modulator/demodulator, which is essentially the function that a modem provides. Modems connect a computer, which transmits digital data signals, to a plain old telephone service (POTS) line, which transmits analog signals. To get the digital data across an analog POTS line, the modem modulates the digital signal into an analog signal, such that a certain wavelength, frequency, and amplitude designates a bit that is either a 1 or a 0. When the modem at the other end receives this signal, it demodulates it into the digital bit of data and sends the bit to the receiving computer. Integrated Services Digital Network (ISDN) modems, Digital Subscriber Line (DSL) modems, and cable modems, however, are misnamed. These types of equipment are actually codecs (coder/decoder). A codec takes a digital signal and encodes it for a different digital transmission scheme, and then decodes the incoming digital data into the format that the receiving computer recognizes. Modems of any kind can be either internal adapters or external equipment connected to a port on the computer. ISDN modems are either internal adapters or external boxes. External ISDN modems connect to the computer's serial port. DSL modems and cable modems connect to a network adapterusually Ethernet 10/100Mbps using an RJ-45 connectorrather than to a USB, SCSI, parallel, or serial port. Regular modems connect to a serial port, which is best suited for slower speed transmissions. Regular modems reach 56Kbps, whereas a DSL or a cable modem can reach much faster speeds. Standard modems incorporate processors in the modem hardware, which ensures that there is no extra burden placed on the computer's processor. To install a new modem, you must first connect it to the computer if it is external, or install the adapter card inside the computer if it is internal. When you start the computer, Windows XP Professional should detect the modem and install the driver if it is Plug and Play. If there is no driver, Windows XP starts the Add New Hardware Wizard, in which you can direct the computer to the location of the manufacturer's driver. If the modem isn't Plug and Play, you can install it from within Control Panel by clicking the Printers and Other Hardware category and then clicking the Phone and Modem Options icon. (You may be prompted to type your area code before the dialog box opens, if it has not been configured.) Click the Modems tab and then click the Add button, as shown in Figure 8.7. Figure 8.7. The Phone and Modem Options dialog box enables you to install and configure a modem. When you install a new modem, it is typically assigned to COM1, COM2, COM3, or COM4, all of which are assigned static resources. If these ports are currently assigned to other devices, Windows XP assigns the modem a port of COM5 or higher, which makes it unusable by some legacy applications. To troubleshoot this problem, you can adjust the base address of the modem and one of the other devices to switch them. You can also disable one of the other devices. Windows XP Professional supports Multilink, which is a system of congruent Point-to-Point Protocol (PPP) connections of multiple modems in both the transmitting and receiving computers. Windows XP logically aggregates the bandwidth of all the connections, which results in much faster transmission speeds.
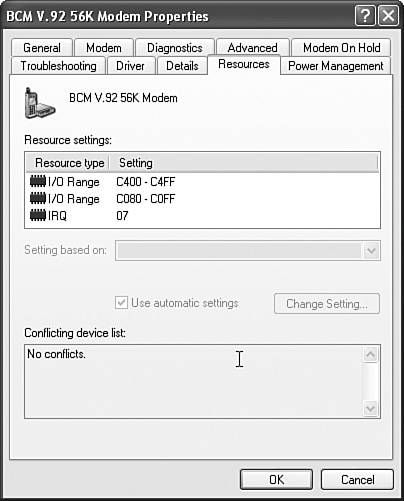
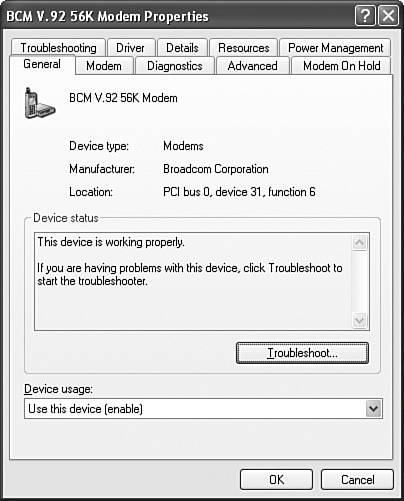
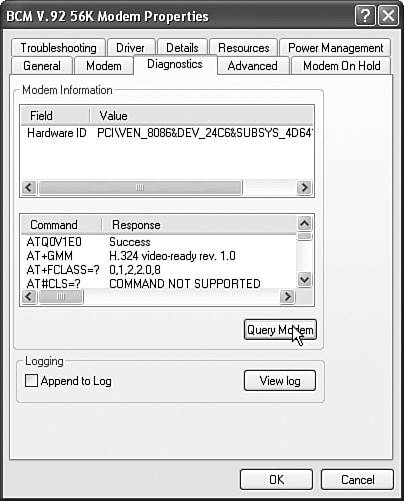
Exam Alert Know how to configure the firewall as it applies to modem connections You might be asked how to disable the Windows Firewall for individual network connections, which include those using modems. Double-click the modem device icon in Device Manager. The Properties dialog box opens, as shown in Figure 8.10. Modems have a wide variety of capabilities, so this dialog box is similar but not identical for modems made by different manufacturers. Figure 8.10. You can configure the modem device in the modem's Properties dialog box in Device Manager. To test a modem, you should click the Diagnostics tab and then click the Query Modem button. This displays a list of commands that were sent to the modem, and provides the results of those commands as depicted in Figure 8.11. The Query Modem function can also provide information needed when troubleshooting modem scripts. Figure 8.11. Clicking the Query Modem button sends commands to the modem to test it. If you have trouble connecting with a modem, you can view a log of the commands that the modem has received. This log, which is accessed by clicking the View Log button on the Diagnostics tab, can show you where a failure has occurred. Modem connectivity depends on the interaction between two modems. Because they are unique, likely with different capabilities and made by separate manufacturers, miscommunication is possible between the modems. If the modem to which you are connecting is slower than yours and you cannot create a link to it, you can alter the transmit and receive buffers to a lower level to resolve the issue. Table 8.1 discusses other ways to resolve modem problems.
Installing, Configuring, and Managing Infrared Data Association (IrDA) DevicesObjective: Implement, manage, and troubleshoot input and output (I/O) devices.
Most laptops are equipped with IrDA ports and can create ad hoc peer-to-peer network connections. An ad hoc network is one that does not need a central access point to direct traffic. Instead, each computer creates a mesh network of links to all other computers. Performance is typically lower in ad hoc networks than in those using access points. Not only can two IrDA computers create a network link, but a computer can connect to peripheral devices, such as digital cameras and printers, through the same IrDA port. Using IrDA to link up to peripheral devices eliminates the need for cables, so it is very convenient. Windows XP Professional should automatically detect and install IrDA devices. However, if the device is not detected, you can install it manually using the procedure in Step by Step 8.2.
To connect an IrDA device after it has been installed, you need to be within a fairly close range of the devicetypically about three to four feetwith the infrared transceivers pointing toward each other. After the two devices are aligned, Windows XP alerts you to an IrDA link, by means such as providing an icon on the taskbar. IrDA devices can be monitored in Control Panel in the Wireless Link utility, which appears only after an IrDA device is installed. The Hardware tab of the Wireless Link dialog box shows the IrDA devices installed. Right-click the device and select Properties to view the device's current status. Installing, Configuring, and Managing Wireless DevicesObjective: Implement, manage, and troubleshoot input and output (I/O) devices.
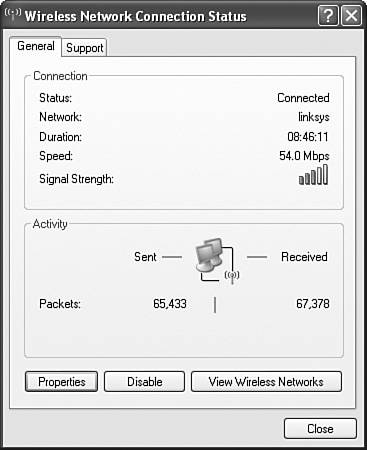
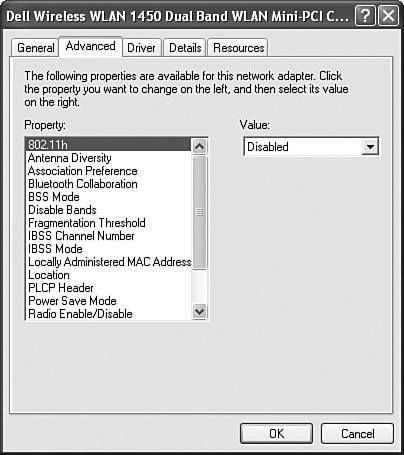
Wireless networks are easy to install and use, and are gaining tremendous popularity for small home and office networks. Security is still not perfected for wireless networks, so they have not made major inroads in corporate environments yet. Windows XP Professional supports the 802.1x protocols for wireless LANs and is capable of transparently moving between multiple wireless access points (WAPs), changing to a new IP subnet, and remaining connected to the network. Each time the IP subnet is changed, the user is reauthenticated. Other than IrDA devices, wireless devices are usually network adapters that are installed and configured identically to every other network adapter. What is different for a wireless network adapter is that it is monitoredand actually must be monitoreddifferently. Multiple wireless networks may be installed in a single location. A computer can detect and connect to any of those networks, given that it has the appropriate authentication for a wireless network that has been secured. Windows XP Professional displays all network links as icons in the taskbar. A disconnected network link is displayed by an icon with a "X" over two computers. A connected wired link is represented by an icon of two computers. A connected wireless link is denoted by a computer icon with three curved lines next to it. The wireless icon is highly recognizable because these curved lines are typically used to symbolize radar or sonar. When you double-click the icon in the taskbar, the Wireless Network Connection Status dialog box opens (see Figure 8.12). Figure 8.12. You can monitor the wireless link by double-clicking the wireless icon in the taskbar. Clicking the Properties button opens the Properties dialog box for the wireless NIC. In this dialog box, you can configure the network protocols used, file and printer sharing, and other network characteristics. To prevent a wireless adapter from connecting to any wireless network, you can right-click the icon in the taskbar and select Disable. If you are in the wireless connection dialog box, you can click the Disable button. In the Properties dialog box, you can click the View Wireless Networks button to display all the wireless LANs that are in communication's reach, as shown in Figure 8.13. In this dialog box, you can refresh the list of available networks, disconnect from a wireless LAN, and change the order of networks to which Windows XP attempts to link. Figure 8.13. In the Wireless Network Connection window, you can choose the wireless network to which you want to connect.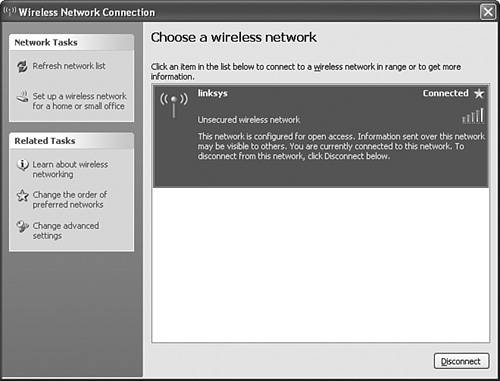 If a wireless access point is not found, Windows XP adjusts the wireless adapter to be able to create an ad hoc network with another wireless computer. To force a computer to use the peer-to-peer connection rather than connect to a wireless LAN, double-click the wireless icon in the taskbar, click the Properties button, select the Wireless Networks tab, and click the Advanced button. In the resulting dialog box, select Computer-To-Computer (Ad Hoc) Networks Only. If you later need to connect to a wireless LAN, you will need to change this setting to either Any Available Network (Access Point Preferred) or Access Point (Infrastructure) Networks Only. Exam Alert Be aware of moving between different types of wireless networks You might be queried about how to troubleshoot a failing wireless network connection on the exam. Remember that when the Computer-to Computer (Ad Hoc) Networks Only option is configured, a wireless network connection tries to connect to those networks only, and this prevents the computer from connecting to a network that uses wireless access points (WAPs). Installing, Configuring, and Managing USB DevicesObjective: Implement, manage, and troubleshoot input and output (I/O) devices.
USB devices are connected to a high-speed transmission path, of up to 12Mbps for USB 1.0 and up to 480Mbps for USB 2.0, that is accessed through a Plug and Play interface. Many different types of devicessuch as telephones, speakers, keyboards, cameras, hand-held devices, and moreconnect via USB. To accommodate more devices than the number of ports on a computer, you can even connect a USB hub. When Windows XP detects a USB device, it installs the drivers for it or prompts for a manufacturer's driver to be installed. If the device serves multiple purposes, such as a fax/copier/printer/scanner unit, Windows XP installs the device drivers for each of the functions. In general, you don't need to perform any additional installation when you plug in a USB device. After a USB device is installed, you can manage and configure it through Device Manager, or by accessing the device's icon in Control Panel. For example, a fax/copier/scanner/printer multi-function device would be available in the Printers and Faxes utility, as well as in the Scanners and Cameras utility, both of which are in the Control Panel. Plus, you could use Device Manager to configure each of the properties of the device's varied functions. Some errors can affect all types of USB devices, as follows:
The USB 2.0 device driver specification is not part of the Windows XP Professional operating system. To use USB 2.0 devices, you must install the USB 2.0 device driver, which is available on the Windows Update website at http://windowsupdate.microsoft.com. Installing, Configuring, and Managing Handheld DevicesObjective: Implement, manage, and troubleshoot input and output (I/O) devices.
Pocket PCs can use Microsoft ActiveSync via IrDA, serial cable, or a USB link to synchronize data. You can install the PDA by using Device Manager or the Add New Hardware Wizard if it is not detected by Windows XP. When the device driver and Microsoft ActiveSync software are installed, you can synchronize the data between the PDA and the PC by clicking the ActiveSync icon in the taskbar and selecting Connection Settings. Select the correct type of connection for the PDA. Make certain the PDA is on and, if using IrDA, that its infrared port is aligned. Click the Get Connected button to start the connection wizard. If you are using IrDA on the PDA, tap on Start and then tap the Connections option. Select the IR icon. The devices should connect and synchronization can begin. Installing, Configuring, and Managing Network AdaptersObjective: Implement, manage, and troubleshoot input and output (I/O) devices.
Windows XP Professional supports many types of network adapters, both Plug and Play devices and otherwise. To install a network adapter, your first step is to physically install the adapter in the appropriate slot within the computer. Next, start the computer and Windows XP Professional. Windows XP automatically detects Plug and Play network adapters. NonPlug and Play network adapters can be installed through the Add Hardware Wizard. When a Plug and Play adapter is installed, Windows XP automatically allocates hardware resources, loads the driver, initializes any associated drivers and applications, and coordinates any power management features with Advanced Configuration and Power Interface (ACPI). Device drivers are configured and loaded without requiring a restart, or even user input. However, the default configuration for network adapters doesn't always fit the network to which the adapter is connecting. You should be prepared to provide users with configuration data for the network if they are installing the adapters themselves. The configuration of network parameters is covered in Chapter 11. To change a network adapter's hardware settings, open Device Manager and expand the Network Adapters device type. Double-click the network adapter and click the Advanced tab. A dialog box, similar to the one shown in Figure 8.14, opens. Each adapter has different parameters in this dialog box. Figure 8.14. Network adapter device settings can be configured in the device's Properties dialog box in Device Manager. If the network adapter has functioned appropriately and suddenly stops working and you have not made any configuration changes, you are likely faced with a network adapter failure or, if that is not the case, a failure of the port to which the adapter is connected. To test whether it is the adapter or the port, you can either switch to a different port or replace the adapter. When you initially install a network adapter and are unable to connect to a desired location, you are likely facing a configuration error or driver problem. You can follow these steps to attempt resolution:
|


EAN: 2147483647
Pages: 193