| Chapter 5 introduced you to the three file systems supported by Windows XP Professional: FAT16 (also simply known as FAT), FAT32, and NTFS. You saw the limitations of FAT16 and FAT32, and the advantages of NTFS version 5 with regard to file and folder permissions, as well as support for disk quotas, compression, and encryption. In this chapter, you continue the discussion of file systems to include conversion between file systems and configuration of additional properties native to these file systems. Converting from One File System to Another File System Objective: Configure and manage file systems. Windows XP Professional enables you to convert volumes (partitions) formatted with the FAT or FAT32 file system to NTFS. You can accomplish this task using the Convert.exe command-line procedure. This procedure performs a one-way conversion that does not affect data stored on the volume. Follow the steps outlined in Step by Step 6.6. Step by Step: 6.6 Converting a FAT or FAT32 Volume to NTFS 1. | Open a command prompt.
| 2. | Type the following:
convert drive: /fs:NTFS
where drive is the drive letter to be converted. For example, typing convert D: /fs:ntfs converts drive D: to the NTFS format.
| 3. | If you are converting the boot volume (the volume containing the %systemroot% folder) to NTFS, you receive a message asking you to restart your computer. Click Yes to restart your computer and convert the boot volume.
|
|
Windows XP Professional does not support a direct conversion from NTFS back to FAT or FAT32. If you need to convert a NTFS volume back to FAT or FAT32, you must re-create and reformat the volume. Back up all the data on the volume and use the Disk Management snap-in to perform these tasks. Use of the Disk Management snap-in is discussed in the next section. Note Canceling an improper NTFS conversion Should you accidentally choose to convert the wrong FAT or FAT32 volume to NTFS, you can cancel the conversion before restarting your computer. To do this, run Regedit.exe and navigate to HKEY_LOCAL_MACHINE\SYSTEM\CurrentControlSet\Control\Session Manager. Change the BootExecute value to autocheck autochk *. See Knowledge Base article 130913 for more information.
Exam Alert Remember the features that are exclusive to NTFS Remember that only NTFS volumes support local file and folder security. Also remember that only NTFS volumes support features such as file compression, encryption, mount points, and disk quotas. If the question mentions that the user is unable to locate the interface required to perform these tasks, it is probably because the volume is not formatted with the NTFS file system.
Configuring NTFS, FAT32, or FAT File Systems Objective: Configure and manage file systems. Windows XP Professional provides the Disk Management snap-in (see Figure 6.7) for performing configuration tasks on disk volumes formatted with the NTFS, FAT32, and FAT file systems. This snap-in is included in the Computer Management console and can also be added to its own console. This chapter looks at the following tasks that you can perform with this snap-in: Displaying disk properties Assigning, changing, and removing drive letters Mounting volumes to empty folders Configuring disk quotas
Figure 6.7. You can perform most disk and volume management tasks from the Disk Management snap-in, shown here as a component of the Computer Management snap-in. 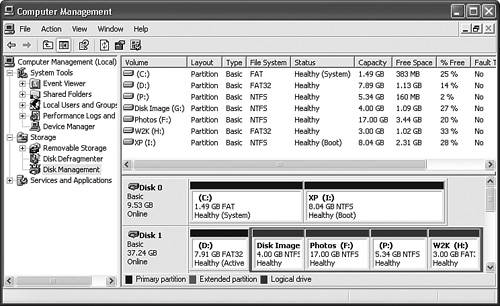
You will cover other disk and volume management tasks in Chapter 7, "Implementing, Managing, Monitoring, and Troubleshooting Hardware Devices." Displaying Disk Information You can display information about a disk from the Disk Management snap-in, as Step by Step 6.7 shows. Step by Step: 6.7 Displaying Disk Information 1. | Open the Disk Management snap-in. You can do this by any of the following methods:
Right-click My Computer and choose Manage. Select Disk Management from the console tree of the Computer Management console. Click Start, Control Panel, Performance and Maintenance, Administrative Tools, Computer Management, and then select Disk Management. Click Start, Run, type diskmgmt.msc, and then press Enter. This method opens Disk Management in its own console.
| 2. | Right-click the disk (not the partition) and choose Properties. The disk's Properties dialog box opens, as shown in Figure 6.8.
Figure 6.8. The Properties dialog box for a disk displays information that is general to the entire disk. 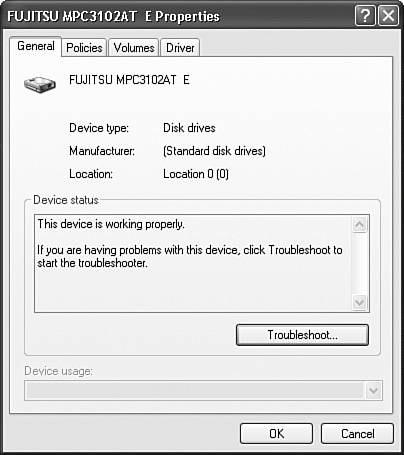
| 3. | Select the appropriate tab to display information or configure the following properties:
- General Displays information about the device type and manufacturer, and enables you to run a troubleshooter if problems are occurring.
- Policies Enables properties related to write caching of all disks and safe removal of removable disks only.
- Volumes Displays information about the volumes contained on the disk.
- Driver Provides information on the driver and enables you to update, roll back, or uninstall the driver if needed. For more information, see information related to Device Manager in Chapter 7.
|
|
Note Command-line tool names Most command-line tools, such as Diskmgmt, have a maximum of eight characters in their names.
Configuring Drive Letters Although Windows automatically assigns drive letters to all volumes on your disks, you may want to change the default drive letter assignment under certain conditions. Follow Step by Step 6.8 to change a drive letter: Step by Step: 6.8 Changing a Drive Letter 1. | In the Disk Management snap-in, right-click the volume and choose Change Drive Letter and Paths.
| 2. | In the Change Drive Letter and Paths dialog box, click Change.
| 3. | In the Change Drive Letter or Path dialog box, select Assign the Following Drive Letter and choose the desired letter from the drop-down list. Click OK.
|
|
Mounting a Volume The Change Drive Letter or Path dialog box also enables you to mount a volume to an empty folder in another volume, provided that volume is formatted with the NTFS file system. Doing so offers the following advantages: You can overcome the limitation of having only 24 letters of the English alphabet available for assigning letters to local and mapped network drives (drive letters A: and B: are reserved for floppy disk drives, so only the remaining 24 letters are available). You can add space to a volume that is filling up by installing a new disk and mounting a volume on this disk to an empty folder on the other volume. You can reduce the number of drive letters that users need to contend with when searching for files or folders. Users often find a large number of drive letters to be confusing.
Follow Step by Step 6.9 to mount a volume to an empty folder. Step by Step: 6.9 Mounting a Volume 1. | Create a new folder on an existing volume formatted with the NTFS file system.
| 2. | In the Disk Management snap-in, right-click the volume and choose Change Drive Letter and Paths.
| 3. | In the Change Drive Letter and Paths dialog box, click Add.
| 4. | In the Add Drive Letter or Path dialog box, type the folder name or browse to the folder you created in step 1, and then click OK.
|
|
Exam Alert Removing drive letters or mount points You can also remove extra drive letters or mount points. In the Change Drive Letter and Paths dialog box, select the path and click Remove, and then click Yes to confirm your action. If a question in the 70-270 exam asks how to add disk capacity when all available drive letters have been used, mount points are probably involved in the correct answer.
Configuring Disk Quotas You can enable disk quotas on volumes formatted with the NTFS file system to limit the amount of disk space used by any one user. Quotas are configured on a per-user, per-volume basis and can also be used to keep track of the amount of disk space used by a given user. Step by Step 6.10 shows you how to implement disk quotas. Step by Step: 6.10 Configuring Disk Quotas 1. | Right-click the volume from My Computer or the Disk Management snap-in, and choose Properties.
| 2. | Select the Quota tab.
| 3. | Select the Enable Quota Management check box to enable the configuration of disk quotas, and then select from the following additional options (see Figure 6.9) as required:
- Deny Disk Space to Users Exceeding Quota Limit When users exceed their quota, they receive an Out of disk space message and are unable to save further data to that volume.
- Do Not Limit Disk Usage Select this option to use disk quotas only for gathering disk usage statistics.
- Limit Disk Space To Configures the disk space limit per user. This limit is effective for all users except members of the local Administrators group, who are always exempt from quotas. You can configure individual limits by selecting the Quota Entries command button.
- Set Warning Level To Users receive a warning message when they exceed the value configured here. This amount must be less than the disk space limit.
- Log Event When a User Exceeds Their Quota Limit and Log Event When a User Exceeds Their Warning Level Write events to the Windows System log when users exceed these levels.
- Quota Entries command button Enables you to view information on per-user disk space usage and modify the quota limits on a user-by-user basis.
Figure 6.9. The Quota tab of a volume's Properties dialog box enables you to configure disk quota options. 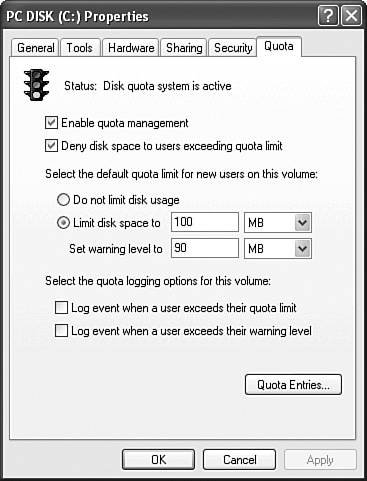
| 4. | Click OK or Apply.
| 5. | The Disk Quota dialog box opens, informing you that the volume will be rescanned to update disk usage statistics. Click OK to proceed.
| 6. | The traffic light icon displays a yellow light while the volume is scanned, and then a green light to inform you that disk quotas are active.
|
|
Exam Alert Disk quotas are based on uncompressed file sizes Windows charges users according to the uncompressed file sizes, even if the files are compressed. The total charged against a user's disk quota includes all files owned by that user, including those he has taken ownership of and those contained in an application he has installed.
Exam Alert Configuring disk quotas from the command line You can use the Fsutil.exe utility to configure disk quotas from the command line. This utility enables you to script the setting of disk quotas across multiple Windows 2000, XP, or Server 2003 computers. For more information on this utility, refer to Fsutil: quota in the Windows XP Help and Support Center.
Challenge You are a desktop administrator working for a medium-sized dental office that operates a workgroup for the office's five dentists, seven dental hygienists and technicians, and two secretaries. You are directly responsible for a Windows XP Professional computer containing a 20GB hard disk that holds the office's dental records. The hard disk is partitioned into the following three partitions: drive C: (5GB) holds the operating system files, drive D: (5GB) holds applications, and drive E: (10GB) holds the dental records. Drive F: is the computer's CD-ROM drive. One day, the head dentist informs you that the X-ray technician received a Disk full message when attempting to save additional information to the dental records folder, which is located at E:\Records. The folder is shared as Records and mapped to the Z: drive on every workgroup computer. You investigate and realize that the E: partition has only 2MB of free space. The head dentist authorizes you to purchase and install a new 60GB hard disk. However, because most of the dental staff are not very knowledgeable about computers, you need to ensure that all records are available on the same mapped share. Furthermore, you need to ensure that each staff member has available 4GB of disk space except for the X-ray technician, who estimates that she will need 8GB of disk space within the next few years for storage of all images captured by the facility's new digital X-ray imaging system. Users should be warned when they have only 500MB of available disk space left. You open the computer, install the new disk, reboot the computer, and notice that the new disk appears as drive G: in My Computer. Your task is to configure the new disk so that all records are easily available to the employees concerned without requiring them to access a different folder and share name, and that disk space is allocated in a fair manner. Try to work through the required steps on your own. If you have difficulty, refer to the following steps: 1. | Right-click My Computer and choose Manage. Select Disk Management from the entries displayed in the console tree.
| 2. | In My Computer, rename the E:\Records folder as E:\Temp, and create a new empty folder named E:\Records.
| 3. | Right-click the G: partition and choose Change Drive Letter and Paths.
| 4. | In the Change Drive Letter and Paths for G: dialog box, click Add and type E:\Records in the text box that appears. Click OK.
| 5. | Stop sharing the E:\Temp folder and share the E:\Records folder as Records. If you have forgotten how to perform these steps, refer to Chapter 5.
| 6. | Open the E:\Temp folder and move all the subfolders and files in this folder to the new E:\Records folder.
| 7. | In My Computer, open the G: partition. You should note that this partition contains all the current dental records which you moved in the previous step.
| 8. | Right-click this partition and choose Properties.
| 9. | Select the Quota tab and select the Enable Quota Management check box.
| 10. | Select the Deny Disk Space To Users Exceeding Quota Limit option.
| 11. | Select Limit Disk Space To, and enter 4GB for the limit and 3.5GB for the warning level, and then click Apply.
| 12. | Click OK in the warning dialog box that opens.
| 13. | Click the Quota Entries button. The Quota Entries for G: dialog box should display a list containing all users, with a quota limit of 4GB and warning level of 3.5GB for each user except the Administrator, who has no limit.
| 14. | Right-click the user account of the X-ray technician, and choose Properties.
| 15. | In the dialog box that appears, set the disk space limit to 8GB and the warning level to 7.5GB, and then click OK.
| 16. | Note that this modified disk space limit appears in the Quota Entries dialog box, and then close this dialog box.
|
|
|