| Objective: Perform and troubleshoot an attended installation of Windows XP Professional. When you are sitting in front of a computer, watching it go through the various installation phases, it's easier to troubleshoot a problem as it occurs than to resolve a failed installation after the event. Therefore, it helps to know what phases the computer goes through during installation because this can point to the source of the problem. Table 4.1 describes the installation stages. Table 4.1. Windows XP Professional Setup ProcessPhase | Prompted Actions | Possible Problems |
|---|
Boot into DOS mode | Load storage device drivers | Hardware incompatibility with the storage device; incompatible device driver; wrong device driver; no built-in device drivers; Windows XP Setup does not detect the storage device | Welcome to Setup | Select Recovery Console option, installation, or quit | Accidental selection of Recovery Console (R) or quitting Setup (F3) | EULA agreement | Accept the EULA | Not accepting the EULA | Create partitions | Select or create a partition | Not creating or selecting a partition | File system | Select a file system to format the drive | Disk errors prevent formatting the drive; formatting a partition that contains information; using NTFS for a dual-boot computer that requires FAT | File copy | Computer reboots after files are copied | Disk errors prevent files from copying; not enough space on the designated drive for files to be copied; source drive for file copy (network) does not contain all the necessary files/drivers for following installation phases | Graphical mode | Setup detects and installs drivers | Source drive for file copy (network) does not contain the correct drivers | Regional and language settings | Select the language to use | User installed from an incorrect language version of Windows XP Professional | Name and organization | Enter a user's name and company name | Information is later used by some applications, but this screen is not related to installation problems | Product key | Input the product key | Invalid, missing, or duplicate product key | Computer name | Enter a computer name | A duplicate computer name causes network conflicts. NetBIOS requires each computer name to have less than 15 characters, which cannot use special characters such as: ; :" < > * + = \ | ? , | Dialup info | Enter modem and time zone information | Incorrect time zone information may cause application errors later, but this screen is not usually related to installation problems | Network settings | Accept typical settings or choose custom settings | Computer cannot connect to the domain; computer has a network address conflict; computer cannot connect to some/all network devices; computer cannot share files or printers; network adapter drivers are incorrect; computer cannot obtain an IP address | File copy | Setup completes file copying and cleans up temporary files | Hardware device drivers are loaded after Windows XP restarts; an error after this point may be a hardware device driver error |
Common Problems During Installation The Windows XP Setup process is so streamlined that you usually do not encounter problems during installation. However, when a problem does occur, it's frequently related to lack of preparation. This basic problem manifests itself in the following symptoms: The Basic Input/Output System (BIOS) is not compatible with Windows XP Professional. The hardware is not compatible with Windows XP Professional. There is not enough space on the hard drive to install the operating system. The drivers for the hard disk, network adapter, or other devices are incorrect or incompatible. The computer cannot connect to the network because the name or IP address conflicts with another computer on the network.
Typically, it takes much longer to fix a problem, or to run the installation again, than it does to gather the tools and information you need before you start the installation. As it happens, an ounce of preparation is equal to a pound of troubleshooting. Exam Alert Have the latest BIOS One or two exam questions look for a combination of answers, with one being the need for the latest BIOS. Compatibility with Windows XP is not just related to hardware or software, it includes firmware.
You will review specific problems that you may encounter during installation. These consist of media errors, insufficient hard disk space, unrecognized CD-ROM, a network that can't be accessed, and problems that require an advanced startup. Exam Alert Be prepared to draw conclusions from stated symptoms Often, exam questions simply describe the symptoms of a problem. You need to draw conclusions from the exam question and then create a solution. To succeed on these questions, you should be thoroughly familiar with the most common problems that can occur during installation.
Media Problems Windows XP Professional can be installed directly from a bootable CD-ROM drive. If the disk does not boot, check to see whether the drive can be configured as a boot drive, and whether this is set in the computer's BIOS. If you are installing from a bootable CD-ROM and your computer has difficulty reading from the disc, the quickest way to resolve the problem may be to simply use a different Windows XP Setup CD-ROM. Even though a CD-ROM has worked in the past for other installations, it might have become scratched or otherwise damaged. If you inspect the data side of the disc and discover fingerprints, a simple cleaning may fix the problem. To determine whether it is the CD-ROM or a problem with the CD-ROM drive, test the disc on another computer. If you have the same or similar errors reading the disc, you should contact Microsoft for a replacement. If you boot from a CD-ROM and the Setup process begins but is unable to copy files to the computer, you might have an unsupported CD-ROM drive. Try to install Windows XP from another locationeither from another CD-ROM drive or across the network. Another option is to copy the Setup files to a local hard drive before beginning Setup. For network installations, you can boot to the network from either the computer's existing operating system or a Setup floppy boot disk. If you have problems with the boot disk, test it on an alternate computer to see whether the disk needs to be re-created. Insufficient Hard Drive Space The minimum hardware requirements for installing Windows XP Professional state that you should have 640MB of available drive space for the operating system. This is not the minimum required for installation, however. For that, you should have at least 1.5GB of available disk space. Even if you want to have a partition smaller than 1.5GB on which the base operating system is to be installed, you can create additional partitions on the hard disk to reach the amount of space you need. If your hard drive is smaller than 1.5GB, you should add a new hard drive or replace the drive. Exam Alert Reality bytes Although theoretically (and on the exam) you can install Windows XP with only 1.5GB of free space, the reality is you need well over 2GB. On an exam question that suggests installing Windows XP on a disk with less than 1.5GB total of space, select the answer to add another disk or replace the disk.
Unrecognizable CD-ROM Drive If the Setup program doesn't recognize the CD-ROM drive, check whether the CD-ROM drive is compatible with Windows XP Professional. If it is, you may be able to load updated drivers from the manufacturer. A much easier solution is to install across a network or to copy the files to a local drive before running Setup. Unavailable Network Network connectivity can be a problem caused by simple errors, such as the following: The password is incorrectly typed. Check to make sure that the Caps Lock key isn't on. The wrong domain name is used. Check to make sure that the domain name has been entered correctly. The network cable is not connected. The IP address is incorrect. A name conflict exists, or the name is too long or contains illegal characters. The computer was unable to obtain an IP address from the Dynamic Host Configuration Protocol (DHCP) server. The network adapter drivers are incorrect or malfunctioning. The Domain Name Service (DNS) server or domain controller is not online. There is no computer account created in the domain. The IP address of the default gateway is incorrect.
For each of these problems, there is generally an easy solution. To determine which of the errors specifically applies to you, or if there is another error preventing network connectivity, you can use the IP utilities listed in Table 4.2. Table 4.2. IP UtilitiesUtility | Command | Usage |
|---|
Packet InterNet Groper (Ping) | ping | Uses an echo command to establish whether packets can be routed at the Network layer on a network. | File Transfer Protocol (FTP) | ftp | Uploads/downloads files on a network. This command helps you determine whether Application layer functions can work on the network. | Telnet | telnet | Establishes a character-based session with a Telnet server across a network. This command helps you determine whether Session layer functions can work on a network. | Line printer daemon | lpr | Executes a print job on a network printer. | Ipconfig | ipconfig | Shows the IP configuration of network adapters installed in a computer. From the results of this command, you can determine whether you have incorrectly addressed the adapter or the default gateway, or whether the adapter was unable to obtain an address from the DHCP server. | Name Server Lookup | nslookup | Checks DNS entries. | Netstat | netstat | Displays Transmission Control Protocol/Internet Protocol (TCP/IP) connections and protocol statistics. To find all the applicable switches, type netstat /? at the command prompt, as shown in Figure 4.1. | Nbtstat | nbtstat | Is similar to netstat, except that it resolves NetBIOS names to IP addresses. To find all applicable command switches, type nbtstat /? at a command prompt. | Trace Route | TRacert | Shows all the routing hops that a packet takes to reach a destination on a network. |
Figure 4.1. The netstat command with switches is used for troubleshooting. 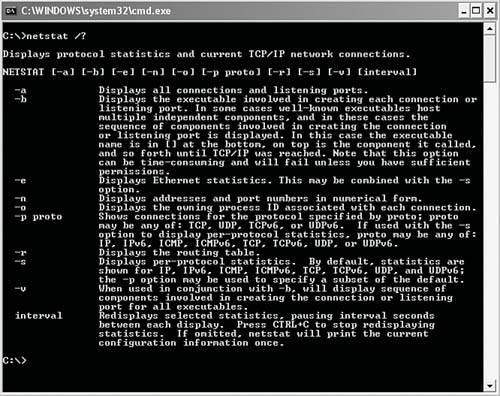
If everything physically checks out with your computer, and you are able to install and boot the computer but you cannot connect to the network, you should determine whether the adapter is working and then review your network adapter configuration settings. Step by Step 4.1 shows you how to determine whether the adapter is functioning. Step by Step: 4.1 Checking Network Adapter Settings 1. | Right-click My Computer and select Properties.
| 2. | Click the Computer Name tab to make certain that the name is unique for the network, and that the workgroup or domain name is spelled correctly.
| 3. | Click the Hardware tab.
| 4. | Click the Device Manager button.
| 5. | Expand the Network Adapters section, as shown in Figure 4.2.
Figure 4.2. Device Manager displays the network adapter. 
| 6. | Right-click the network adapter and select Properties. The Properties dialog box is shown in Figure 4.3.
Figure 4.3. The network adapter's Properties dialog box provides device information. 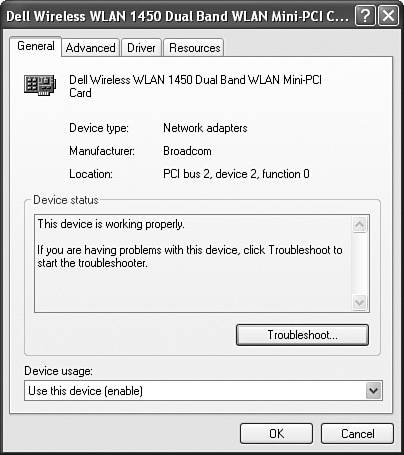
| 7. | Ensure that the General tab states that This Device Is Working Properly.
| 8. | Click the Advanced tab to check the adapter's configuration.
| 9. | Click the Driver tab to determine whether you are using the current/latest driver for the adapter. You can also use the Update Driver button to install a newer driver or the Roll Back Driver button to revert to an older driver version.
| 10. | Click the Resources tab to see whether there are any hardware conflicts to resolve.
| 11. | Click the Power Management tab, if available, to see whether Power Management has been configured to turn the device off.
| 12. | Close the Properties dialog box and Device Manager.
| 13. | Right-click My Network Places and select Properties. Look for the Local Area Connection icon. If the network adapter is not functioning, the Local Area Connection icon displays a disconnected symbol in the form of a red "X".
| 14. | Right-click the connection and select Properties. You should see a driver in the Connect Using text box. You should also see the following protocols listed in the This Connection Uses the Following Items list: Client for Microsoft Networks (or alternate client if connecting to a different type of network), Internet Protocol (TCP/IP), and/or other network protocols.
| 15. | If you have determined that there is a TCP/IP problem from the results of running an ipconfig command, select the Internet Protocol (TCP/IP) option, and then click the Properties button. The Internet Protocol (TCP/IP) Properties dialog box opens, as shown in Figure 4.4. You can configure the IP address, subnet mask, and default gateway.
Figure 4.4. The Internet Protocol (TCP/IP) Properties dialog box shows how the network adapter's IP address is configured. 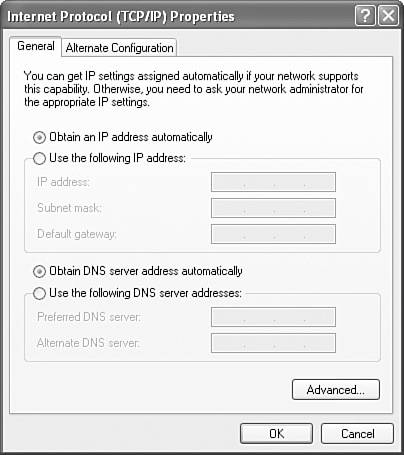
|
|
Advanced Startup Sometimes you can install the Windows XP operating system but cannot get the computer to boot normally. You can use options in the Advanced Options Menu by pressing F8 during the initial boot sequence. Use the Safe Mode option to load the minimum necessary operating system drivers and then continue to troubleshoot the problem by making configuration changes as appropriate. You can also select Safe Mode with Networking to access network or Internet resources. Another useful option is Enable Boot Logging. Boot logging stores information about drivers that initialize upon startup in the %systemroot% directory in a file named Ntbtlog.txt. You can identify incorrect, missing, or possibly corrupt drivers and replace them as necessary. You can get more information about boot logging from the Microsoft website at http://www.microsoft.com/resources/documentation/Windows/XP/all/reskit/en-us/Default.asp?url=/resources/documentation/windows/xp/all/reskit/en-us/prmb_tol_rpsc.asp. Recovery Console The Recovery Console is a command-line tool that you can start from Setup, although it's most commonly used to recover from startup problems. You can use the Recovery Console to start and stop services, read and write data on a local drive, format disks, and perform many other administrative tasks. The Recovery Console is quite useful for reconfiguring a service that is preventing your computer from starting properly. You must be an administrator to use the Recovery Console. To run the Recovery Console, start the program from your Windows XP Professional CD-ROM or install it from the CD-ROM so it is available now and in the future. (See Chapter 9, "Monitoring and Optimizing System Performance and Reliability," for more information about the Recovery Console, or use the Windows XP Help and Support Center by clicking Start, Help and Support.) Refer to Compatibility As you probably noticed in the previous sections, there are several references to checking the compatibility of your hardware, BIOS, and drivers. This is probably the main issue that affects a new installation of Windows XP Professional. Compatibility with Windows XP means that Microsoft supports the driver or the device. If you have hardware that is not listed on the Hardware Compatibility List (HCL) or in the Windows Catalog, even if Windows XP installs and appears to work correctly, in the event of an error Microsoft will not provide any technical support. Note Check your hardware first Hardware compatibility should be the first thing to check when you have an installation failure.
Application compatibility is another significant concern. Because many unattended installations of Windows XP automatically incorporate applications, you can encounter errors that are caused by the applications rather than the operating system. To reduce application errors significantly, you should prepare in advance as follows: Inventory the applications on the network. Investigate the compatibility of the applications with Microsoft and the manufacturers. Test the applications. Resolve application compatibility issues and incorporate the resolutions in the installation process. Test hotfixes, service packs, and application updates. Incorporate hotfixes, service packs, and application updates into the installation process. Create standard software images so that all users have identical application installations.
Strip the PC Back when we first got interested in computers, having a hard drive larger than 10MB was a big deal. The hardware for a standard PC was limited to a VGA monitor, simple CPU, hard drive, 5-1/4' floppy disk drive, keyboard, and mouse. Installing the operating system software on one of those babies was a matter of knowing each device's resources and manually setting pins on adapters that you added before you started feeding installation floppy disks into the computer for a 2-hour stretch, while manually selecting or inputting the device drivers for your computer into the Setup program. If you encountered an error, you checked your resources and pin settings, and then started over again because there was no such thing as a Recovery Console. How times have changed! With today's hardware automatically detected by Plug and Play, there is much less hardware tweaking needed. You'd think that would make installation easier, but, unfortunately, that's not always the case. There are currently hundreds of different types of devices that can be attached to various brands of computers, with thousands of different configurations and millions of lines of operating system code that is supposed to recognize every possible hardware combination and make it all work together seamlessly with whichever version of device driver it happens to have available to it. The fact is that errors abound and the methods of resolving or working around them to have a functioning PC are convoluted at best. So, the best way to resolve a problem with the operating system installation is to strip the PC. Remove every unnecessary hardware component, including detaching the printer, and take out any extra network adapters. This can greatly help you successfully install Windows XP Professional on a PC. After you have Windows XP installed and running, you can then add each component back to the computer, one at a time, rebooting and testing the computer between each device installation. If the first hardware component checks out okay, add a second, retest, and then go on to the third. Continue this for all devices. At some point, you will either discover the errant component or be able to chalk up the error to a conflict that no longer exists. |
|