| Objective: Perform and troubleshoot an unattended installation of Windows XP Professional. First introduced with Windows 2000, RIS provides a means of performing on-demand, image-based installation of operating systems across a network connection from a server running RIS to the computer on which the operating system is to be installed. You can install RIS on a server running either Windows 2000 Server or Windows Server 2003, and use it to install Windows 2000 Professional or Windows XP Professional on remote computers. If you install RIS on a computer running Windows Server 2003, you can also install a server-based operating system on the remote computers. Note Windows Server 2003 RIS can install both servers and client computers Unlike RIS in Windows 2000, which allowed you to install only client operating systems, Windows Server 2003 can install Windows 2000 Server or Windows Server 2003 on new computers.
About RIS RIS provides several advantages to the administrator who needs to install Windows XP on a large number of computers, including the following: RIS enables you to install Windows XP Professional on computers at a remote location across a wide area network (WAN). RIS simplifies the duties associated with management of an installation server. RIS simplifies the procedures required to recover an installation from system failures that occur during installation.
You can create installation images of Windows XP or Windows Server 2003 that include complete computer configurations, including such items as applications and desktop settings, and use RIS to push these images out to client computers on the network. The capabilities of RIS include the following: Enable users to install an operating system on demand. On starting a client computer that is equipped with the PreBoot eXecution Environment (PXE), the computer connects to an RIS server, which then installs the operating system across the network without the need for a CD. Provide images of the operating system that are complete with specific settings and applications such as those required by a corporate workstation policy. You can designate the group of users that is provided with a certain image or series of images. Create images that enable the automated installation of Windows XP Professional or Windows 2000 Professional, as well as the members of the Windows Server 2003 family.
You can use RIS to create two types of images: A flat image that is created directly from a set of operating system files, and a Remote Installation Preparation Wizard (RIPrep) image that includes the operating system with specific settings and applications. RIS includes a Client Installation Wizard, which is downloaded from the server at the beginning of the installation process and minimizes the extent of interaction required at the client end. Its use enables individuals with little or no computer training to begin installations of Windows XP Professional. The use of this wizard is discussed later in this section. Requirements to Use RIS RIS is included with Windows 2000 Server and Windows Server 2003. To use RIS, you need to install this component on the server. In addition, the following server components must be available on the RIS server or on another server available to the RIS server (see Figure 2.7): Dynamic Host Configuration Protocol (DHCP) Provides TCP/IP configuration parameters that enable the client computer to create its own network connection. Domain Name System (DNS) Provides name resolution services so that the client computer can locate the RIS server by name. Active Directory RIS operates only in an Active Directoryenabled domain environment. You cannot use RIS in a workgroup environment.
Figure 2.7. RIS requires that you have DHCP, DNS, and Active Directory available on the network. 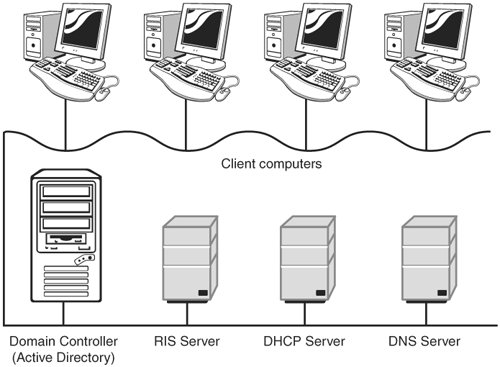
Exam Alert Be sure you know these requirements for using RIS You might encounter a question where you are asked to troubleshoot why RIS isn't working, when the reason is that one of these services is missing. Also remember that DNS is required for Active Directory.
In addition, the RIS server must have a separate disk partition that is configured with the NTFS file system and does not hold any of the server's system or boot files. This is required because RIS uses the single instance storage (SIS), which stores only a single copy of each file in a common storage folder. SIS uses reparse points (reference points used by NTFS to extend functionality in the input/output (I/O) subsystem) to this folder for multiple references to this file, thereby saving disk space. The Risetup.exe program automatically installs SIS when it is first run. Client computers must meet the proper design specification to be installed with RIS. This includes the capability for remote booting, which is usually accomplished by adding a network interface card (NIC) that is equipped with a PXE ROM-enabled chip, along with support in the BIOS for booting the computer from this NIC. In addition, the client computer can have only a single disk partition. (Any additional partitions are destroyed when the operating system is installed, and the entire disk is formatted as a single NTFS partition.) If the client computer does not possess a NIC with a PXE-enabled boot ROM, you can create a remote boot floppy disk at the RIS server that enables the user to start the installation process. Such a disk is analogous to a boot ROM; it simulates the PXE startup process, providing a connection to the RIS server so that the client can download the Client Installation Wizard. For this procedure to work, the NIC in the client computer must be included on the list supported by the RBFG. Installing RIS on the Server Although RIS is included with Windows 2000 Server and Windows Server 2003, you must install it from Add or Remove Programs in Control Panel. Follow Step by Step 2.4 to install RIS on a computer running Windows Server 2003. Steps on a Windows 2000 Server computer are similar. Step by Step: 2.4 Installing and Preparing RIS 1. | Log on to a computer running Windows Server 2003 as an administrator.
| 2. | Click Start, Control Panel, Add or Remove Programs, Add/Remove Windows Components.
| 3. | In the Windows Components Wizard, scroll to select Remote Installation Services and then click Next.
| 4. | When prompted, insert the Windows Server 2003 CD-ROM and click OK.
| 5. | When the completion screen appears, click Finish.
| 6. | If requested, click Yes to restart the server.
| 7. | Log back on as a member of the Enterprise Administrators group in the domain to which the server belongs.
| 8. | Open a command prompt and type risetup -check. This starts the Check Server Wizard, which prepares the RIS server to accept images and authorizes RIS in Active Directory.
| 9. | Click Next to bypass the welcome screen of the Check Server Wizard.
| 10. | On the Remote Installation Folder Location, confirm or modify the folder to which the remote installation folder structure will be written. By default, the folder name is RemoteInstall, and this folder is shared with the share name RemInst. This folder must be located on a partition other than the system partition, and the partition must be formatted with the NTFS file system.
| 11. | On the Initial Settings page, select the Respond to Client Computers Requesting Service check box, and then click Next.
Note You can limit the computers that can receive a given image By selecting the check box labeled Do Not Respond to Unknown Client Computers, found on the Initial Settings page, you can prestage client computers to install from a specific RIS server. You need to define the prestaged computers that will receive Windows images in Active Directory. This process ensures that only the specific client computers you want to receive a given XP image will receive that image.
| 12. | On the Installation Source Files Location page, specify the path to the CD or network location in which the installation files are located, and then click Next.
| 13. | On the Windows Installation Image Folder Name page, type a name for the folder on which the installation files are to be located, and then click Next.
| 14. | On the Friendly Description and Help Text page, accept the entries provided or type information that assists users further in identifying the installation image. Then click Next.
| 15. | Review your settings and then click Finish to create the setup files. The wizard displays a dialog box that charts the progress of file creation, as shown in Figure 2.8. This will take several minutes.
Figure 2.8. The Remote Installation Services Setup Wizard performs a series of tasks to create the files necessary for RIS to operate. 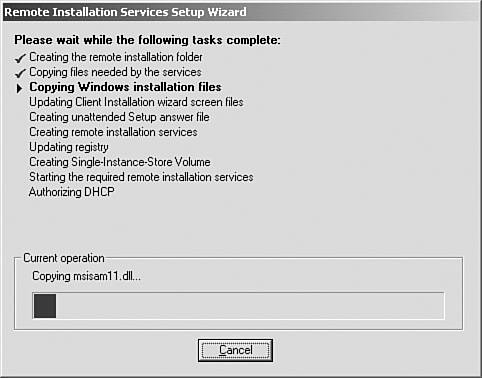
|
|
Exam Alert You need to authorize the RIS server in Active Directory The authorization feature provided with RIS is designed to prevent unauthorized RIS servers from being added to the network. If the RIS server has not been authorized, client computers receive a PXE boot server not found error message when attempting to access the RIS server.
Creating a Remote Boot Floppy Disk RIS includes a program called the Remote Boot Disk Generator to create a floppy disk for use with client computers that do not contain a PXE-enabled NIC. Step by Step 2.5 shows you how. Step by Step: 2.5 Creating a Remote Boot Floppy Disk 1. | Log on to the RIS server as an administrator.
| 2. | Click Start, Run, and type %systemroot%\System32\Reminst\rbfg.
| 3. | As shown in Figure 2.9, the Microsoft Windows Remote Boot Disk Generator dialog box provides you with information about creating the remote boot disk. Insert a 3.5 inch floppy disk and click Create Disk.
Figure 2.9. Rbfg.exe creates a remote boot disk for installing Windows XP. 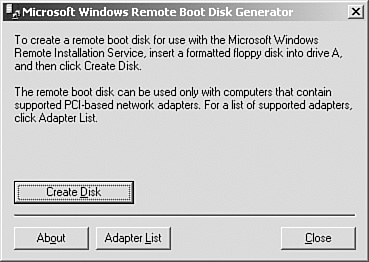
| 4. | After a few seconds you receive a message confirming that the boot floppy has been created. Click Yes to create another floppy or No to exit.
| 5. | Click Close to quit the program.
|
|
Folders Created on the RIS Server Step by Step 2.4 creates a folder called RemoteInstall on the separate partition of the RIS server. This folder is created with a default share name of REMINST, which you can modify if you desire. This folder contains the following three subfolders: Admin\i386 Contains three executable programs: Rbfg.exe (the remote boot floppy disk program described earlier), Riprep.exe (which prepares an image of a Windows XP computer, described in the next section), and Setupcl.exe (used by Riprep.exe in the imaging process). OSChooser Contains two subfolders, English and i386. Setup Contains a subfolder hierarchy with the installation files. As you create additional images, each is stored in its own subfolder within this hierarchy.
Creating an Image for RIS Creating the image for RIS involves two steps: preparing the client computer and creating the actual image. You use the Riprep.exe program found on the RIS server to accomplish these objectives. This program removes computer-specific information such as the computer name and SID from the source computer, and then copies the image to the Images subfolder on the Reminst share. Follow the procedure outlined in Step by Step 2.6 to create a RIS image. Step by Step: 2.6 Preparing a RIS Image 1. |  Install Windows XP Professional on a computer that meets the hardware configuration specifications of the client computers on which RIS will be used to install the operating system. Install Windows XP Professional on a computer that meets the hardware configuration specifications of the client computers on which RIS will be used to install the operating system.
| 2. | Install SP2 (or later), as well as any post-SP hotfixes that might be available from the Microsoft Windows Update website.
| 3. | Install any applications that users of the new computers will utilize in their everyday work.
| 4. | Perform any required additional configurations such as corporate desktops or wallpapers, and so on.
| 5. | Click Start, Run, and type \\RISserver\RemInst\admin\i386\riprep.exe, where RISserver is the name of the server on which you installed RIS. If the share name is not RemInst, substitute the proper share name.
| 6. | Click Next to bypass the welcome page of the Remote Installation Preparation Wizard that appears.
| 7. | Type the name of the RIS server to which the contents of the client hard disk are to be copied, and then click Next.
| 8. | Type the name of the folder in which this image is to be placed, and then click Next.
| 9. | Type a description and help text to describe the image, and then click Next. This information is displayed to users performing an installation with RIS; consequently, it should be informative enough to help the users with selecting the appropriate image.
| 10. | If any items on the computer are not compatible with the Remote Installation Preparation Wizard, a Report System Compatibility page appears (see Figure 2.10). Select an item and click Details to obtain information about the incompatibility, and then click Next.
Figure 2.10. The Report System Compatibility page provides details on any items that are incompatible with the Remote Installation Preparation Wizard. 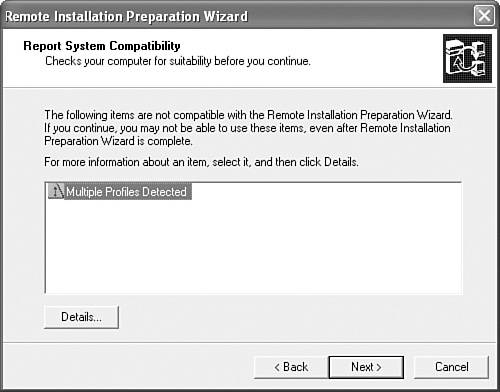
| 11. | A Stop Services page appears, listing services that must be stopped to avoid errors. Click Next and wait while these services are stopped.
| 12. | On the summary page, review your settings, and then click Next twice to complete the image preparation and copying.
| 13. | The copy stage takes several minutes (see Figure 2.11), after which the computer shuts down.
Figure 2.11. The wizard performs a series of tasks and then shuts down the computer. 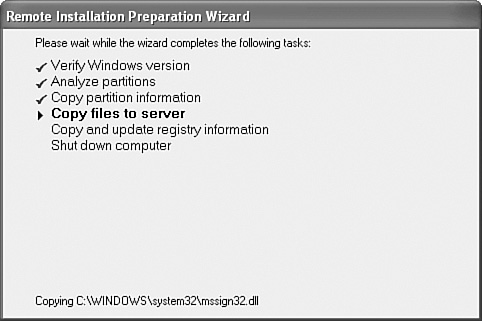
|
|
RIS prepares the image and copies it to the appropriate subfolder on the server. After you have completed this process, a user at any remote client computer can use the Client Installation Wizard to select an image for installing Windows XP Professional. Exam Alert Copy the Administrator profile before imaging When you prepare a computer for imaging by means of RIS, you should copy the local Administrator profile to the Default User profile if you have installed applications with desktop shortcuts. In that way, users receive the shortcuts when they log on.
Answer Files for RIS RIS creates a standard answer file named Ristndrd.sif when you run Riprep.exe as described in Step by Step 2.6. You can create additional answer files that RIS can use in customizing the installation images. Setup Manager enables you to create RIS-based answer files. In step 3 of Step by Step 2.2, select Remote Installation Services on the Product to Install page (refer to Figure 2.2). This creates a file named Remboot.sif, which can be used to provide information to the installation process. This filename is confirmed to you at step 25 of Step by Step 2.2. Exam Alert Remember the names of the various answer files You can modify the Ristndrd.sif answer file or create the Remboot.sif answer file for use with RIS. Also remember that Winnt.sif is used when installing Windows XP from a CD-ROM and a floppy-based answer file, and Sysprep.inf is used to provide answers when using Sysprep to install Windows XP.
Deploying via RIS After you have prepared the appropriate images on the RIS server, remote users can access this server and use the Client Installation Wizard, which is a text-based wizard that walks them through the process of installing Windows XP Professional. This wizard uses Plug and Play to detect hardware differences between the reference computer and the computer on which it is installing Windows XP. Step by Step 2.7 outlines the procedure that you should follow. Step by Step: 2.7 Using RIS to Install Windows XP Professional 1. | If the remote computer is not equipped with a PXE-compliant NIC, insert the remote boot floppy and turn the computer on. If it is equipped with a PXE-compliant NIC, simply turn the computer on.
| 2. | When prompted, press F12 to commence downloading the Client Installation Wizard.
| 3. | When you receive the logon prompt, use an existing domain account and password to log on to the network (see Figure 2.12).
Figure 2.12. You need to log on with a domain user account with privileges to add the computer account to the domain. 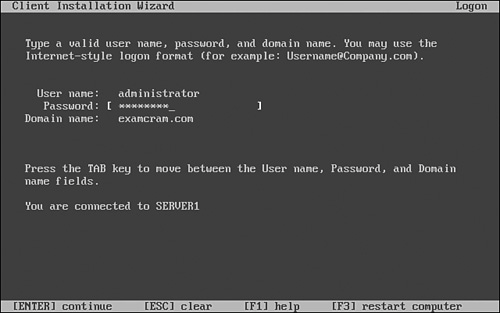
| 4. | The wizard presents the menu shown in Figure 2.13, which displays the available installation options. Select an operating system from the available options, if more than one option is displayed.
Figure 2.13. When more than one operating system image is present, the wizard presents you with a choice of images. 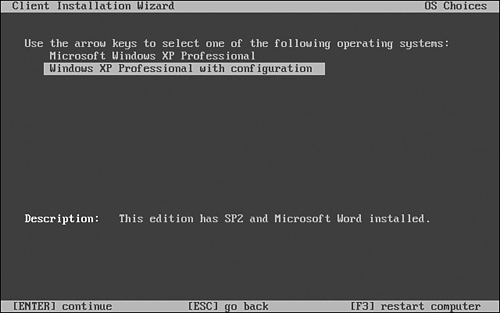
| 5. | Press Enter to accept the warning message that informs you that the hard disk will be formatted and all data will be erased.
| 6. | Verify the information on the summary page, which includes the computer name and GUID, and the name of the RIS server.
| 7. | Remove the floppy disk (if used), and press Enter to exit the Client Installation Wizard and commence the installation of Windows XP.
|
|
Having completed the Client Installation Wizard, Windows XP Professional Setup proceeds to install the operating system together with configured service packs, hotfixes, and applications without further intervention. Exam Alert A PXE-enabled client must be able to boot from the NIC If the client computer displays an Operating System Not Found error message, make sure that the BIOS is configured to boot from the NIC.
Challenge You are a consultant who is on the short bidding list for a contract that involves rolling out 500 new Windows XP Professional computers to a company opening a new office in Phoenix. The company has provided you with a computer running a basic installation of Windows Server 2003 and another computer with a basic installation of Windows XP Professional. The CIO wants to evaluate your ability to roll out Windows XP Professional using RIS and has asked you to prepare an automated installation on the first of the 500 new computers. You are responsible for completing all the steps necessary to perform this task and prove to the CIO that you are the right person to handle the rollout. You need three computers for this exercise, one running Windows Server 2003 (or Windows 2000 Server), one running Windows XP Professional, and one with no operating system installed. These computers should not have any data of value stored on them. You should try to work through the required steps on your own. Those of you who are unfamiliar with the procedures required that involve configuring the server may want to consult one of the training guides available for the Microsoft 70-290 and 70-294 exams. If you need further guidance, follow the steps presented here: 1. | Log on to the Windows Server 2003 (or Windows 2000 Server) computer as Administrator.
| 2. | Click Start, Run, and type dcpromo.
| 3. | Follow the steps presented by the Active Directory Installation Wizard. You should create the first domain in a new forest, and accept the option to install DNS on this computer.
| 4. | When the Summary page appears, click Next to install DNS and Active Directory. When prompted for the Windows Server 2003 CD-ROM, insert it and click OK.
| 5. | When the installation is complete, click Finish and restart the computer.
| 6. | Log back on as Administrator.
| 7. | Click Start, Control Panel, Add or Remove Programs.
| 8. | Click Add/Remove Windows Components.
| 9. | On the Windows Component Wizard, select Remote Installation Services, ensuring that the check box for this item is selected.
| 10. | Also select Networking Services (do not select the check box for this item).
| 11. | Click Details, select Dynamic Host Configuration Protocol (DHCP), click OK, and then click Next. The Windows Server 2003 CD-ROM should still be in the drive. This step installs both DHCP and RIS on the server.
| 12. | When the Windows Components Wizard completes, click Finish, and close Add or Remove Programs and Control Panel.
| 13. | Click Start, Administrative Tools, DHCP.
| 14. | In the DHCP snap-in, right-click the server and choose New Scope.
| 15. | Follow the instructions presented by the New Scope Wizard. Do not add any exclusion, and accept the default lease duration. Do not configure any additional DHCP options.
| 16. | In the console tree of the DHCP snap-in, right-click your new scope and click Activate.
| 17. | Click Start, Administrative Tools, Remote Installation Services Setup.
| 18. | Follow the steps presented by the Remote Installation Services Setup Wizard. See Step by Step 2.4 if you need additional guidance.
| 19. | After you click Finish to complete this wizard, go to the Windows XP Professional computer while you are waiting for the copying stage to complete.
| 20. | On the Windows XP Professional computer, install SP2 and one or more applications that might be typical of what users will require in their everyday tasks.
| 21. | After this installation and the copying of the files at the RIS server are both complete, type \\RISserver\RemInst\admin\i386\riprep.exe, where RISserver is the name of the RIS server computer.
| 22. | Follow the instructions presented by the Remote Installation Preparation Wizard. If you need assistance, see Step by Step 2.6.
| 23. | When the Windows XP Professional computer shuts down, move to the third computer.
Note You can reuse the Windows XP computer if necessary You can use the second computer again because RIS reformats its hard disk. Just make sure this computer does not have any information of value stored on it.
| 24. | Turn on the third computer and press F12 when prompted.
| 25. | Type the username and password of a domain administrative account when prompted.
| 26. | Select an operating system image.
| 27. | Press Enter to accept the warning message that informs you that the hard disk will be formatted and all data will be erased.
| 28. | Review the information on the summary page and press Enter to install Windows XP Professional on this computer.
|
|
Review Break You have looked at the Setup Manager and the use of RIS for unattended installation of Windows XP Professional. You should be aware of the following major points: You can use Setup Manager to create answer files that supply answers to questions asked by the Windows XP Professional setup program. As well as the answer file, Setup Manager creates a uniqueness database file that contains information specific to each computer being installed and a batch file that simplifies installation on target computers. The answer file is a text file that you can prepare or edit, using a text editor such as Notepad. Microsoft recommends that you use the Setup Manager to create this file so that you avoid syntax errors. RIS enables users to connect to a remote installation server and download an image of Windows XP Professional, complete with service packs and applications. You must have DHCP, DNS, and Active Directory operating on the network to use RIS.
|